User Guide
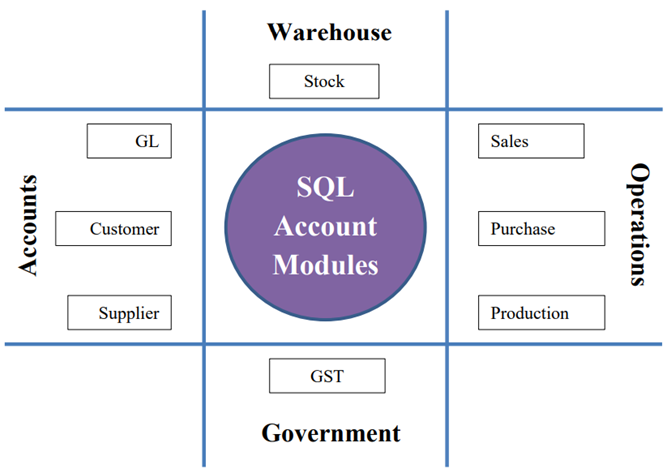
1 SQL Account Modules
SQL Account is a centralize system to assist the business (or departments) to record and process daily documents from sales, purchase, stock, and bank. It also a tool for GST reporting to Royal Malaysia Customs Diraja (RMCD).
-
General Ledger, a general ledger accounting where records all transactions posted from various journal (eg. general, sales, purchase, bank), an entry for general journal and expenses payment (eg. sales person claims, water and electricity expenses). Bank reconciliation, cash flow statement and financial reports are available in this module.
-
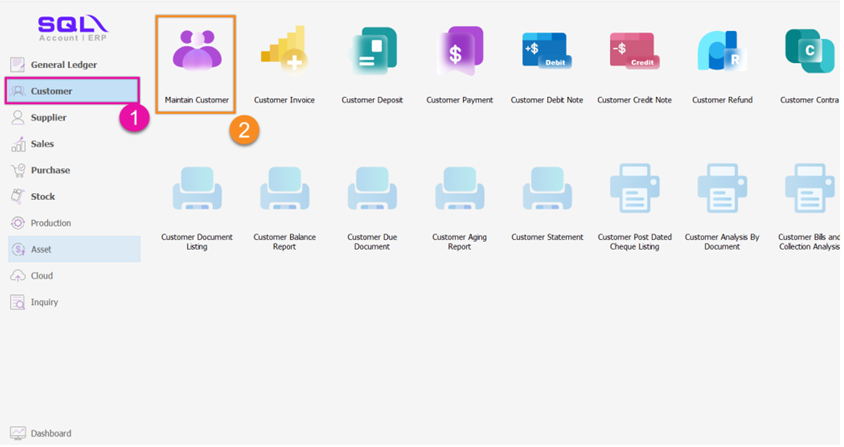
Customer, a sales ledger accounting where monitor the outstanding and payment received from the customers. Customer report such as reminder letter, customer aging and analysis reports are available here.
-
Supplier, a purchase ledger accounting where monitor the outstanding and payment received from the customers. Customer report such as reminder letter, customer aging and analysis reports are available here.
-
Sales, a module to handle all the sales activities from quotation, sales order, delivery order, tax invoice, debit note and credit note. Advance sales reports in help business to identity the top sales of the products.
-
Purchase, a module to records all the purchase activities from purchase request, purchase order, goods receive, purchase invoice, purchase debit note, and purchase returns.
-
Production, a manufacturing data process. It helps to identify the materials required and planned based on the customer orders.
-
Stock, an inventory control, stock take adjustment and for monitor the stock movement from one location to another location. Stock aging to identify out the obsolete stock.
-
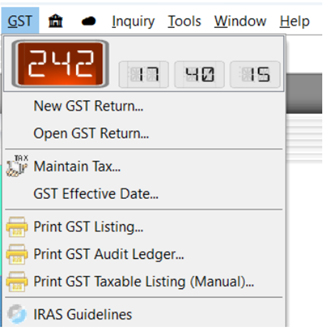
GST, a GST compliance accounting system. Readiness to process and submit the GST returns (GST-03) via TAP online, GAF and others GST reports.
2 Getting Started SQL Account System
2.1 How to set Financial Period & System Conversion Date
-
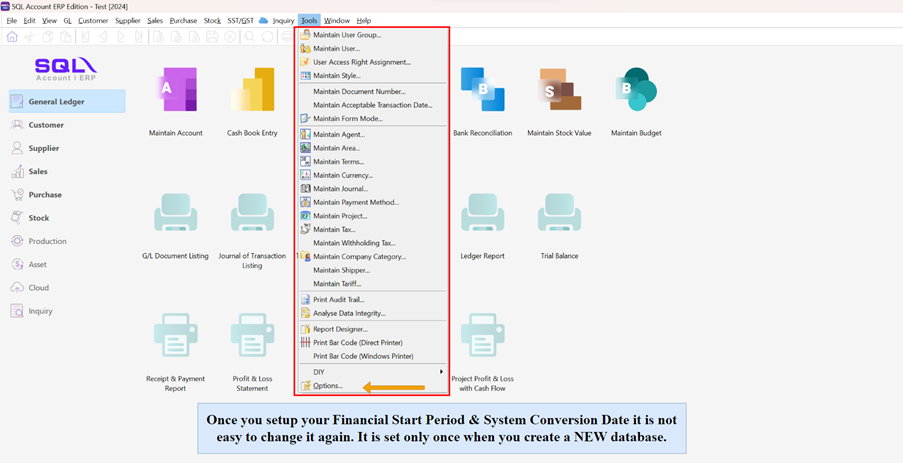
Tools | Options
-
Select General Ledger
-
Select Financial Start Period & System Conversion Date
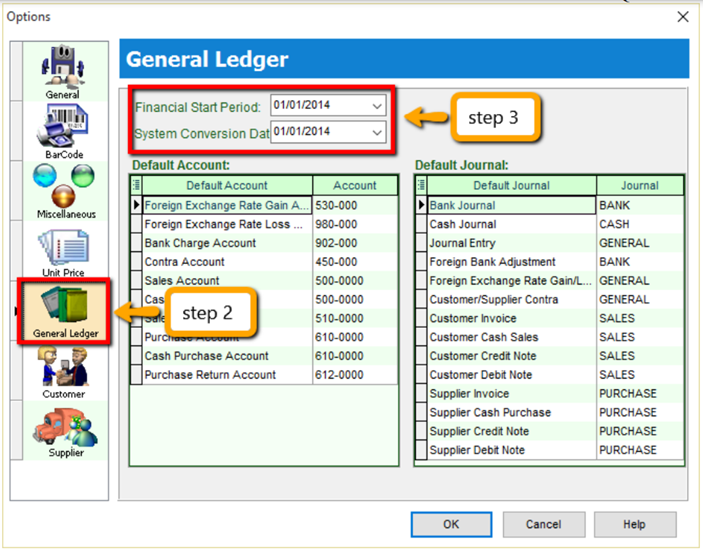
My financial period starts on 1st January every year, I start using SQL from 1/1/2015.
Financial Start Period = 1/1/2015 System Conversion Date = 1/1/2015
My financial period starts on 1st January every year, I start using SQL from 1/4/2015.
Financial Start Period = 1/1/2015 System Conversion Date = 1/4/2015
2.2 Starting GST
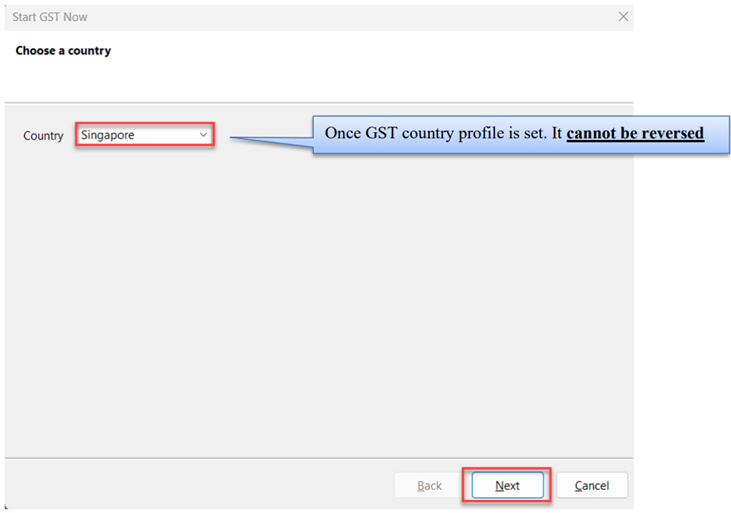
This is to initiate setup of the GST Singapore Module in SQL Accounting System.
-
Go to GST | Start GST Now
-
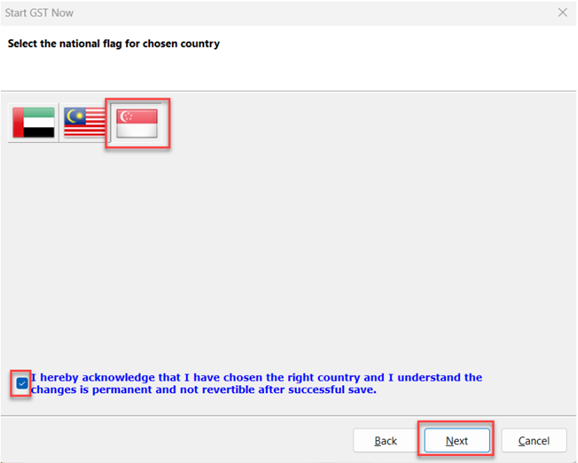
Select Singapore
-
Select Singapore Flag and checked on acknowledgement
-
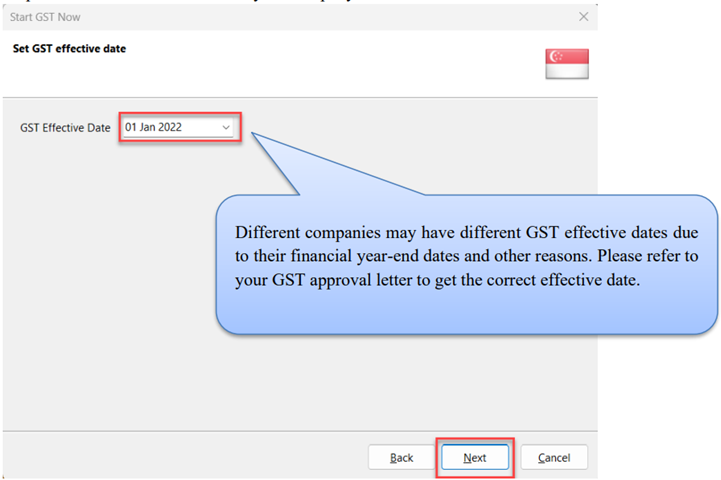
Set GST effective date for your company
-
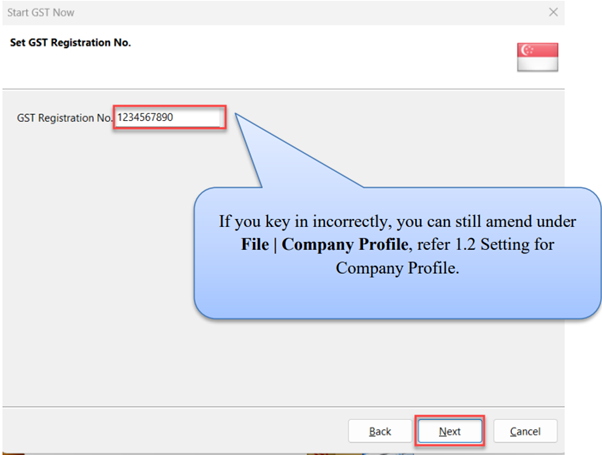
Key in your company’s GST registration number
-
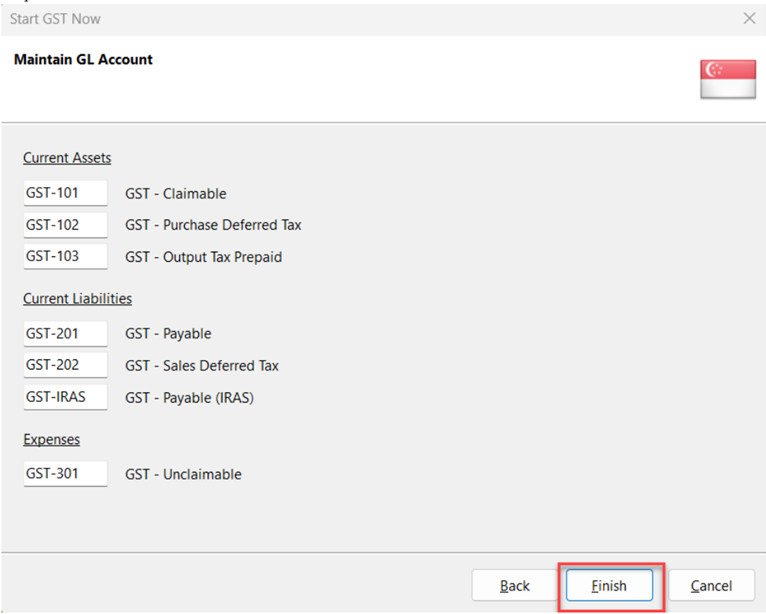
Select Finish
-
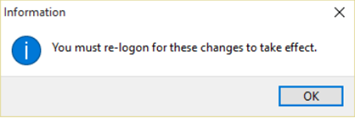
It will prompt you with this message, please log on again to complete the GST Profile setup
-
After logging in again, you should see a new drop-down list with GST functions, the GST setup is now complete.
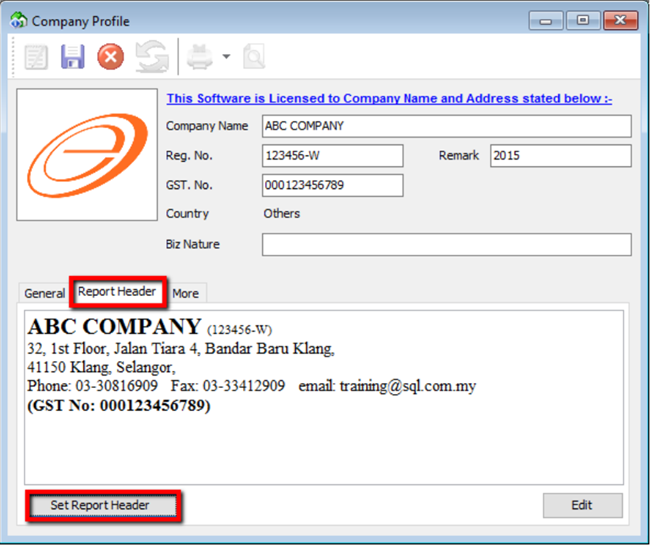
2.3 Setting up Company Profile
Step 1: File | Company Profile
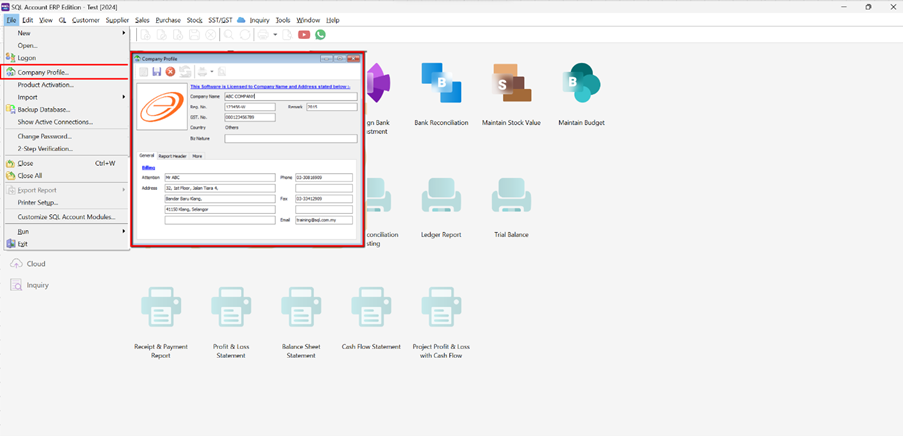
Step 2: Select Report Header
3 Master Data Creation
3.1 General Ledger (Maintain Chart of Account)
3.1.1 Creating a New Account
-
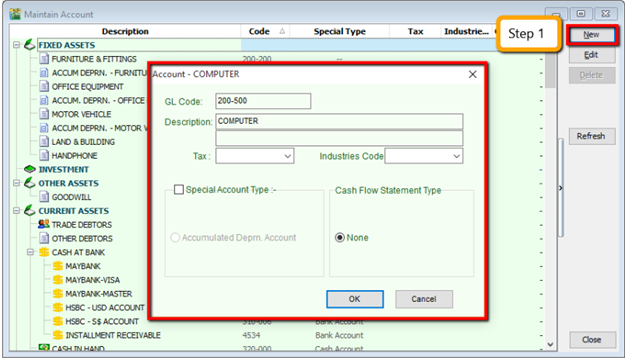
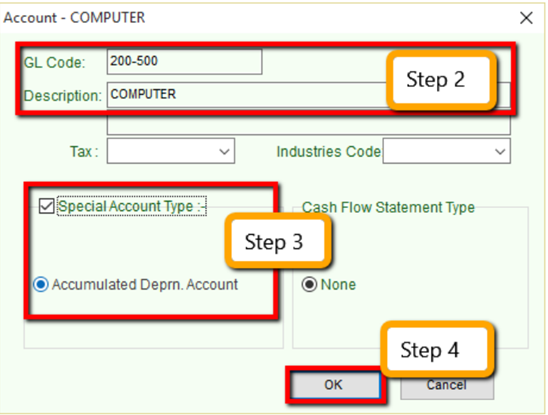
Select GL | Maintain Account | Select category (e.g. Fixed Assets) | New
-
Enter the GL Code and Description (alphanumeric characters are acceptable)
-
Check the Special Account Type if applicable, e.g. the account is belonging to Accumulated Deprn Account (Fixed Assets)
-
Click OK. Your new account is now created.
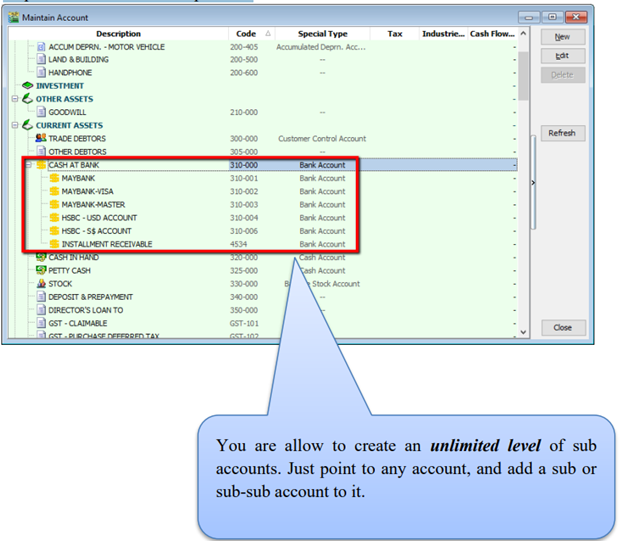
3.1.2 Creating a Sub Account
-
Point to the parent account (e.g. Cash at Bank)
-
Follow the same steps from 2.1.1 Create New Account
3.2 Maintain Customer
There are 4 main tabs under Maintain Customer, let’s look at them
3.2.1 General (Maintenance)
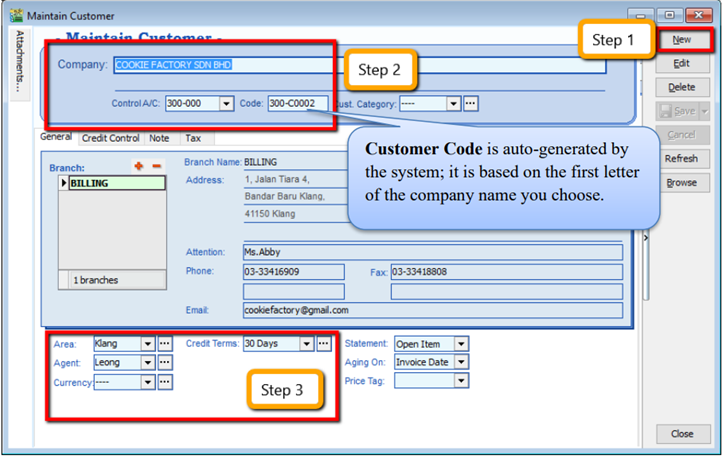
Create New Customer
-
Customer | Maintain Customer | New
-
Enter the customer’s name and other information accordingly.
-
You can categorize your customers into different groups, e.g. Category, agents, area
-
You can also insert more than one billing / delivery addresses (unlimited)
-
There are different options for viewing a customer aging and customer statement
Customer StatementBrought Forward: Summary Statement
Open Item: Detail Statement
Customer AgingInvoice Date: based on IV Date
Due Date: Based on after due date (terms)
3.2.2 Advance Credit Control (*Pro Package Inclusive)
You can set the credit limit and overdue limit amounts as well as blocking a certain transaction entry for specific customers. What does the document include and for the following documents: Quotation(QT), Sales Order(SO), Delivery Order(DO), Invoice (IV), Cash Sales (CS) and Debit Note(DN) We can also set once exceed limit & overdue limit,
- Unblock – No restrictions
- Block – Blocked for all users
- Override – Certain users which have access rights can key in their username & password to override.
- Suspended – Blocked with suspended message
3.2.3 Tax
For the Tax tab, you are advised to update the customer’s GST registration number and to input the tax code. The tax exemption number and expiry date DO NOT need to be updated for the GST period.
You DO NOT need to key in the SR as output tax code for every customer. You can preset it at Tools | Options | Customer.
3.3 Maintain Supplier

Maintain Supplier it’s just a mirror of Maintain Customer, please refer to 2.2 Maintain Customer.
Follow this link for GIRO (beta version) Guide:
3.4 Maintain Stock Groups
Allows the user to set default account posting for the a particular group of items.
-
Stock | Maintain Stock Group | New
-
You can enter your code and description; you can also assign your costing method e.g. FIFO, Weighted Average & Fixed Cost.
-
Assign the account accordingly to sales, cash sales, sales return, purchase, cash purchase and purchase return.
In this case, you can create a different stock group for a different costing method, to apply on a different item code.
3.5 Maintain Stock Item
Allows user to maintain an item or service that you provide for your business.
-
Stock | Maintain Stock Item | New.
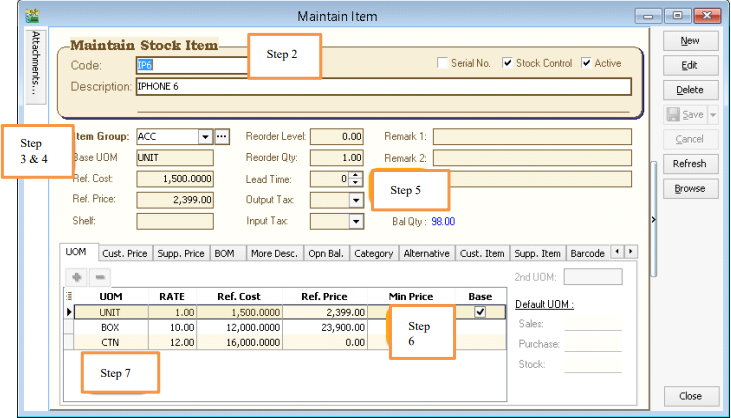
-
You can enter your code and description.
-
You can assign your item to a group (see 2.4 Maintain Stock Group to create a new group)
-
You can insert Base UOM as default / smallest unit of measurement. Ref Cost and Ref Price are used as default purchase and sales price.
-
We categorize Reorder Level, Reorder Qty and Lead Time as one group. The settings here; allow you to pre-set all these details, so that if the stock quantity drops to the reorder level, report is generated as a reminder to reorder
infoReorder Level = When stock balance drops to a certain level, system will be able to prompt you to re-order your stock
Reorder Qty = The quantity you wish to reorder when you print reorder advice report
Lead Time = The number of days required for your stock item to arrive.
Output Tax = Default output tax code for an item (only need to define if different from the system default output tax in Tools | Option | Customer)
Input Tax = Default input tax code for an item (only need to define if different from the system default output tax in Tools | Option | Supplier)
If you pre-set Tax in Customer & Stock Item, system default will capture Maintain Customer Tax Code only follow by Stock Item
-
You can set MIN PRICE, so that your sales personnel won’t sell below min price.
-
Multiple UOM purpose is useful for different packaging, as illustrated by the scenario below:
Scenario A:
I am selling blue pens, blue pens haves different packaging, I can sell by pcs, by box or by carton. Now, I can pre-set them this way:
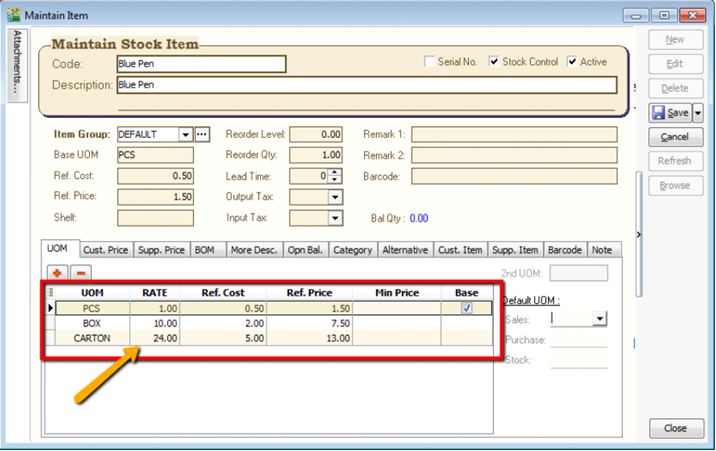
Base Rate = PCS = 1
Box = 10 PCS
Carton = 24 PCS
4 Sales & Purchase
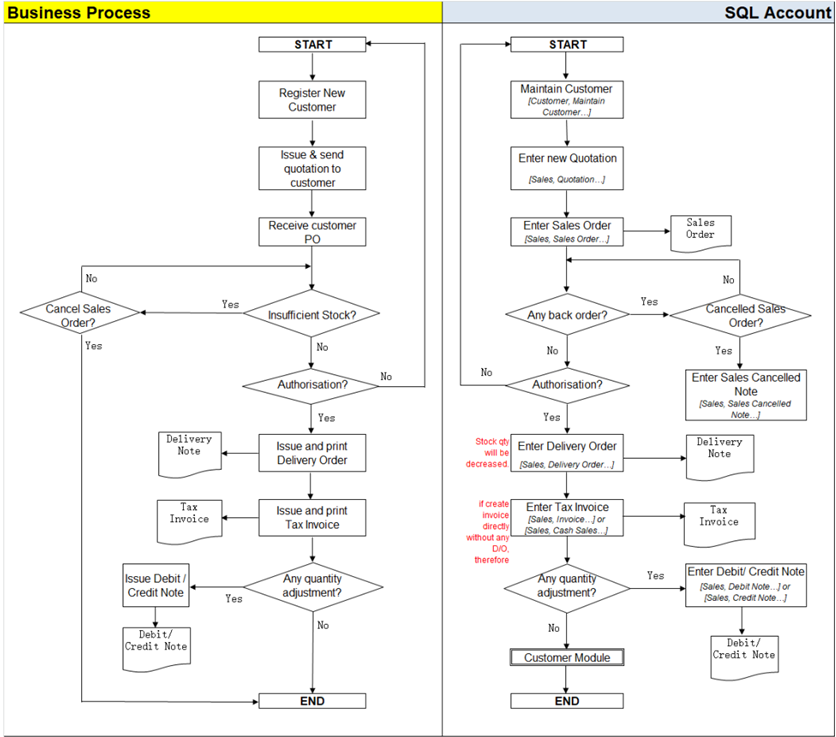
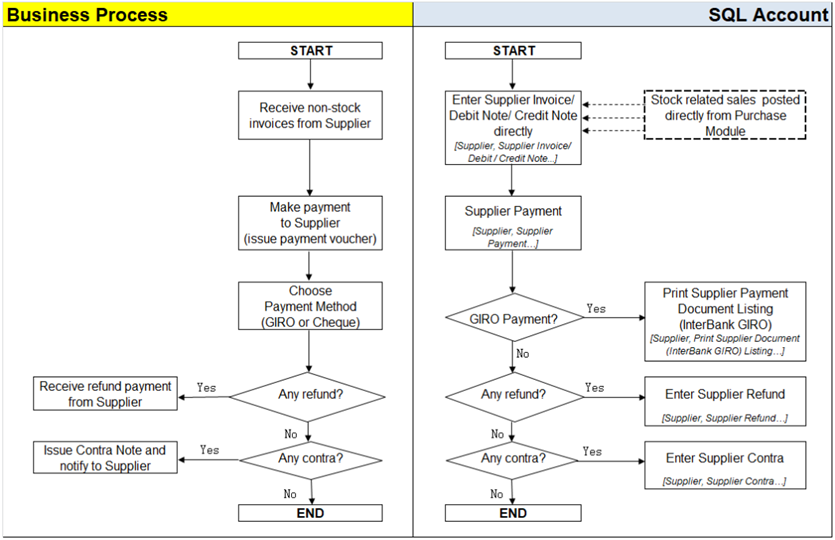
4.1 Purchase Work Flow
Example of sales process work flow aligned with SQL Account flow:
4.2 Purchase Order
-
Purchase | Purchase Order | New
-
Select Supplier
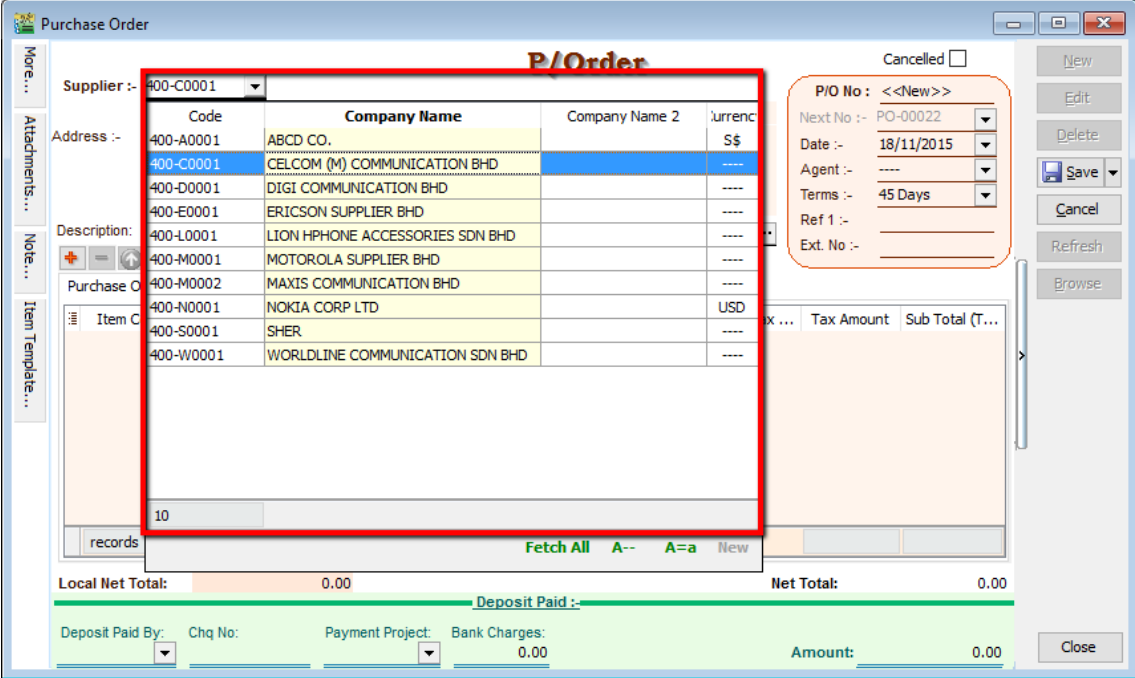
-
Insert Item Code and details (e.g. Qty, Unit Cost)
tipYou can navigate the search column by using the “TAB” button on your keyboard. It will apply to all drop down tables.
-
b. Click on the show/hide/move column icon to customize your column layout.
-
c. If you want to key in for a discount amount, you may tick the discount field by following step 3b and update the discount field. You can key in multiple levels of discount as shown by the picture attached.
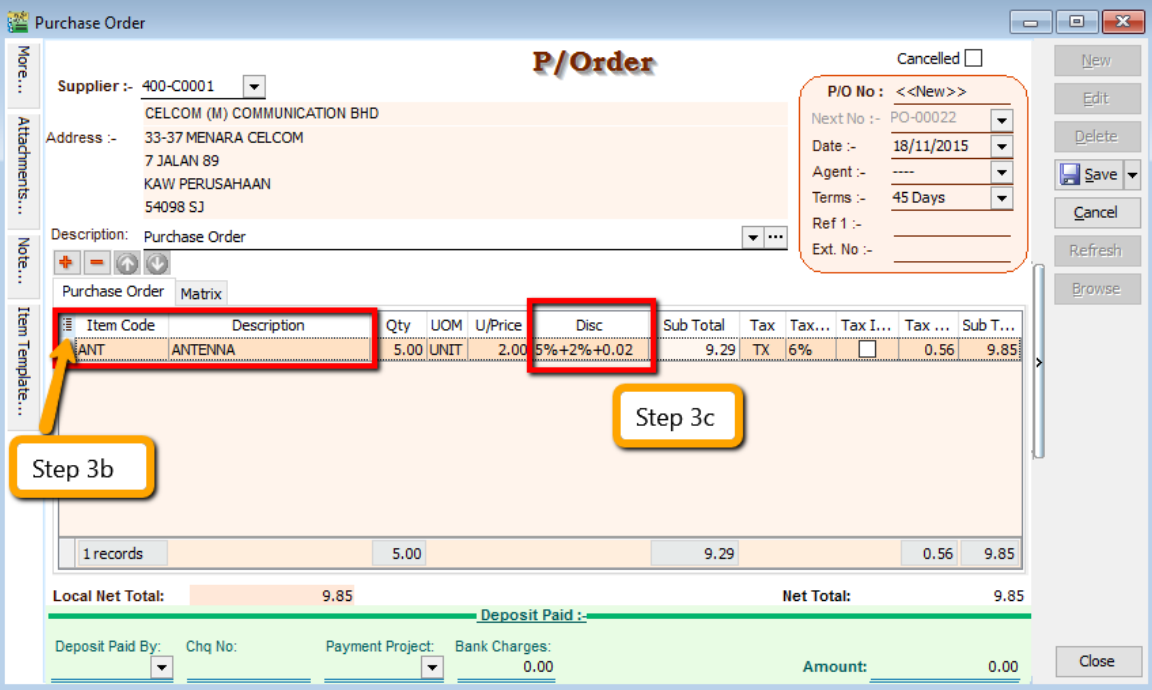
-
-
After updating, click Save.
-
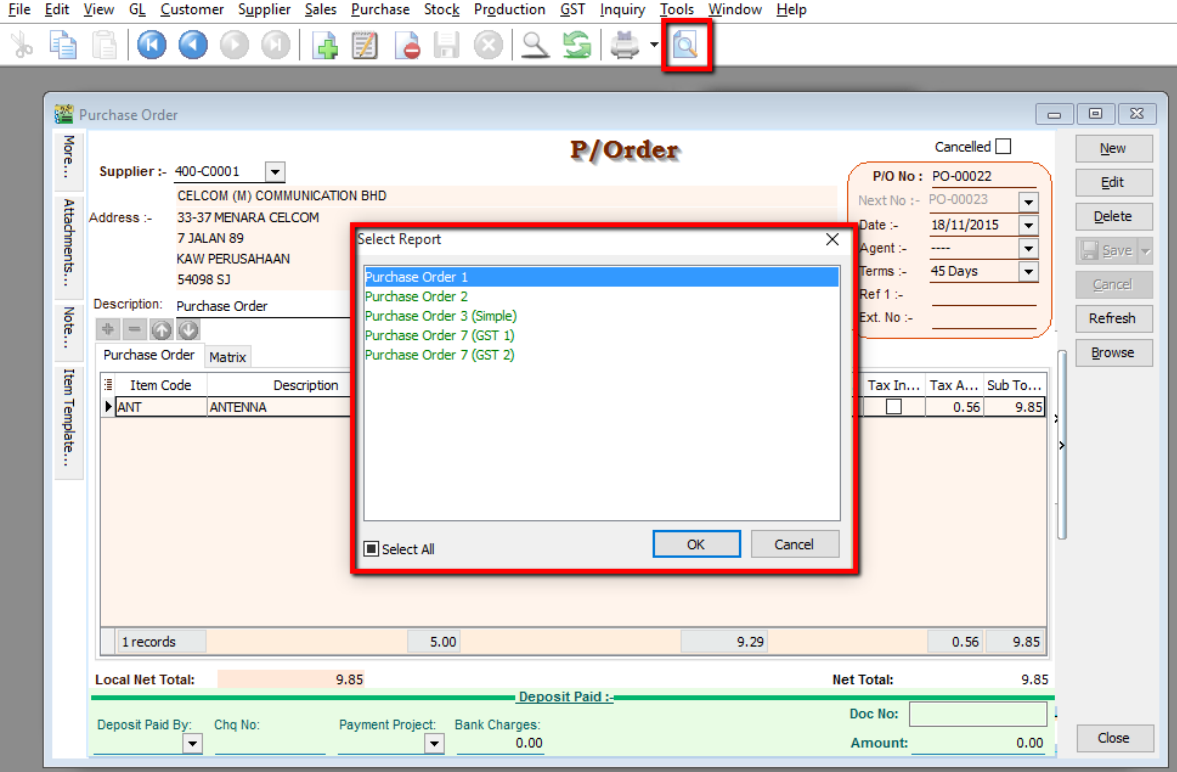
To preview the report, you may click on the preview button and select the format you wish to print.
4.3 Purchase Goods Received
-
Purchase | Goods Received | New
-
Select Supplier Code
-
Right Click on G/R Note title, select Transfer from Purchase Order, tick the document that you wish to transfer
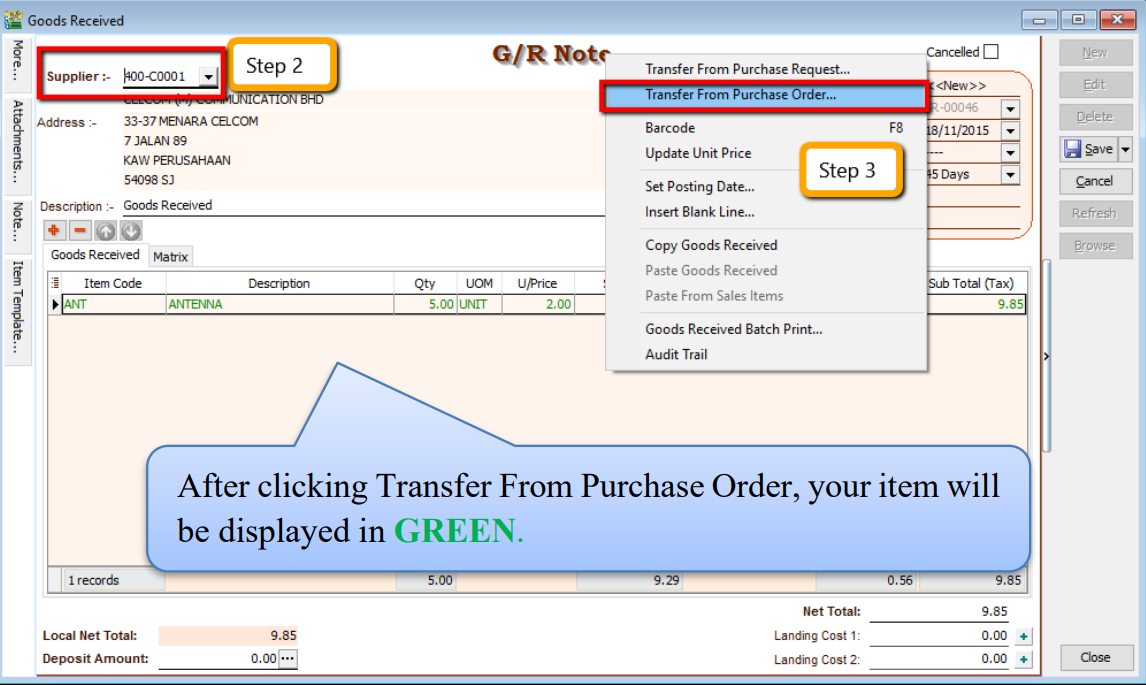
-
Save the Goods Received Note
Once you save the Goods Received Note, the system will automatically update the stock quantity and costing.
4.4 Purchase Invoice��
-
Purchase | Purchase Invoice | New
-
Select Supplier Code
-
Right Click on Purchase Invoice title, select Transfer from Goods Received, tick the document that you wish to transfer
-
Save the Purchase Invoice

4.5 Sales Work Flow
Example of sales process work flow aligned with SQL Account flow:
4.6 Sales Quotation
-
Sales | Quotation | New
-
Select Customer Code
-
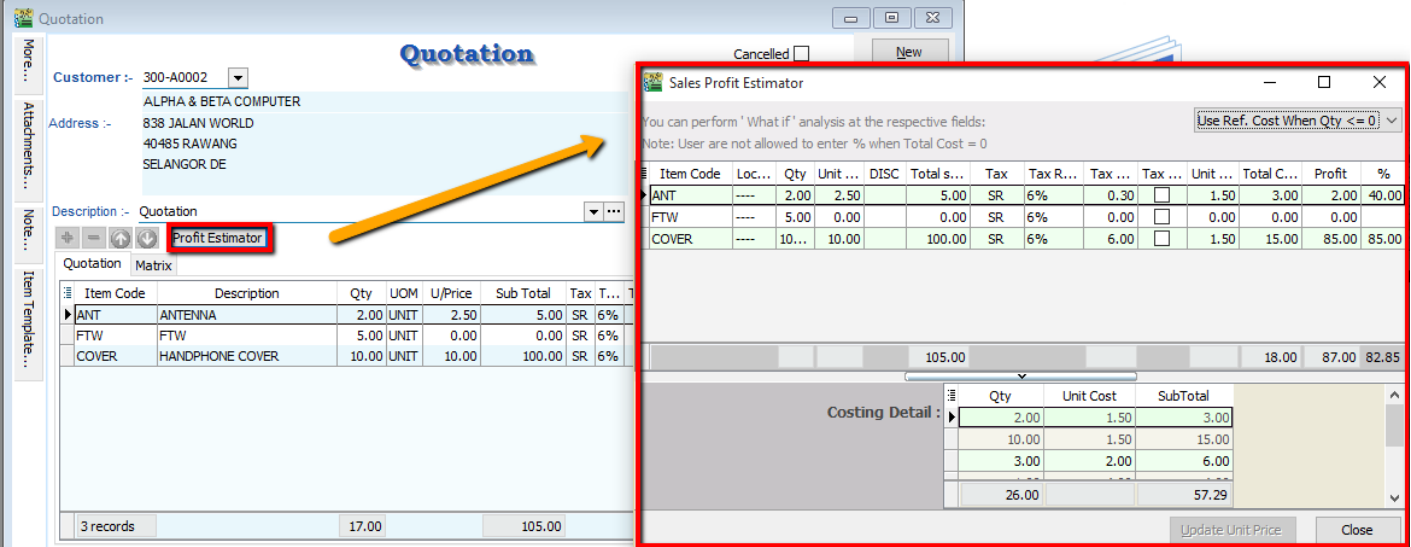
Insert the item that is requested by the customer, and you can estimate your profit & loss in this transaction by checking on Profit Estimator
-
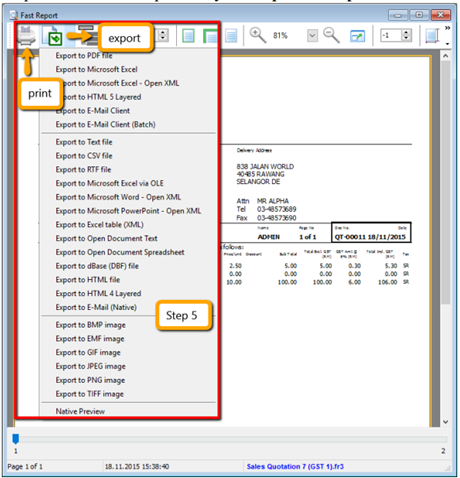
After everything is keyed in correctly, save the Sales Quotation
-
Preview the report and you can print or export it into PDF/ Email/ RTF(Microsoft Word)/Excel or others.
4.7 Sales Order
-
Sales | Sales Order | New
-
Select Customer Code
-
Right Click on Sales Order title, select Transfer from Quotation. You can either transfer the whole quotation or only part of the quotation document (*Partial Delivery Module requested)
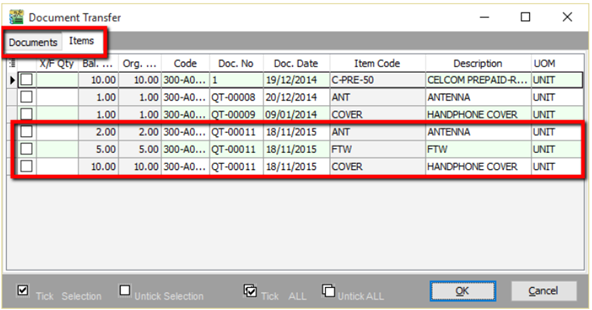
-
Save the Sales Order.
infoFor additional reports showing outstanding sales orders, you can access Sales | Print Outstanding Sales Document Listing, and select Sales Order to view. This also applies to other sales documents.
4.8 Sales Delivery Order
-
Sales | Delivery Order | New
-
Select Customer Code
-
Right Click on D/Order title, select Transfer from Sales Order.
-
Save the Delivery Order.
- Once the delivery order is saved, the stock will be deducted.
- This is the document that determines the 21 Days Rules (GST)
4.9 Sales Invoice
-
Sales | Invoice | New
-
Select Customer Code
-
Right Click on Invoice title, select Transfer from Delivery Order.
-
Save the Invoice.
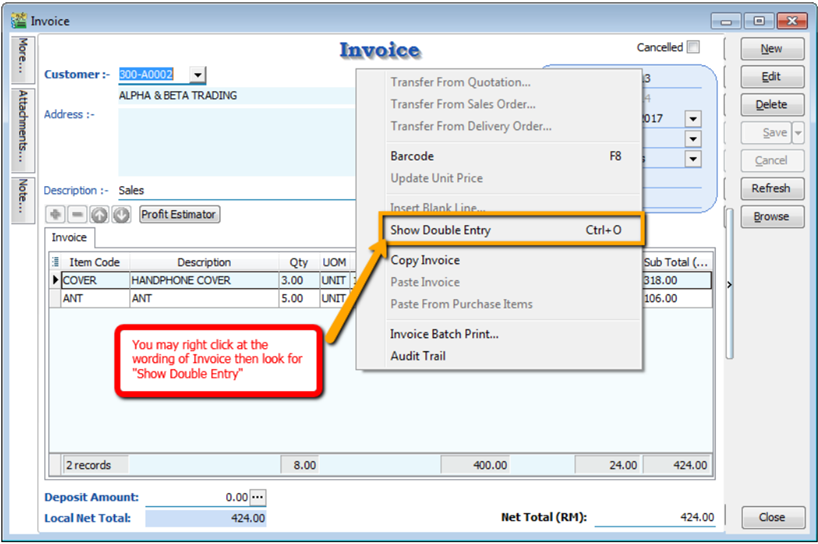
4.9.1 Show Double Entry
There have 2 methods to show double entry of the transactions:
First Method - After you save then invoice then you can press on keyboard short cut key “ Ctrl + O” to get the show double entry result.

Second Method – After you save the invoice, you may right click on the wording of Invoice then select “Show Double Entry”.
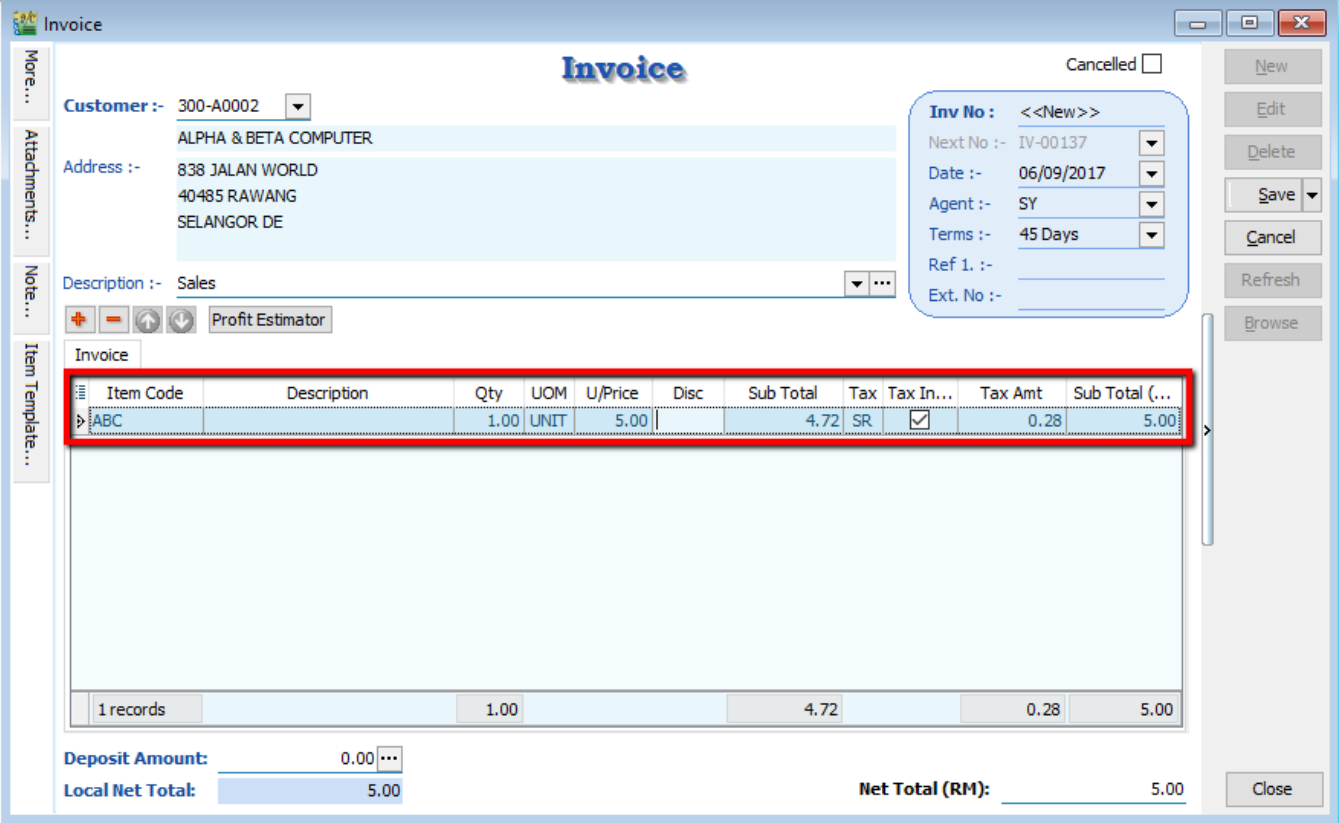
4.9.2 Tax Inclusive
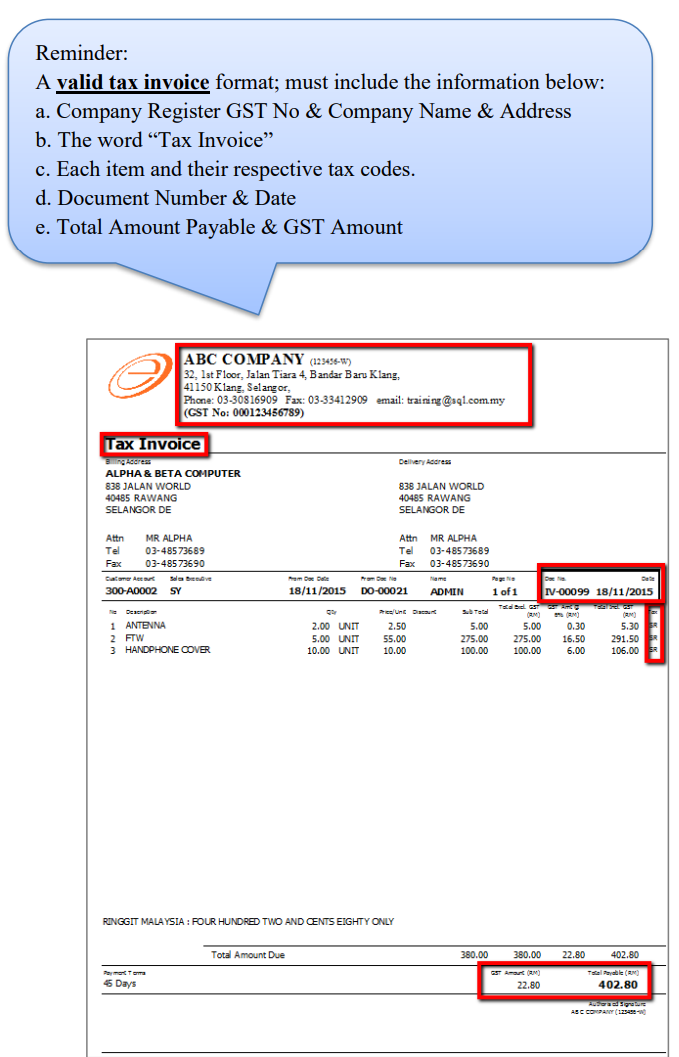
According to RMCD Retailing Guidelines (Page 3), registered persons must show GST-inclusive prices on all price displays to ensure customers know the final price payable. How to set system default as Tax Inclusive?
-
GST | Maintain Tax
-
Select “SR”
-
Edit | Tick “Tax Inclusive”
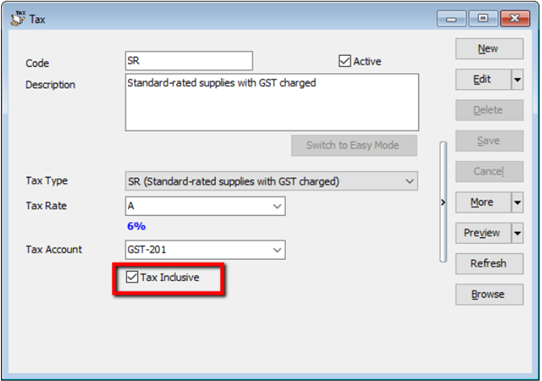
-
Go to Invoice, select Item Code, you will find the Tax Inclusive is tick.
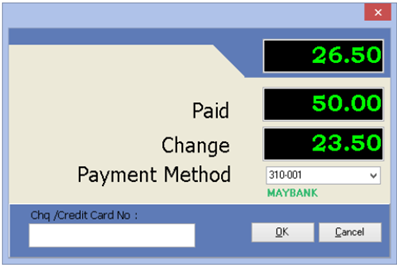
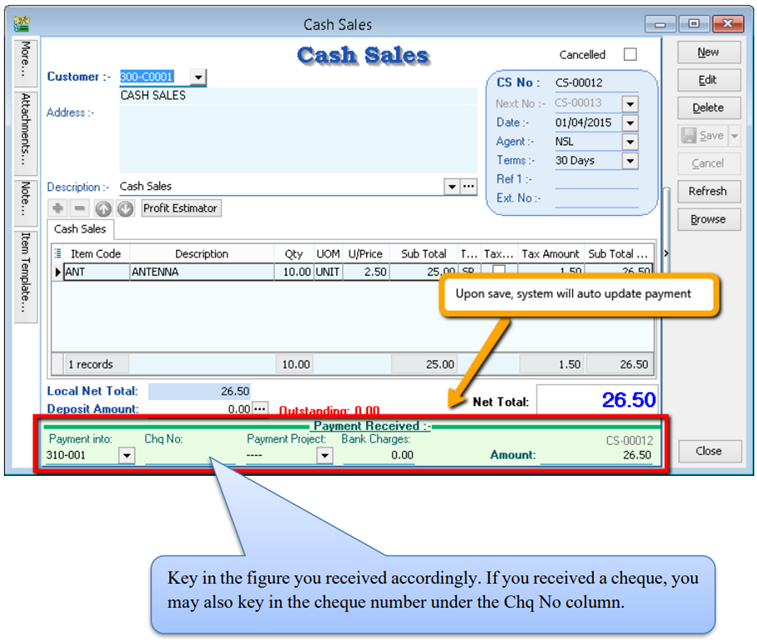
4.10 Sales Cash Sales
-
Sales | Cash Sales | New
-
Select Customer Code
-
Insert item and Save the Cash Sales.
-
When saving, the system will prompt a Payment/ Change dialog box
4.11 Sales Credit Note
-
Sales | Credit Note | New
-
Select Customer Code
-
Right Click on Credit Note title, select Transfer from Sales Invoice/ Cash Sales.
-
Save the Credit Note.
In any GST period, there must be a tax invoice for the issuance of a sales credit note. You are required to knock off the credit note with Invoice or Cash Sales. This can be done by going to Customer | Credit Note
4.12 Sales Cancelled Note (required partial delivery module)
Sales Cancelled Note is used for the cancelling of any outstanding Sales Order.
-
Sales | Sales Cancelled Note | New.
-
Right Click on the Cancelled Note title, select Transfer from Sales Order; (in Sales Cancelled Note, items can only be inserted by transferring from Sales Order)
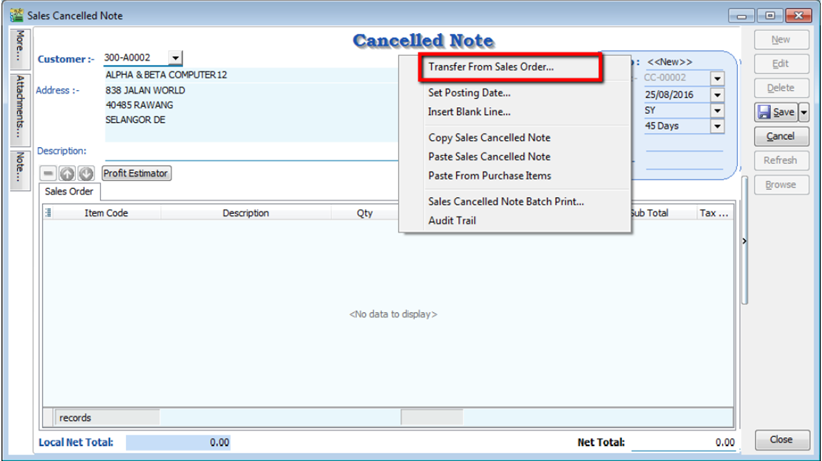
-
You can choose to transfer the sales order either by the whole document or partially.
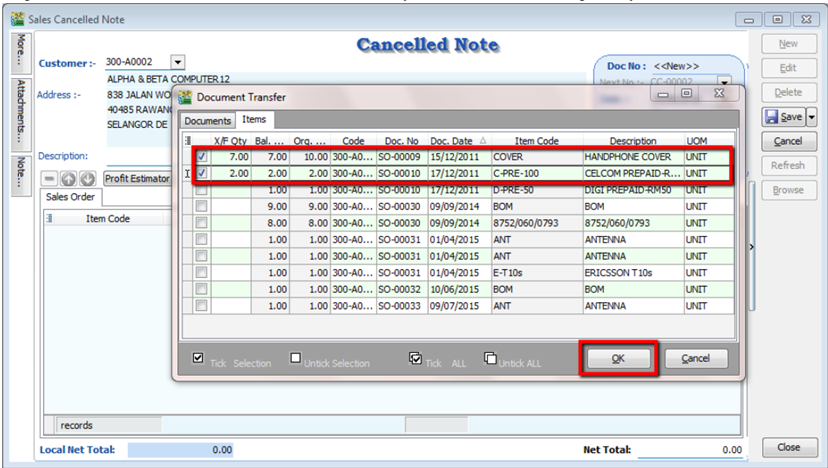
-
Save the Cancelled Note.
5 Customers and Suppliers
5.1 Customers Flow (AR*)
Example of customer (AR) process work flow aligned with SQL Account flow:
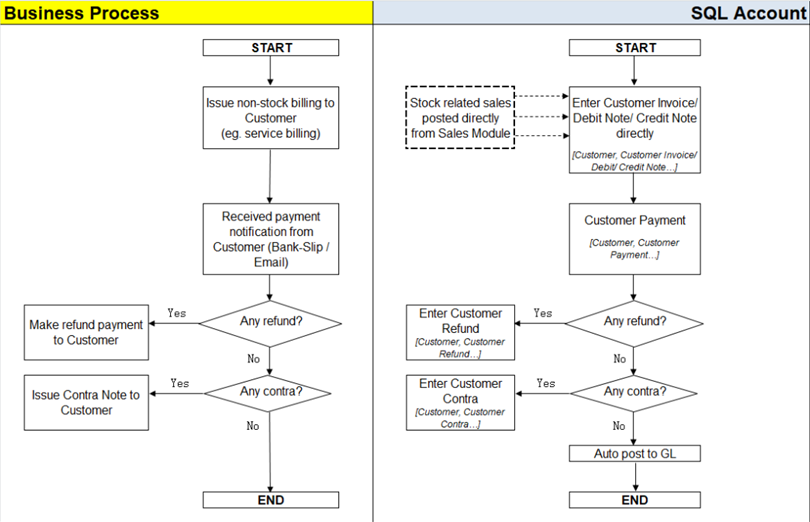
AR = Account Receivable
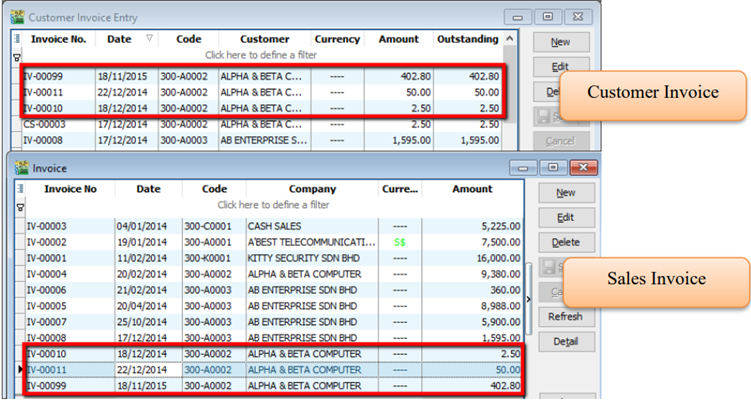
5.2 Customer Invoice
Customer Invoice shows only the accounts code and does not show Qty / Unit Price.
Sales Invoice is linked to the stock and account modules. Hence, we advise users who need to key in stock items to use Sales Invoice. Once the information in the Sales Invoice is updated, the information in the Customer Invoice will automatically be updated by the system.
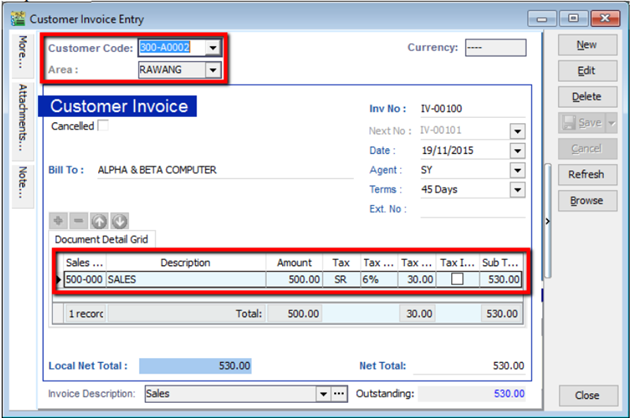
Create a new Customer Invoice
-
Customer | Customer Invoice | New
-
Select Customer Code | insert transaction and amount.
-
Save
5.3 Customer Payment
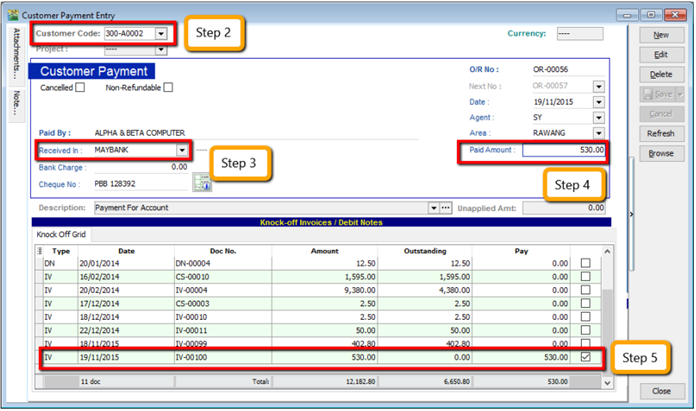
5.3.1 Local Bank Payment
-
Customer | Customer Payment | New
-
Select your Customer
-
Select the bank for your account and cheque no if applicable
-
Key in the customer payment amount
-
Tick the corresponding invoice/debit note to be knocked off
5.3.2 Post Dated Cheque
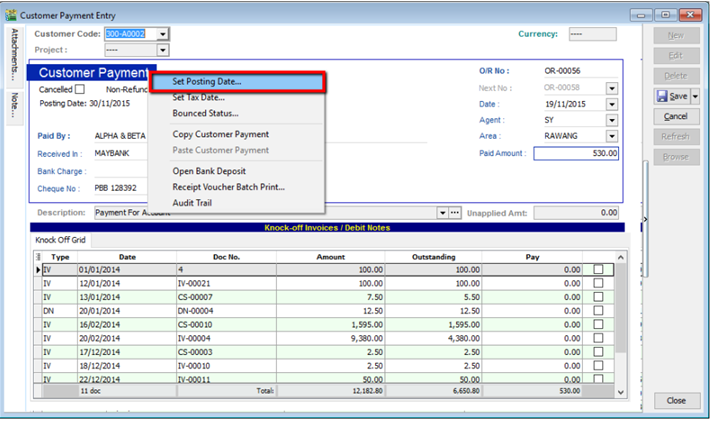
- Search for the payment that you want to edit, click on Edit, right click on Customer Payment, you will see Set Posting Date

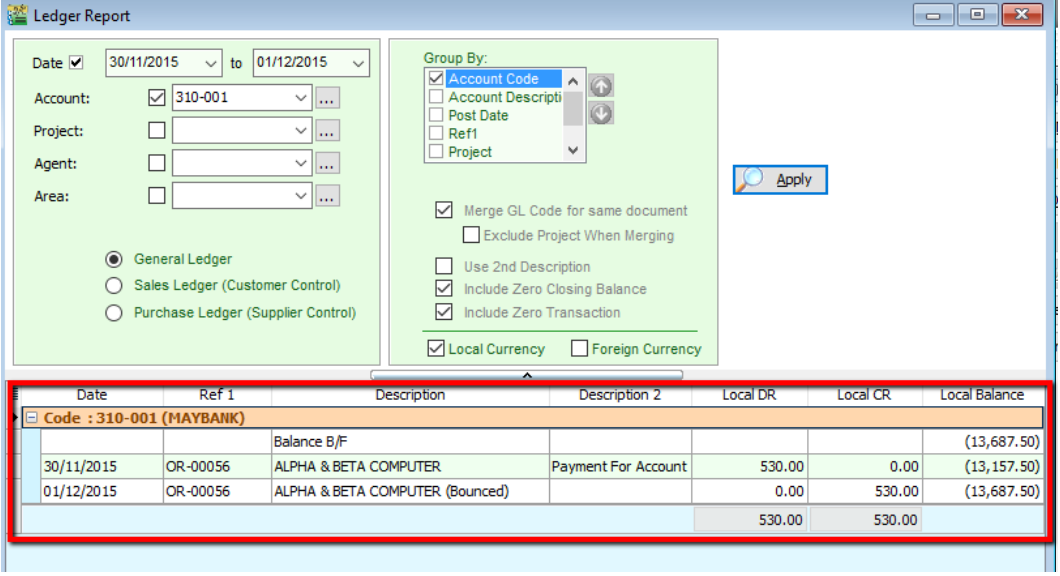
5.3.3 Bounced Cheque
- Search for the payment that you want to edit, click on Edit, right click on Customer Payment, you will see Bounced Status
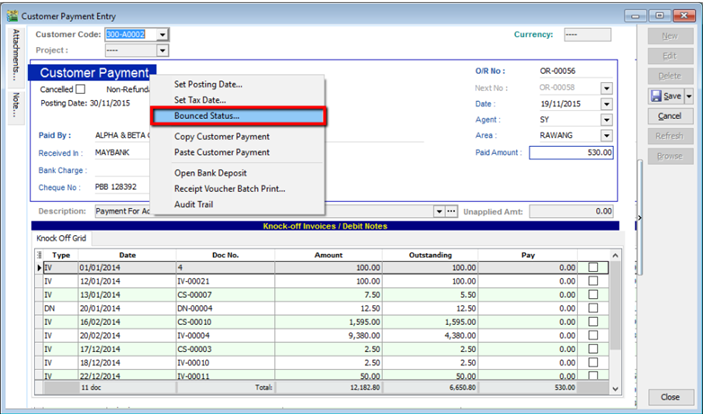
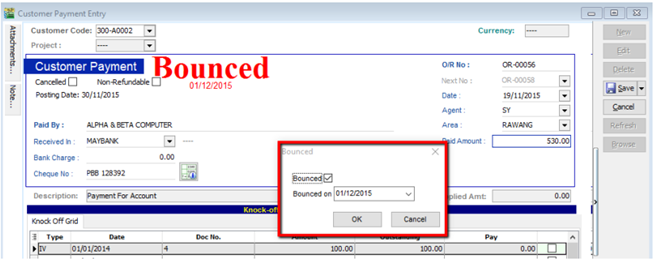
After bounced, system will auto revert the payment out, you can view your ledger.
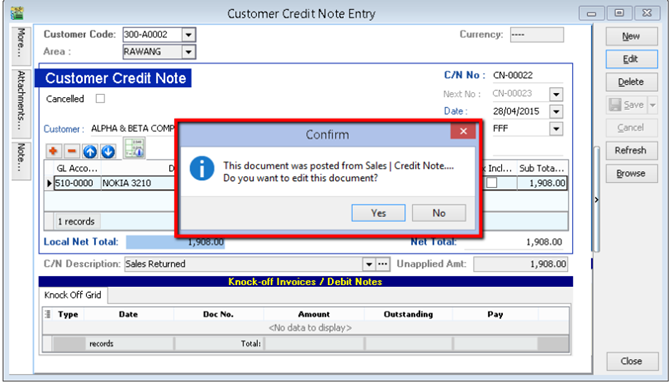
5.4 Customer Credit Note
If the situation involves return stock from customer, please do Sales Credit Note.
-
Customer | Customer Credit Note
-
Edit | Click Yes
-
Knocked off accordingly.
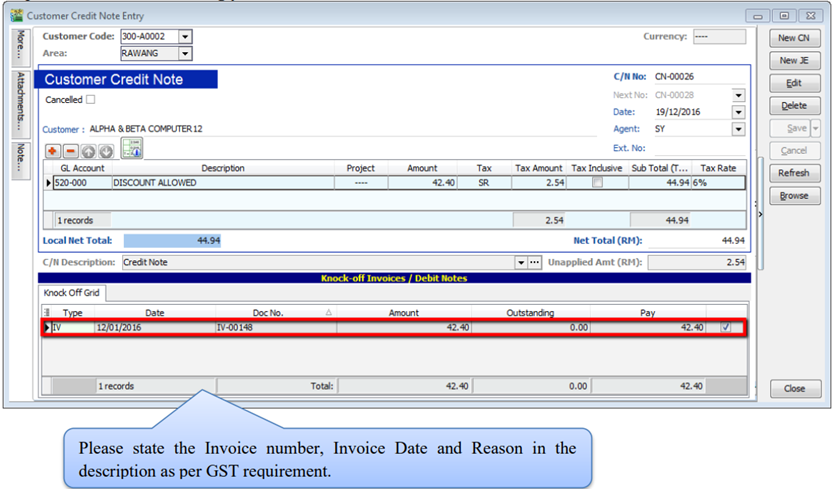
If it does not involve with returned stock, e.g. discount given with steps below
-
Customer | Customer Credit Note | New CN
-
New | Select Customer | Select GL Account | Amount
-
Knocked off accordingly.
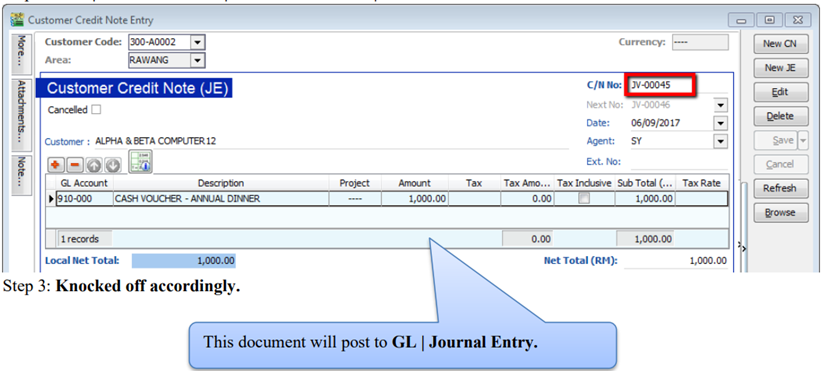
5.4.1 New JE
For non-GST adjustment purpose, a new Journal (JE) is available in
- A. Customer Debit Note and Credit Note
- B. Supplier Debit Note and Credit Note
-
Customer | Customer Credit Note | New JE.
-
New | Select Customer | Select GL Account | Amount.
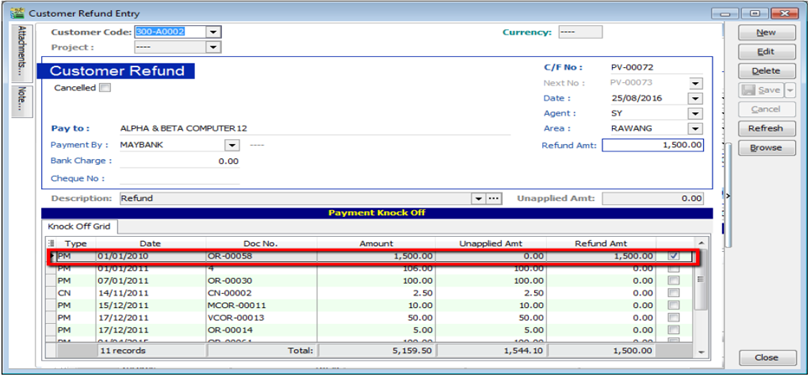
5.5 Customer Refund
You can use this document to refund a customer. You can knock off with Customer Payment or Credit Note which have unapplied amounts.
-
Customer | Customer Refund.
-
Update the information accordingly.
-
Knock off the payment or credit note and save.
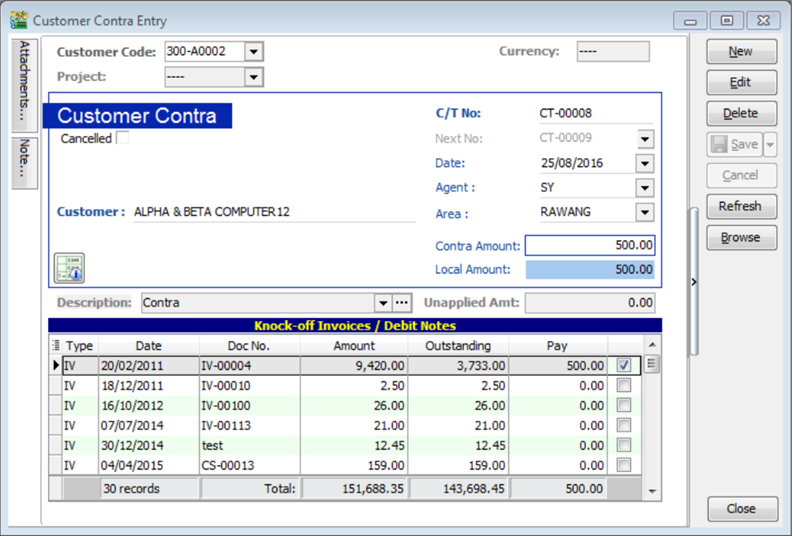
5.6 Customer Contra
If you have a customer who is also a supplier, you may want to offset the outstanding customer and supplier invoices. This is known as a contra entry. You can offset the two invoices by using Customer Contra and Supplier Contra. This means that when you record the invoices as being paid, it will not affect your current bank account balance.
If you have an outstanding sales invoice for RM200 and a purchase invoice for RM150 for the same customer or company, the actual amount owed to you is RM50 and the contra entry amount is RM150.
-
Tools | Options.
-
General Ledger | Make sure you have assigned a contra account.
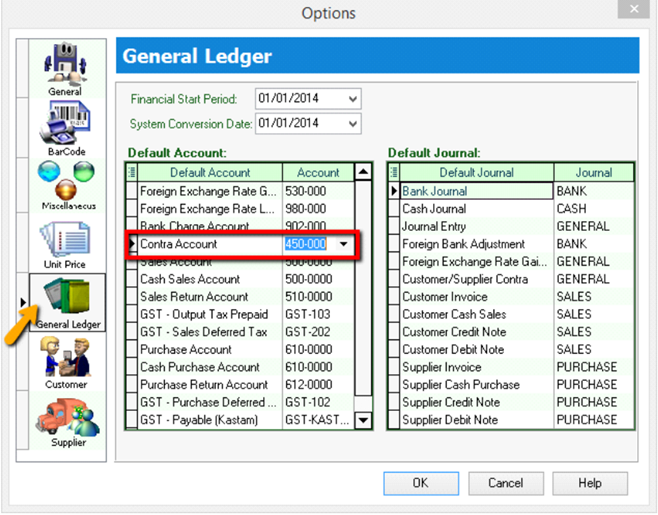
-
Customer | Customer Contra | Click New.
-
Select Customer Code and key-in the contra amount.
-
Knock off the corresponding invoice and Save.

-
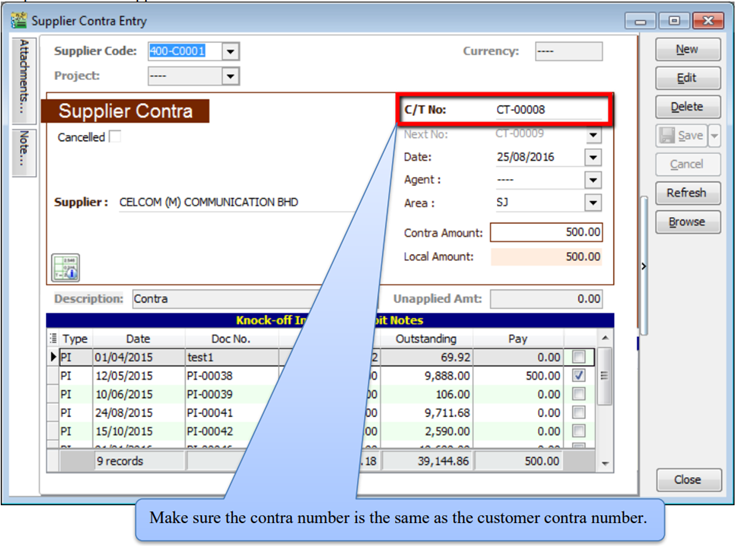
Go to Supplier | Supplier Contra.
-
You will realize that the SAME transaction will appear at Supplier Contra Screen, you just have to EDIT the supplier contra.
-
After Editing you need to update the supplier contra info accordingly and knock off the outstanding invoices of supplier.
-
Save the Supplier Contra.
5.7 Supplier Work Flow (AP*)
Example of supplier (AP) process work flow aligned with SQL Account flow:
AP = Account Payable
Supplier module is the similarly feature with Customer Module. You can repeat the Supplier Module same as Customer guide start from 5.2 Customer Invoice → 5.6 Customer Contra.
Refer to Interbank GIRO guide start from 11 InterBank GIRO.
Genaral Ledger
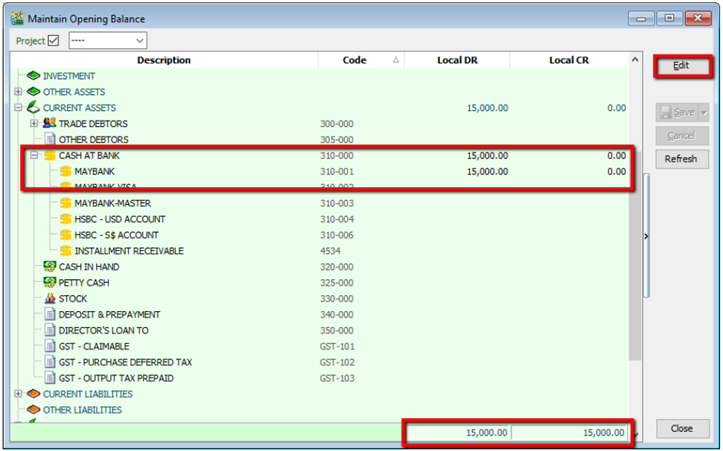
6.1 Opening Balance
6.1.1 General Ledger
-
GL | Maintain Opening Balance
-
Highlight the account that you wish to key in as opening balance, and click Edit.
-
Insert the figure in local Dr or local Cr. Then Save.
-
Make sure the Dr and Cr figures tally
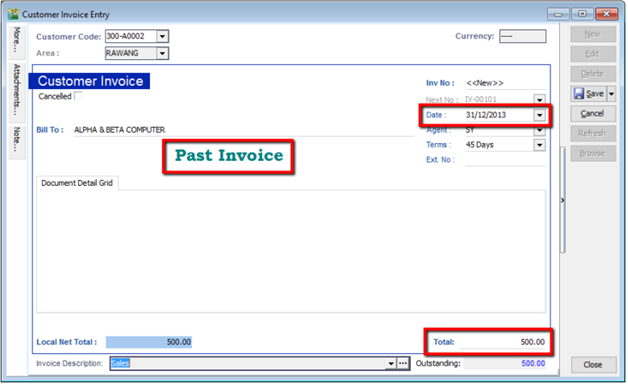
6.1.2 Customer and Supplier
-
Customer(Supplier) | New
-
Set the Date (before system conversion date)
-
Key in only the outstanding amount.
-
The words “Past Invoice” must appear; (they will not appear if the inserted date is after system conversion date) Click Save.
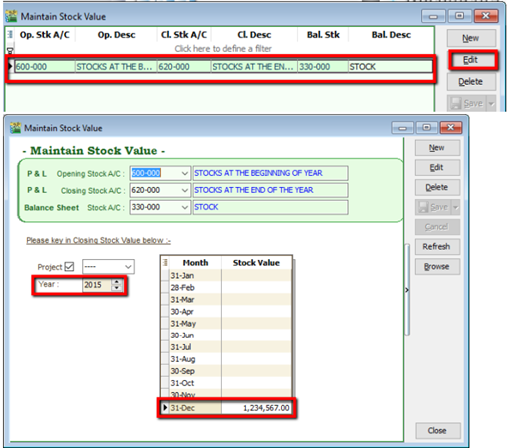
6.1.3 Stock Value
-
GL | Maintain Stock Value| Edit
-
Set the year
-
Insert the Opening Balance
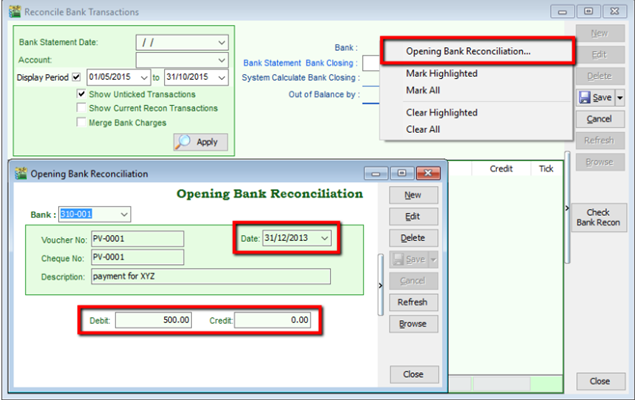
6.1.4 Bank Reconciliation
-
GL | Bank Reconciliation | New
-
Right click, to see Opening Bank Reconciliation
-
Set the Date (before System Conversion Date)
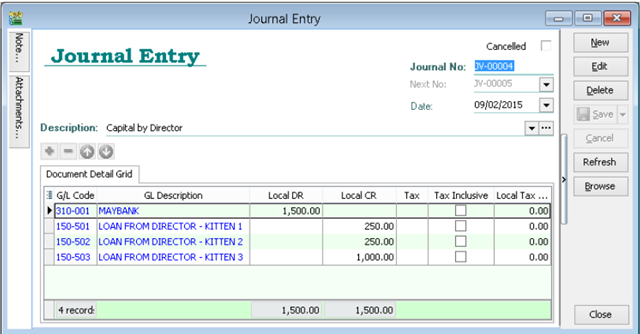
6.2 Journal Entry
-
GL | Journal Entry
-
Key in your double entry
-
Click on Save (both Dr & Cr are tally before you are allowed to save)
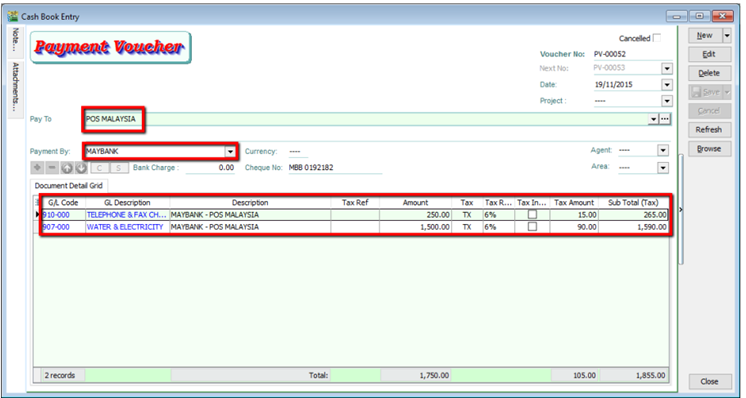
6.3 Cash Book Entry
Cash book entry is normally used for a non-customer/ supplier payment or receipt e.g. payment for salaries, utilities etc
-
GL | Cash Book Entry | New (choose between Payment Voucher or Official Receipt)
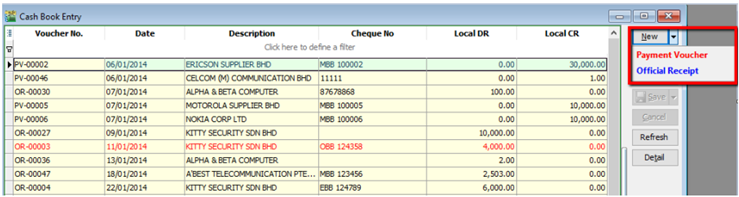
-
Insert Payable Name | Select GL Code /Tax /Amount
7 Inventory
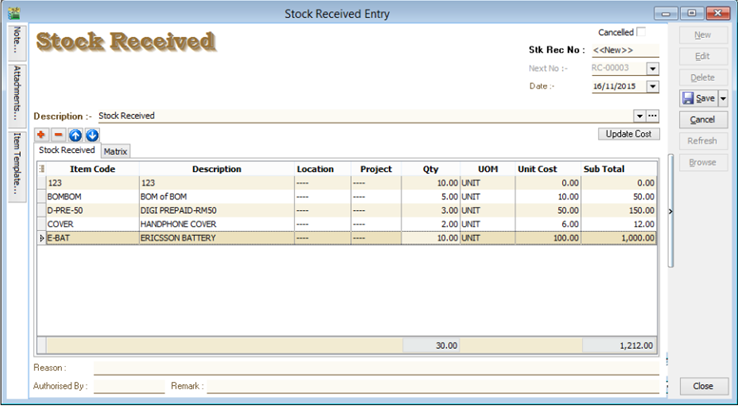
7.1 Stock Received
Allows user to increase stock quantity without purchasing. It is normally used when you have assembled or manufactured finished goods. Just key-in the item code, quantity IN and cost that you want.
- Stock | Stock Received | New.
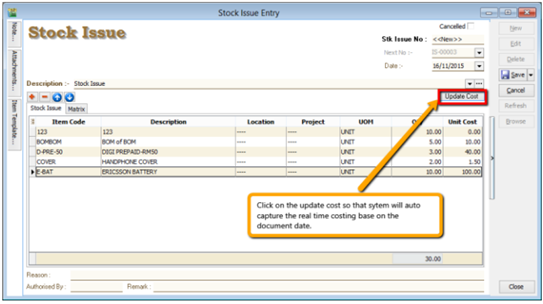
7.2 Stock Issue
Allows user to decrease stock quantity without selling. It is normally used when you consume raw material during assembly or when manufacturing finished goods or even sometimes for internal usage. Just key-in the item code, quantity OUT and cost and you may also click on the Update Cost, then the system will auto-detect the actual costing base on your document date.
- Stock | Stock Issue | New.
7.3 Stock Adjustment / Stock Take
Allows user to key-in quantity in and quantity out from the system, just like a combination of stock received and stock issue. Normally used for stock take purposes. (Stock | Stock Adjustment | New)
How SQL System can help during Stock Take?
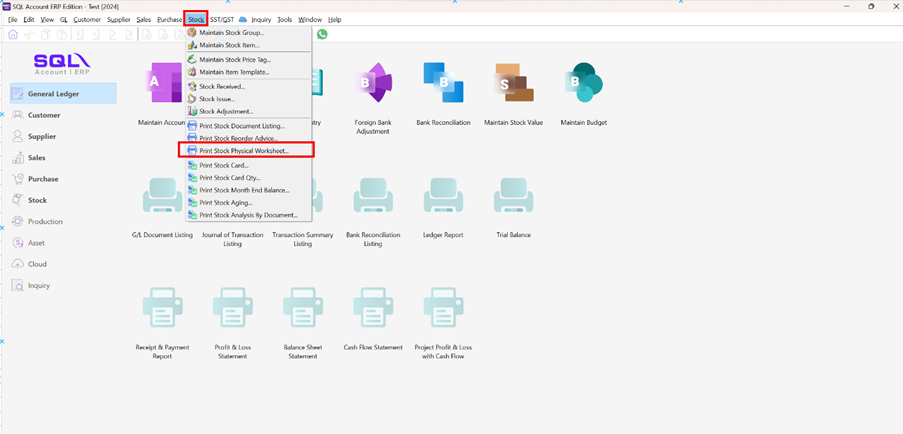
-
Click on Stock
-
Choose Print Stock Physical Worksheet.
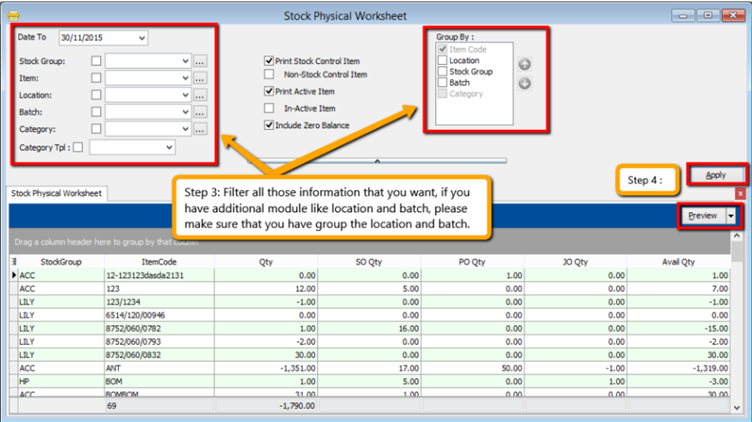
-
Filter by date, stock group or others information that you want to do for the stock take, please make sure that you choose the correct location and batch if you have these two modules.
-
Click on Apply and Preview.
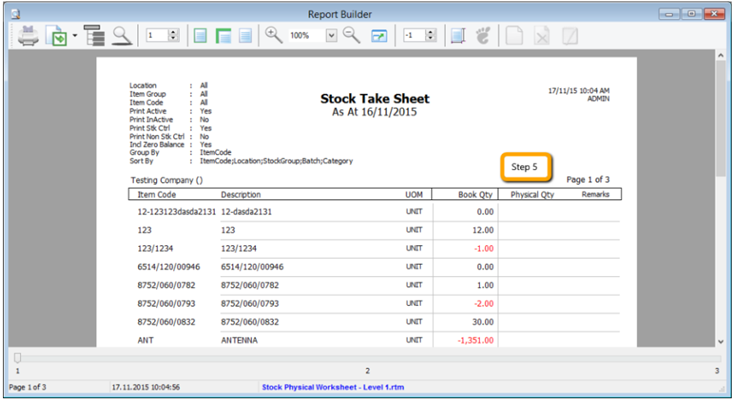
-
Print out the “Stock Take Sheet” for stock keeper. The stock keeper should manually fill in the actual quantity into the “physical qty” column.
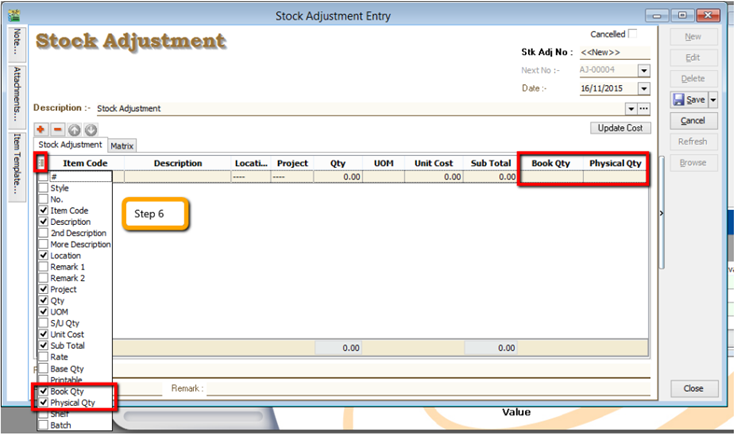
-
After complete updating the stock take report, click on Stock | Stock Adjustment | and drag out Book Qty and Physical Qty.
-
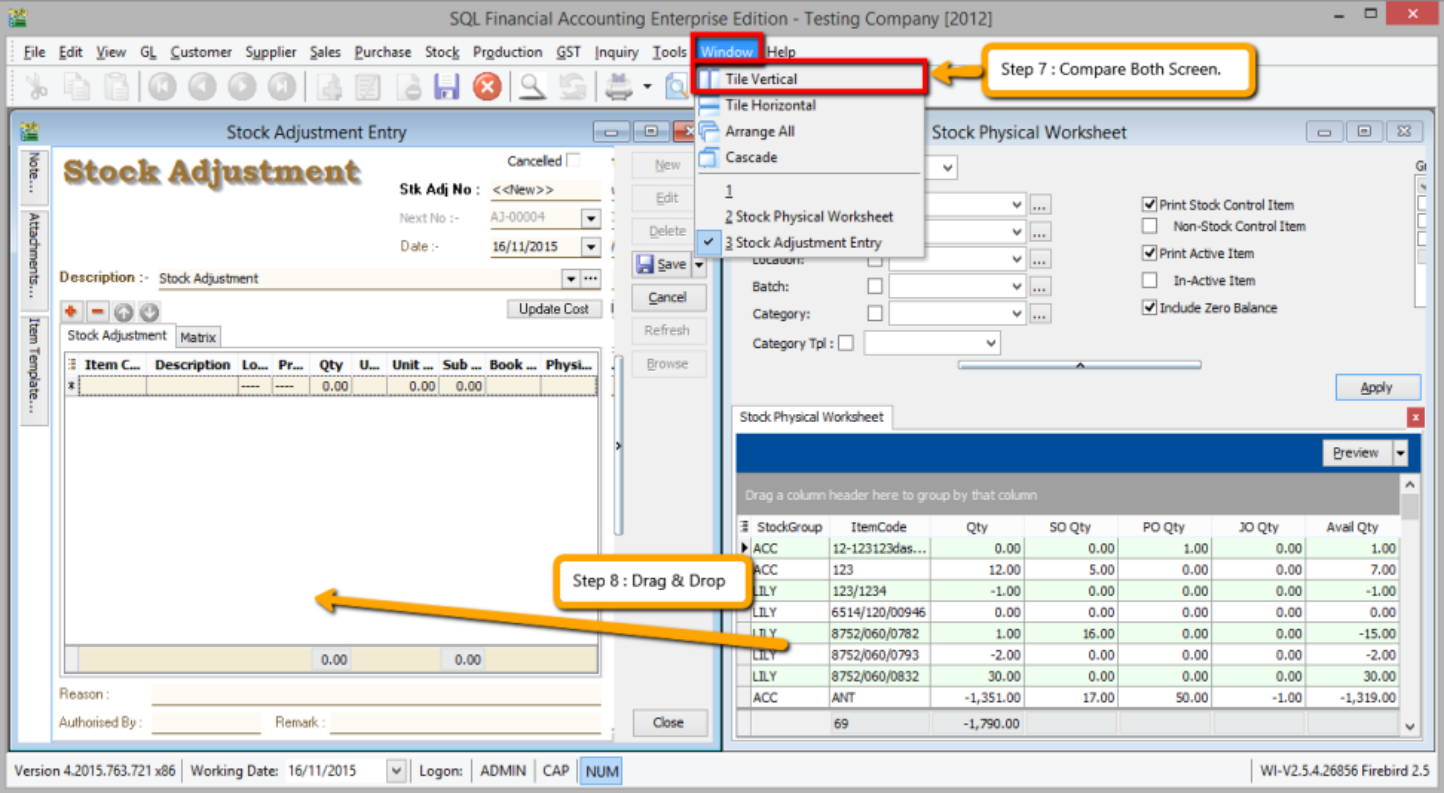
Repeat Steps 1 & 2 to display the Stock Physical Worksheet again, opening 2 windows simultaneously, “stock adjustment” and “stock physical worksheet”, then click on Window | Tile Vertical.
-
Click on the first item in Stock Physical Worksheet, press on Ctrl + A on the keyboard to select all items. Then Drag & Drop into Stock Adjustment.
-
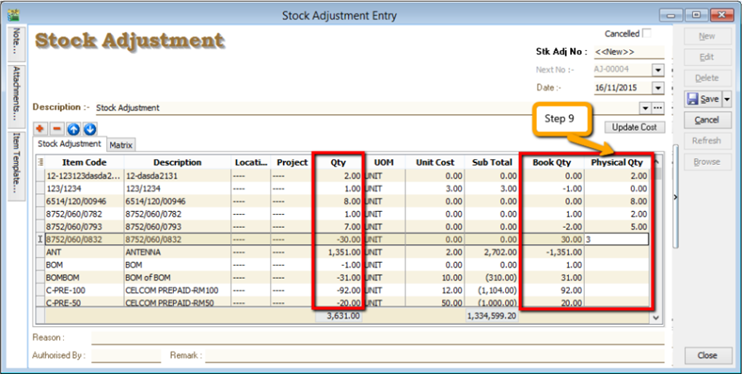
Based on the stock keeper’s Stock Take Report, fill in the actual physical quantity in your warehouse into the Stock Adjustment Physical Qty column, the system will calculate the variance based on the Book Qty and apply a correction to the Qty column.
Book Qty = Quantity that is recorded in system.
Physical Qty = Actual Quantity at your warehouse.
Qty = Variance between Physical and Book Quantity, system will auto-adjust then update accordingly. (Physical Qty – Book Qty)
8 Report
8.1 General Ledger Report
8.1.1 Balance Sheet
Go to GL | Print Balance Sheet
-
Select your date
-
Choose your preferred format
-
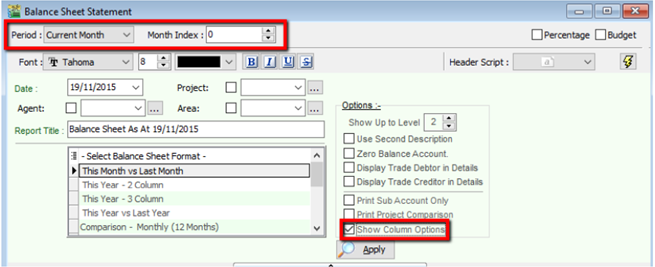
“Show Up to Level” under Option refer to the depth of sub-accounts in your Maintain Chart of Account, the higher the value, the more level of detail will be shown.
-
Step 4
- Use second description – use second description which is controlled at GL | Maintain Chart of Account
- Zero Balance Account – choose to show accounts in the report even if their amount is 0.
- Display Trade Debtor/Creditor in Details – show per customer account in detail
-
Step 5
- Print Sub Account Only – Select a certain account to view
- Print Project Comparison – you are allowed to view your report by project (project module requested)
- Show Column Options – you can preset setting as attached
Step 6: Apply
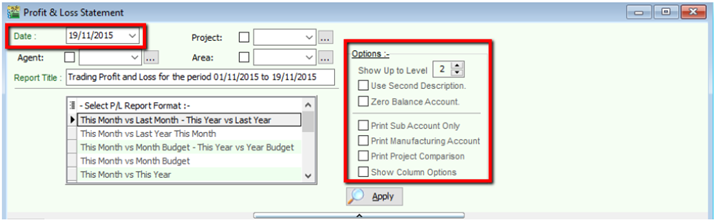
8.1.2 Profit & Loss Statement
Go to GL | Print Profit and Loss Statement
-
Select your date
-
Choose your preferred format
-
Step 3
- Use second description – use second description which is maintained under GL | Maintain Chart of Account
- Zero Balance Account – choose to show accounts in the report even if their amount is 0
-
Step 4
- Print Sub Account Only – Select a certain account to view
- Print Manufacturing Account – you are only allowed to view manufacturing account if you have set it up under Maintain Chart of Account
- Print Project Comparison – you are allowed to view your report by project (project module requested)
- Show Column Options – refer Balance Sheet
-
Apply
8.1.3 Trial Balance
Go to GL | Print Trial Balance
-
Select your date
-
Filter by project, area, agent (optional)
-
Tick whether you want to view General Ledger, Sales Ledger(Customer) or Purchase Ledger (Supplier)
-
Step 4
- Use second description – use second description is which maintained under GL | Maintain Chart of Account
- Zero Balance Account – choose to show accounts in the report even if their amount is 0
Step 5: Apply
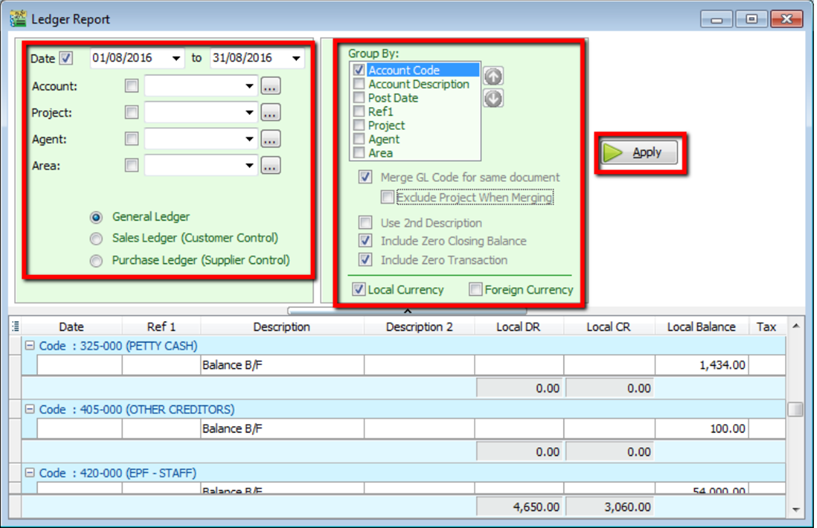
8.1.4 Ledger Report
Go to GL | Print Ledger Report
-
Select your date
-
Filter by account, project, area, agent (optional)
-
Tick whether you want to view General Ledger, Sales Ledger(Customer) or Purchase Ledger (Supplier)
-
System can generate by group and give you a summary of each group (group/sort by)
-
Step 5
- Merge GL Code for same document – if you have the same account in one single transaction, the system will automatically merge, if you want to separate the account code for the same document, please un-tick.
- Exclude Project when merging – exclude project when merge GL Account.
- Use second description – use second description which is maintained under GL | Maintain Chart of Account
- Include Zero Closing Balance – choose to show accounts in the report even if their amount is 0
- Include Zero Transaction – choose to show accounts in the report even if there are 0 transactions.
- Local Currency & Foreign Currency – If you have foreign currency transactions, you can tick the foreign currency so that the system will show the figures in foreign currency compare versus local currency.
-
Apply.
8.2 Customer Report
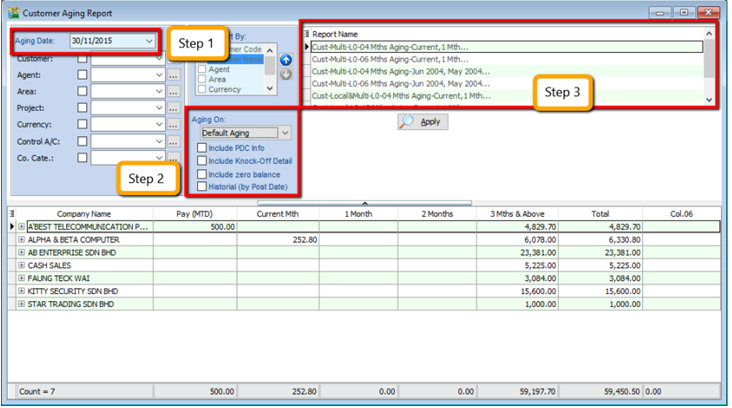
8.2.1 Customer Aging
-
Customer | Print Customer Aging | Filter Aging Date
-
Choose your preferred report format options.
-
You can select either 4 months, 6 months or 12 months aging
-
Click on Apply
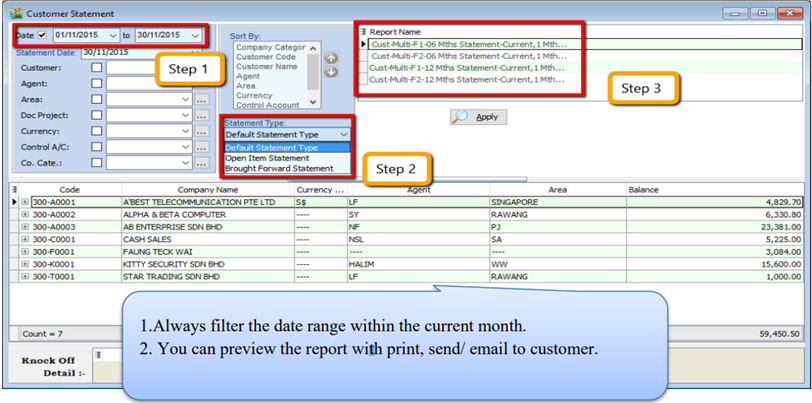
8.2.2 Customer Statement
-
Customer | Print Customer Statement | Set Date Range
-
Choose your preferred options.
- Default Statement Type – The default Setting preset under Maintain Customer
- Open Item Statement – Show all outstanding transaction row by row
- Brought Forward Statement – Show outstanding amount from previous months as a lump-sum
-
You can select either 6 months or 12 months’ statement
-
Click on Apply
8.2.3 Customer Due Document Listing
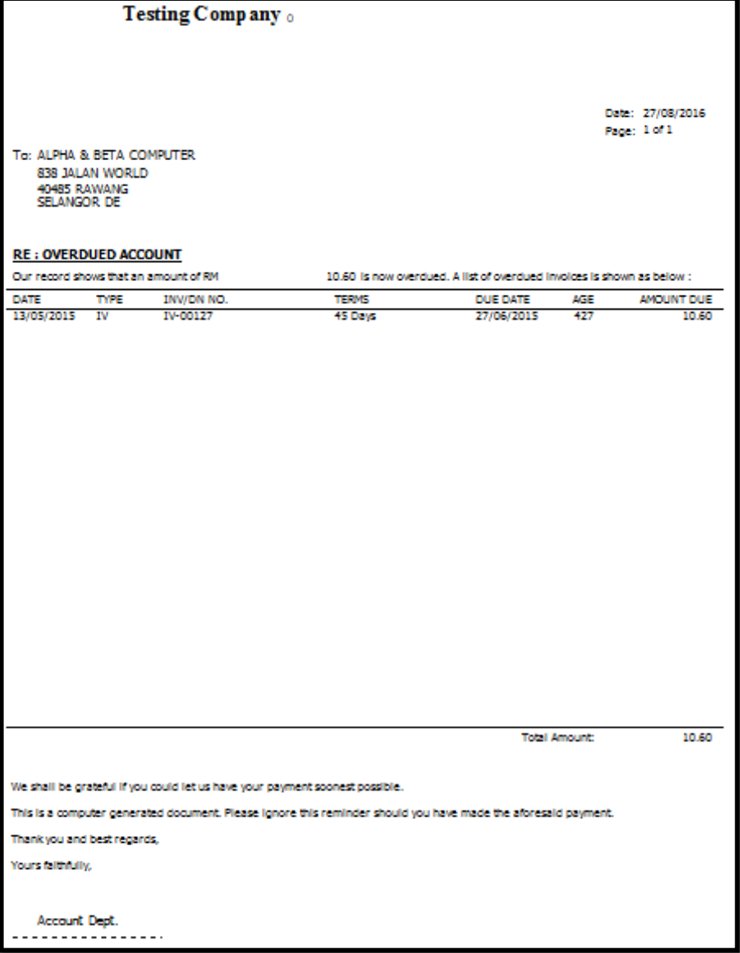
In this report, you can print a reminder letter to remind customers of outstanding amounts.
-
Filter by Date, Document (Invoice, Debit Note, Credit Note, Contra)
-
Overdue or Undue document.
-
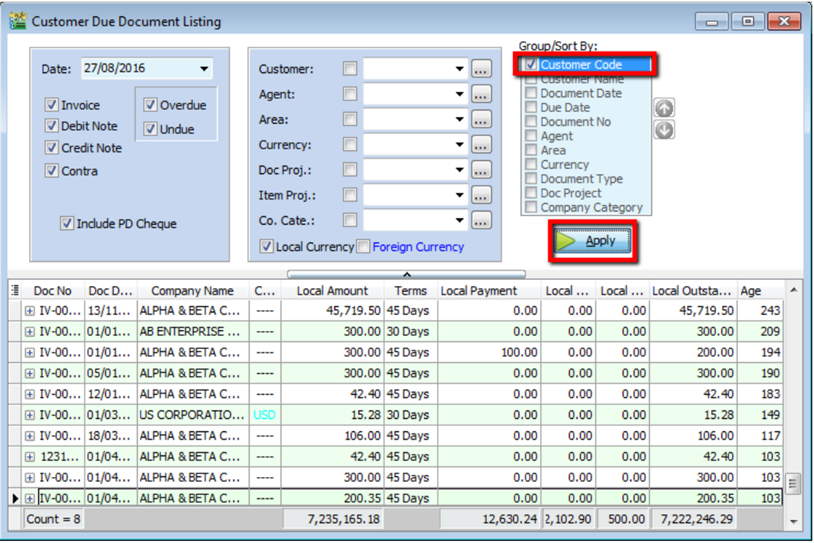
System can generate by group and give you a summary on each group (group/sort by)
-
Apply.
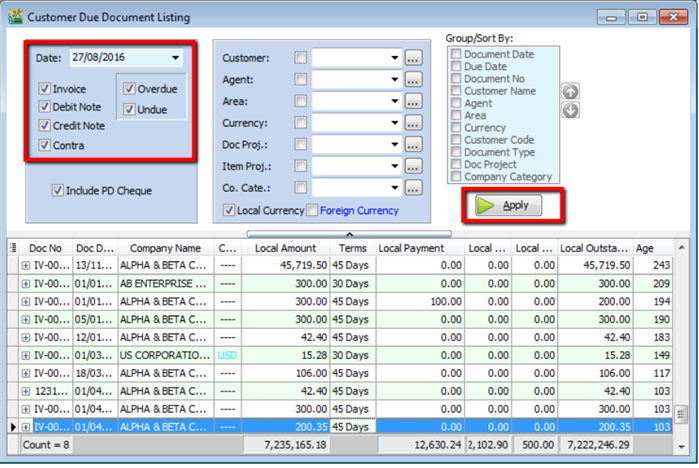
-
If you want to print a reminder letter, make sure you tick the customer code under “group / sort by” and Apply.
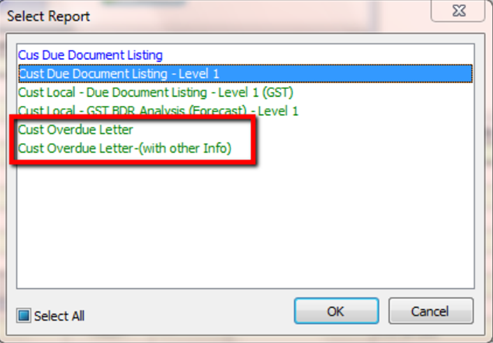
-
Preview the report and you will see Cust Overdue Letter, choose your preferred format.
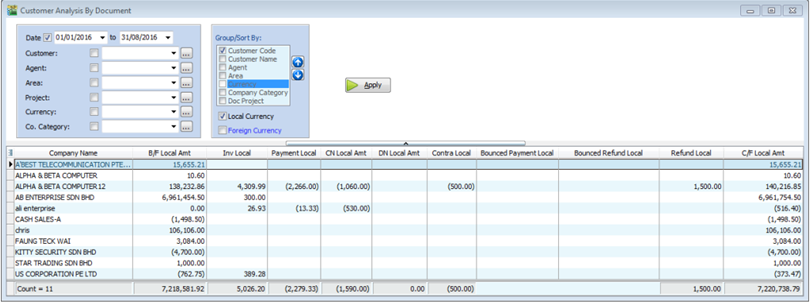
8.2.4 Customer Analysis By Document
This report is used to analyse all customer documents in one report. You can check total Invoice, Credit Note, Debit Note, Payment and the rest of the document amount.
-
Customer | Customer Analysis By Document
-
Filter by Document Date and any others optional field to display.
-
Apply.
8.3 Sales Report
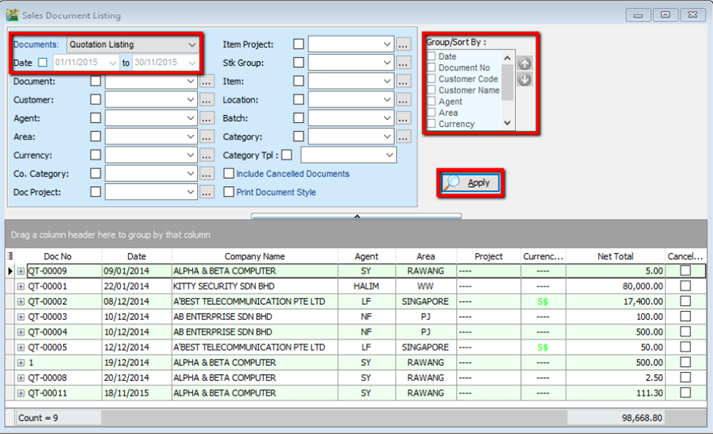
8.3.1 Sales Document Listing
Go to Sales | Print Sales Document Listing
-
You can filter which type of document you want: e.g, Sales Quotation /Sales Order/ Deliver Order/ Invoice Listing
-
Filter by date, if left untick means all periods will be shown
-
Filter area by pipelines (It’s optional)
-
System can generate by group and can give you a summary on each diff group (group/sort by)
-
Click Apply to generate, whenever you change any setting under Step 3 or 4, please redo by clicking Apply
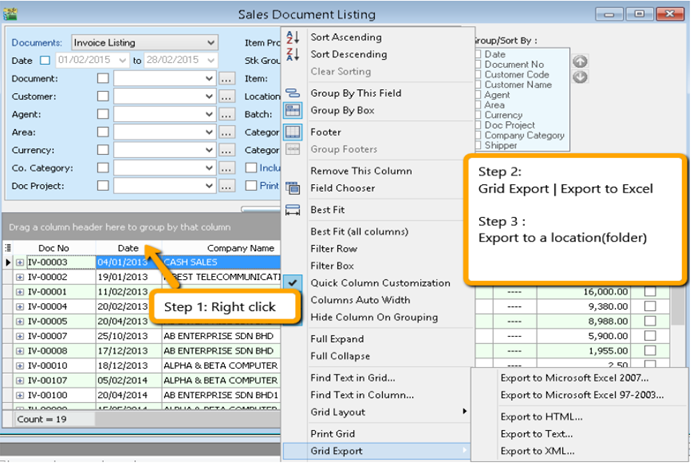
8.3.1.1 Export report into Excel
-
Right click on any title bar
-
Click on Grid Export | Export to Excel.
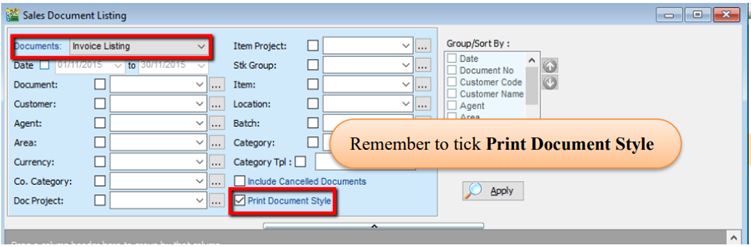
8.3.1.2 Batch Printing Invoices
If you want to print out entire month invoices by batch and into a page-by-page format,
-
Sales | Print Sales Document Listing.
-
Tick “Print Document Style”
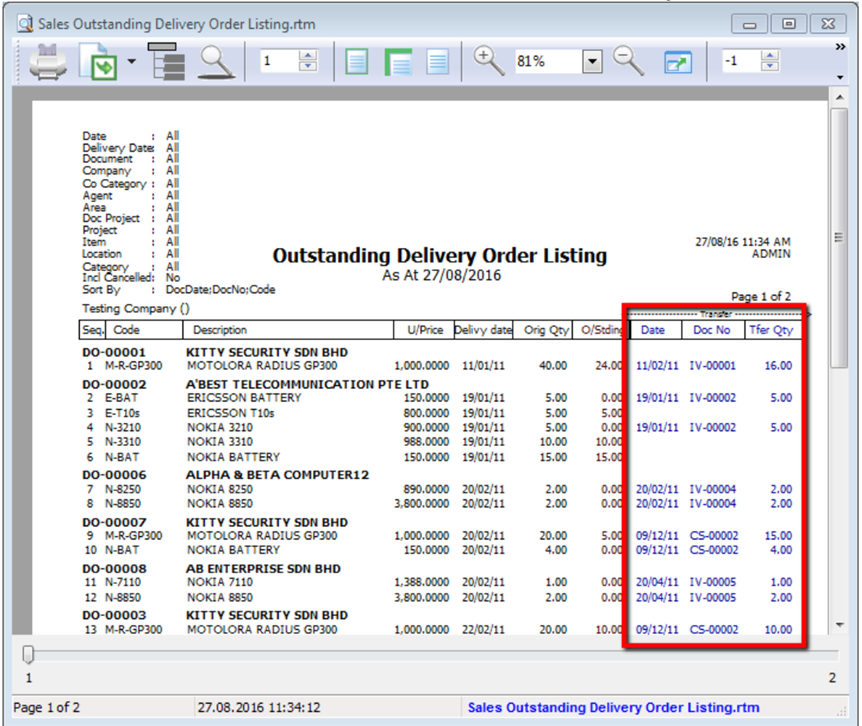
8.3.2 Outstanding Sales Document Listing (Require Partial Delivery Module)
This report can help you check the transfer document’s info, such as the amount of outstanding items for the particular document and; which invoices the DO have been transferred to.
-
Sales | Print Outstanding Sales Document Listing.
-
Filter the information that you want and apply.
-
Step 3
- Print Outstanding Item – to check outstanding items which have not yet been transferred.
- Print Fulfilled Item – to check those documents which have been fully transferred and transferred to which document.
- Include cancelled documents – tick to show cancelled documents in the report.
- Outstanding SO & PO – to check the number of outstanding items from sales order and purchase order
- Transfer Doc Date Follow Filtered Date – tick this if you want the document transfer date (e.g. transfer document Sales Order to Invoice both will followed filtered date.)
-
Apply.
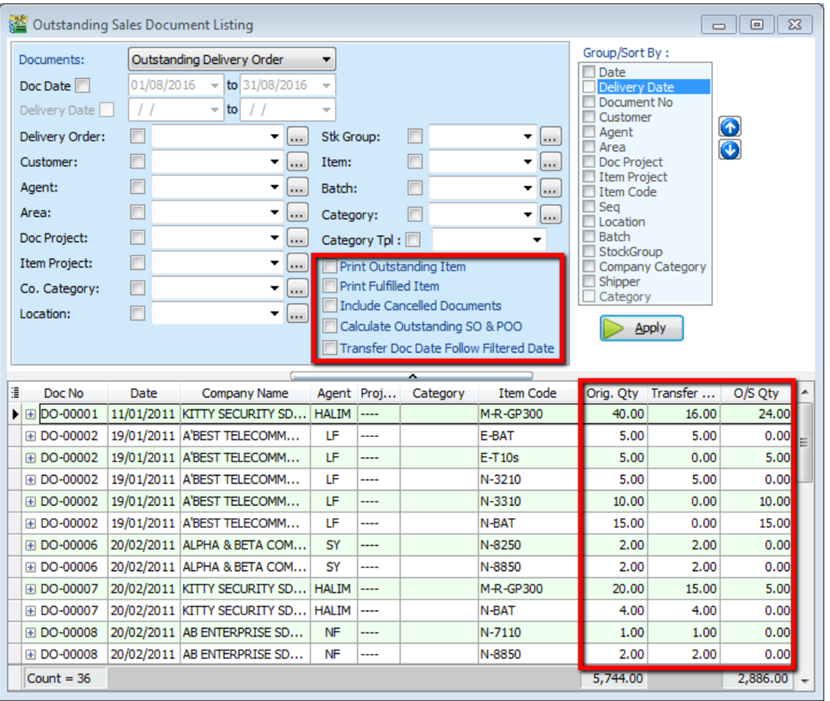
-
If you want to know where this document has already been transferred to, you just Preview the report.
8.4 Inventory Report
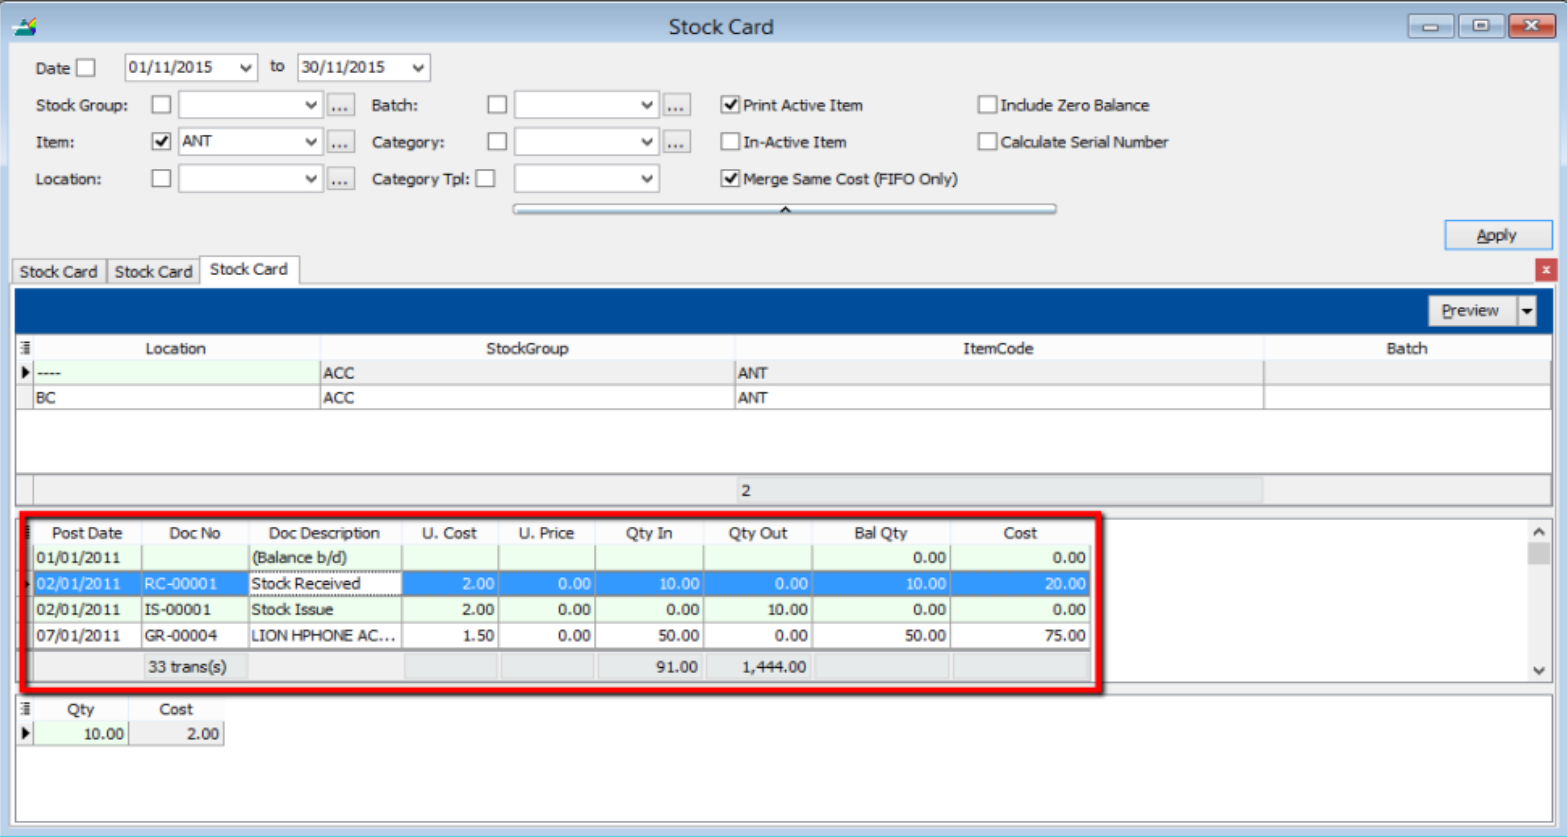
A subsidiary report where each individual movement of stock is recorded, including stock movements from Purchases, Sales and Returns.
8.4.1 Stock Card
- Stock | Print Stock Card | Apply.
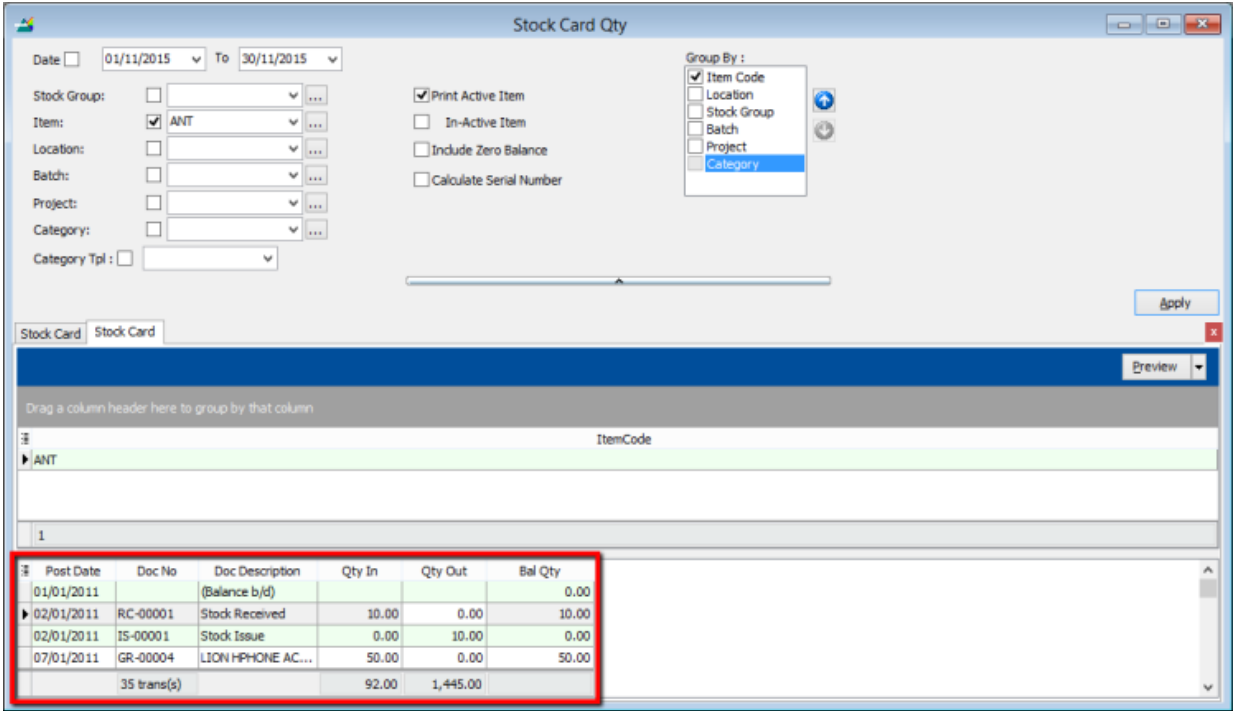
8.4.2 Stock Card Qty
Same purpose with stock card but stock card qty is without costing and pricing, this is useful for customers who want to block specific users from viewing stock costing.
-
Stock | Print Stock Card Qty | Apply.
8.4.3 Stock Month End Balance
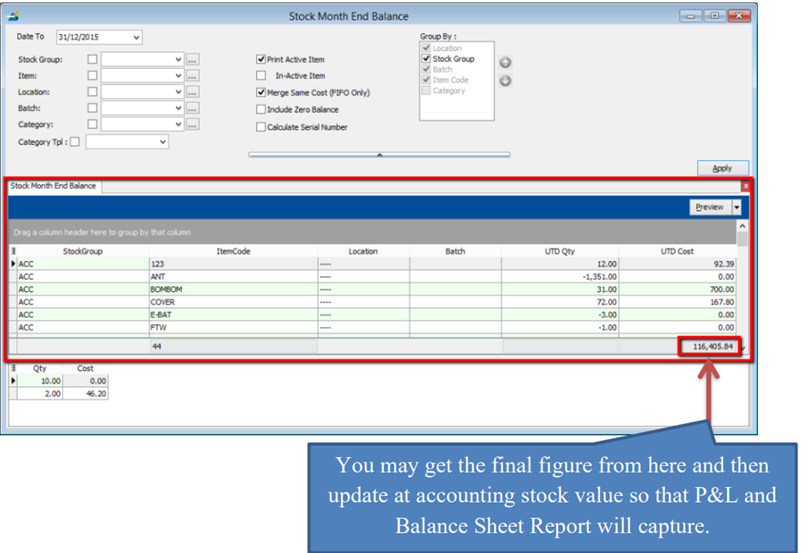
The Monthly Stock Balance Report summarizes the stock balances of the participant as of a calendar month end. The report also shows the monthly custody fee charged for each stock.
- Stock | Print Stock Card Qty | Apply.
8.4.4 Stock Reorder Advice
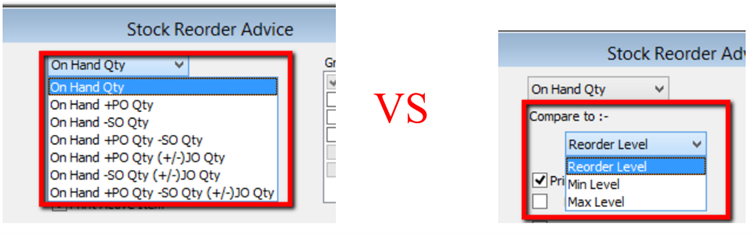
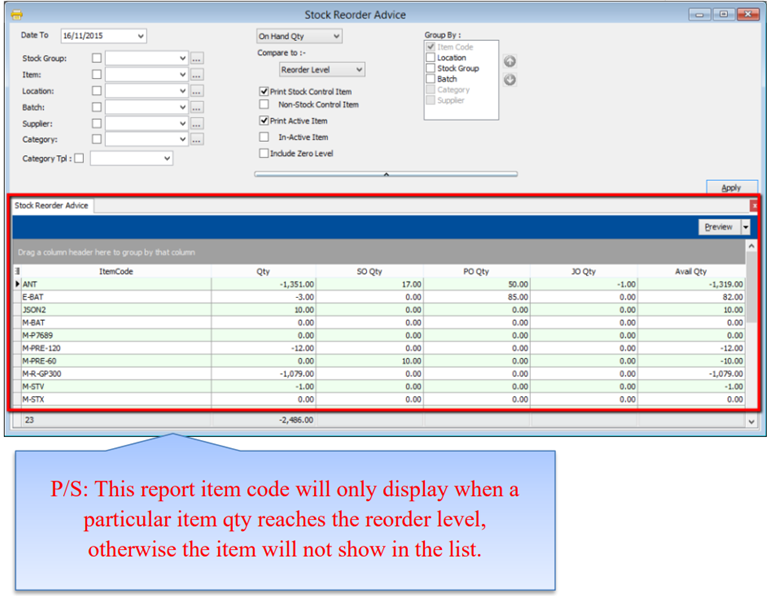
This report is to show reorder advice according to stock level, normally used to trace pending Purchase Orders and Sales Orders. You may compare as seen below:
- Stock | Print Stock Reorder Advice | Apply.
9 GST
GST was introduced in Singapore on 1 Apr 1994. The table below displays the chronological sequence of GST Rate changes:
| Year | GST Rate |
|---|---|
| 1 Apr 1994 to 31 Dec 2002 | 3% |
| 1 Jan 2003 to 31 Dec 2003 | 4% |
| 1 Jan 2004 to 30 Jun 2007 | 5% |
| 1 Jul 2007 to 31 Dec 2022 | 7% |
| 1 Jan 2023 - present | 8% |
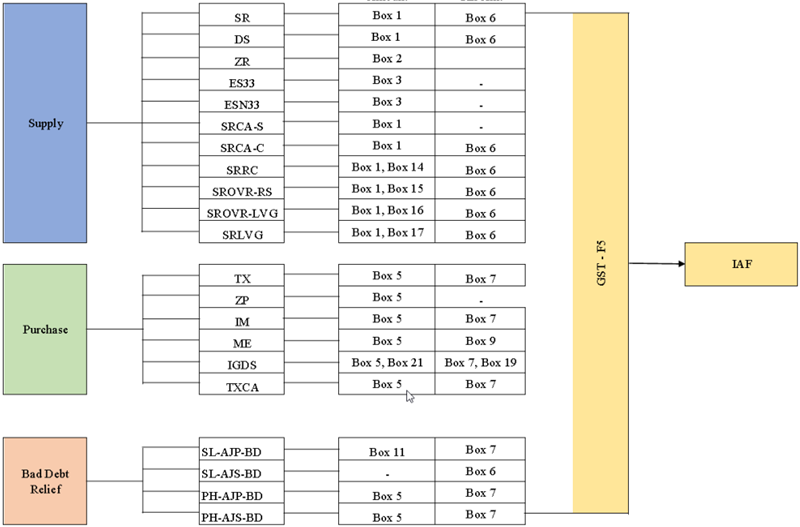
9.1 GST Tax Code, GST-F5 and IAF Flow Chart
Overview of the GST Tax Code in SQL Account and represent to GST F5 and IAF.
9.2 Common Tax Codes used by most businesses
9.3 Disallowed Input Tax Claims
-
Input tax incurred by a taxable person in respect of the following supplies shall be excluded from any credit under GST:
-
Motor Cars Costs and running expenses incurred on motor cars that are either
- Registered under the business’ or individual’s name, or
- hired for business or private use, except where the car is excluded from the definition of a 'motor car' in Regulation 25(1) of the GST (General) Regulations.
-
Family Benefits
- Benefits provided to the family members or relatives of your staff
-
Medical and Personal Accident Insurance
- Medical and Personal Accident insurance policy that are taken up for the staff of your company unless the insurance or payment of compensation is obligatory under the Work Injury Compensation Act orunder any collective agreement within the meaning of the Industrial Relations Act
-
Medical Expenses
- Expenses incurred by staff who seek medical treatment like acupuncture at Traditional Chinese Medicine
- Purchase of medicine from a pharmacy
- Purchase of medical equipment like a wheel chair
-
Club Subscription Fee
- Joining fee, monthly subscription fee or a transfer fee
-
Any transaction involving betting, sweepstakes, lotteries, fruit machines or games of chance.
-
-
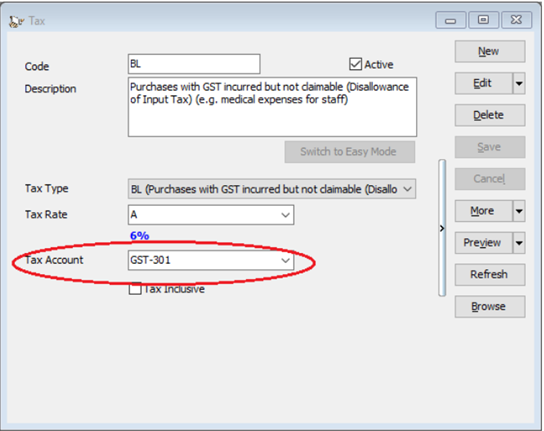
Key in payment voucher as usual and select BL Tax Code
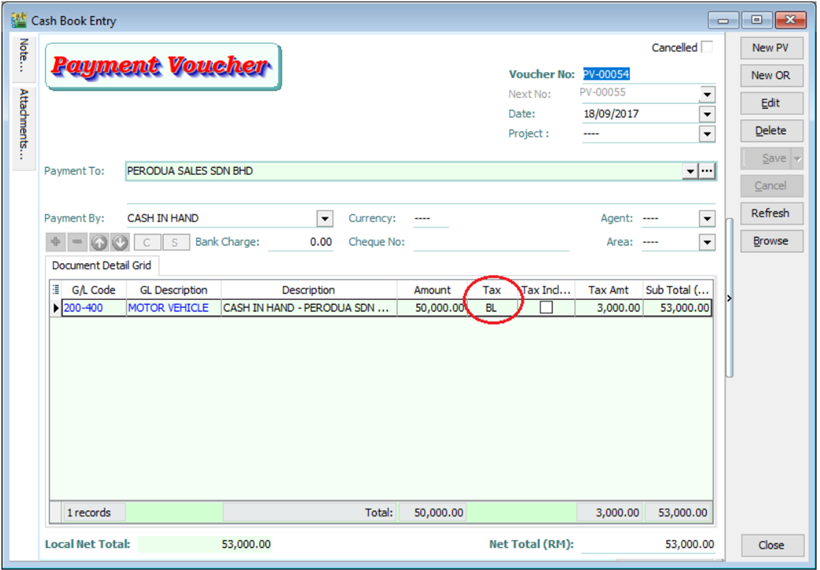
-
If in GST | Maintain Tax , the Tax Account you left it empty, system will auto post the 6% of tax amount according to the document’s GL Code.
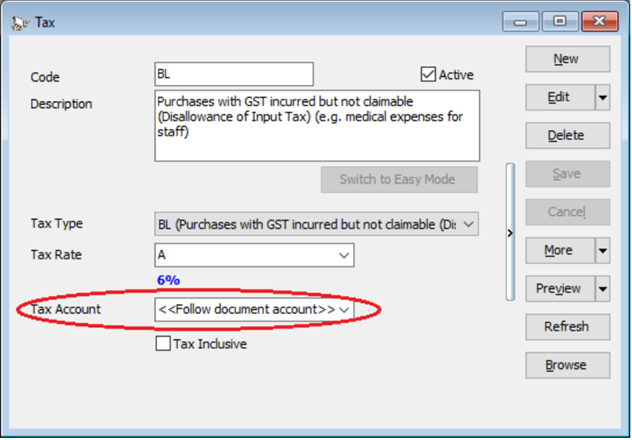
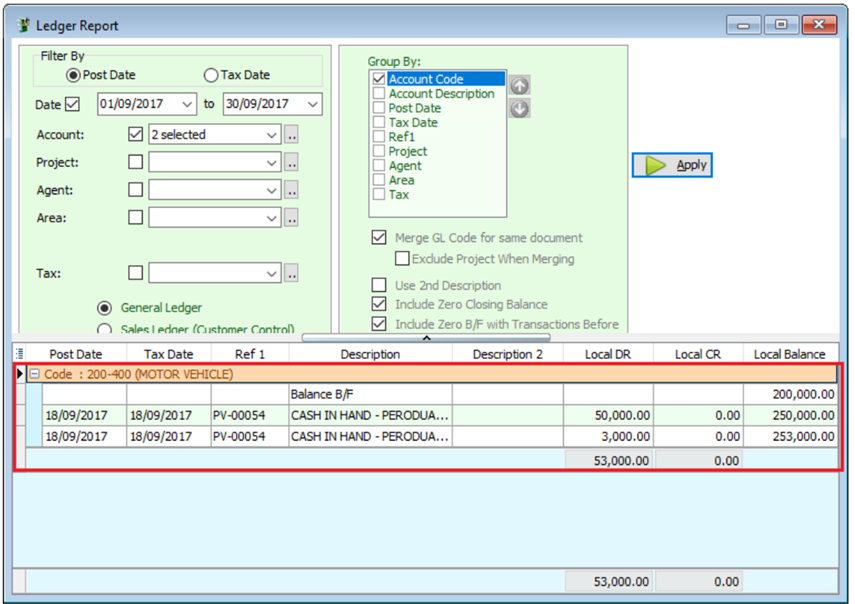
-
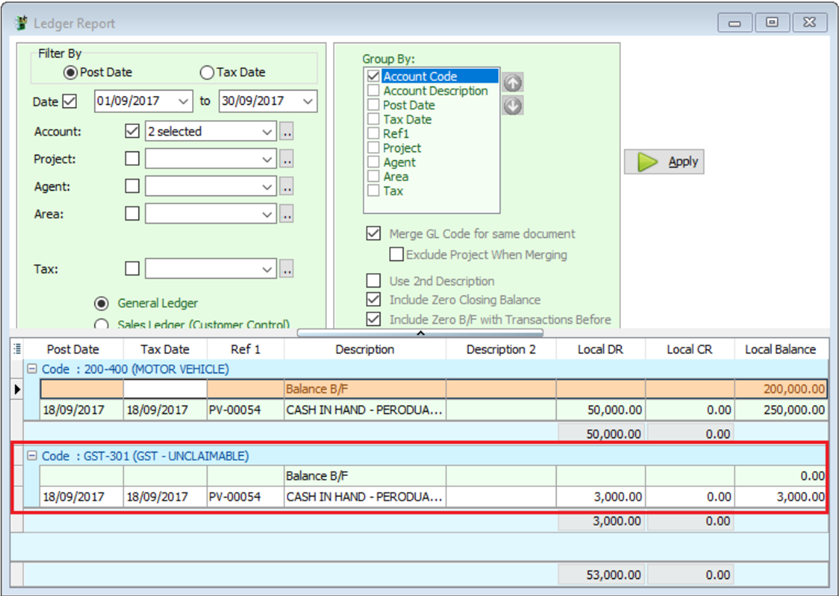
In GST | Maintain Tax |BL Tax code you can also pre-set your preferred expenses account. In this example, we set it to GST-Unclaimable under expenses account, system will auto post the 6% of tax amount according to the Tax account accordingly.
9.4 GST-F5 Draft
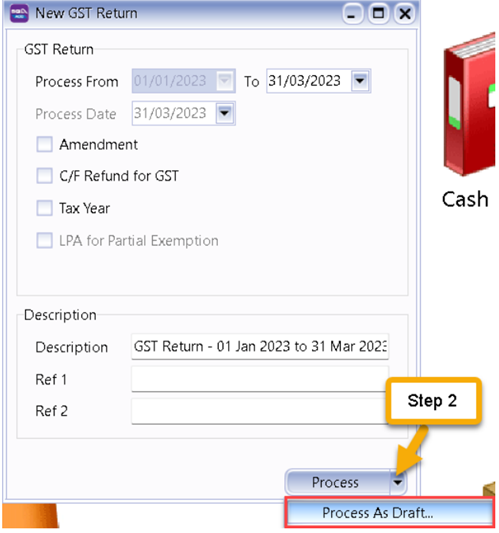
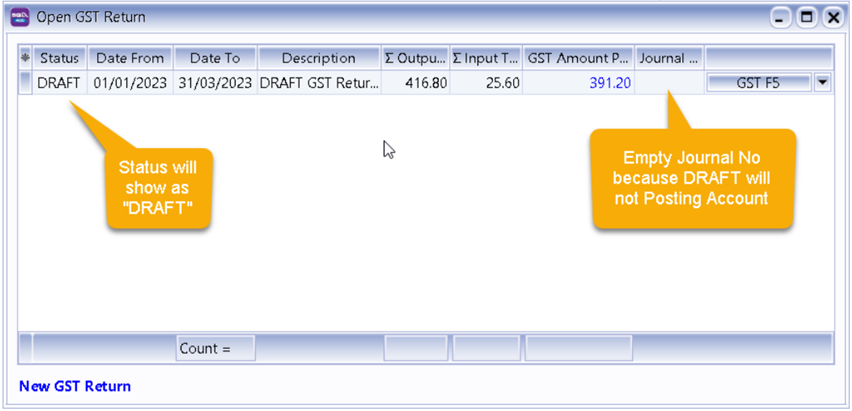
You are allowing to process a draft GST Return before you process the actual GST-F5 that is to be submitted.
-
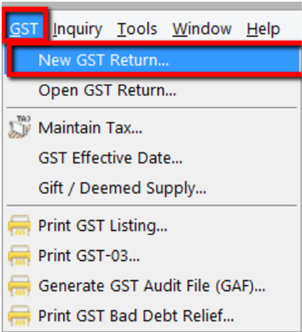
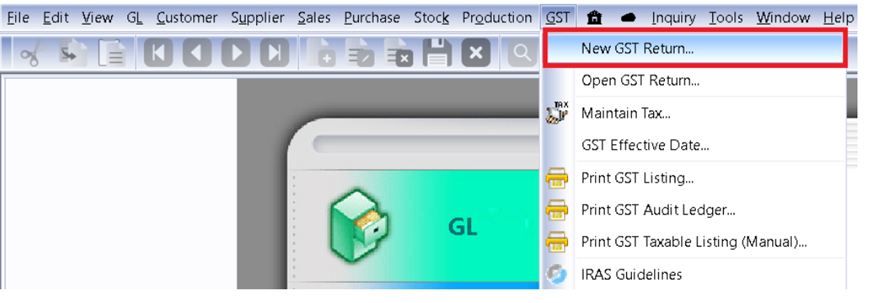
GST | New GST Return.
-
Select the arrow down button beside Process | then click on “Process as Draft”.
-
The Result is as below:
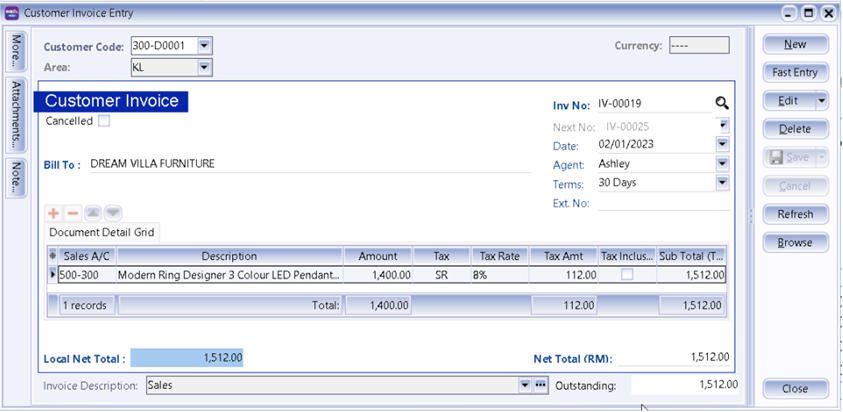
9.4.1 GST- F5 Drill Down
GST-F5 allow to drill down, example:
You can double click on Box 1 Column

Further drill down,
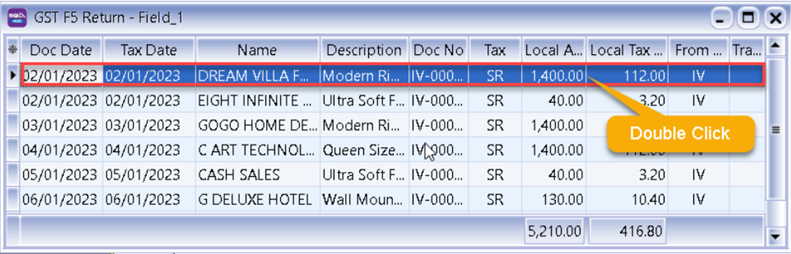
You can drill down until the particular document itself
9.5 Submission GST Return To IRAS?
-
GST | New GST Return.
-
Process monthly or every 3 months based on your company’s registration with IRAS.
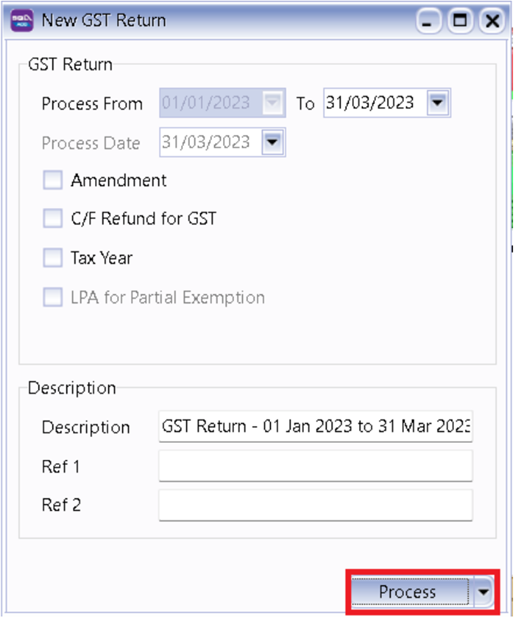
-
Click on GST F5 small Arrow Down.
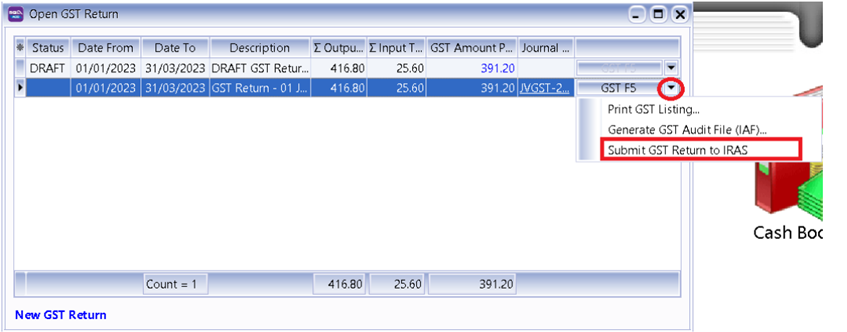
-
Scroll all the way to bottom
-
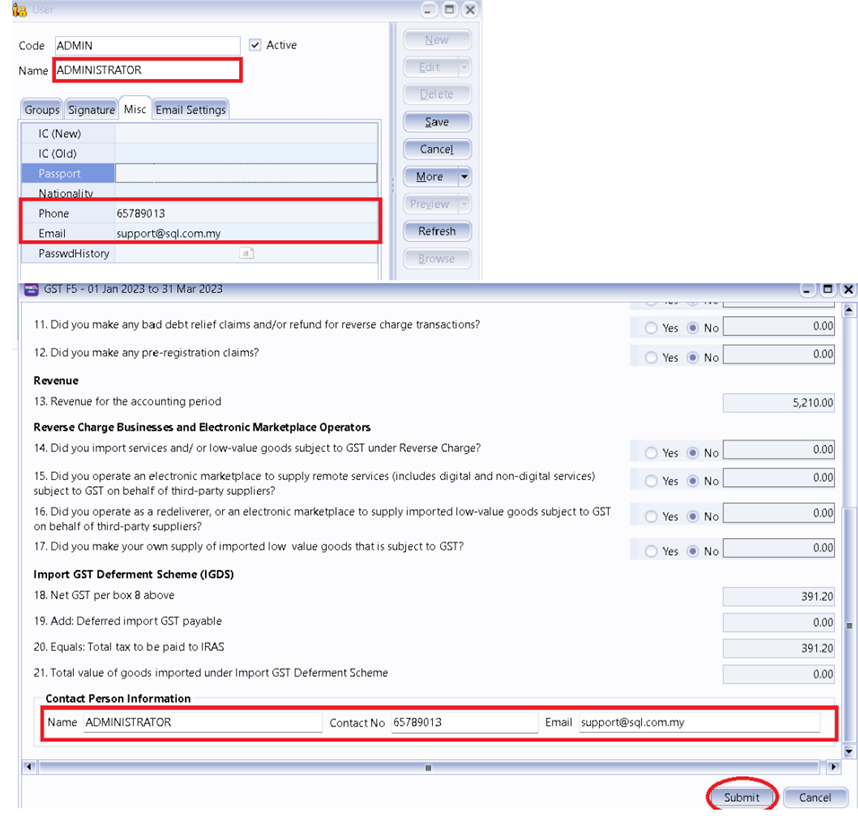
Where to fill in Contact Person Information ?
Go to menu Tools | Maintain User | Misc Tab
-
Click on Submit button
-
Agree with all declaration, fill up Designation and press Ok
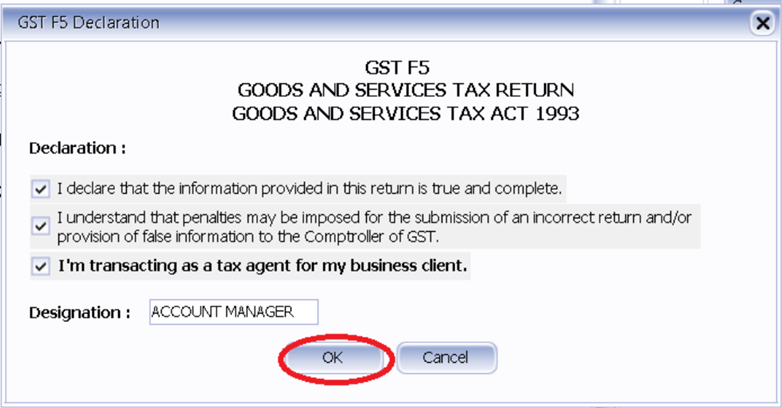
-
You can logon either Singpass App or Password Login
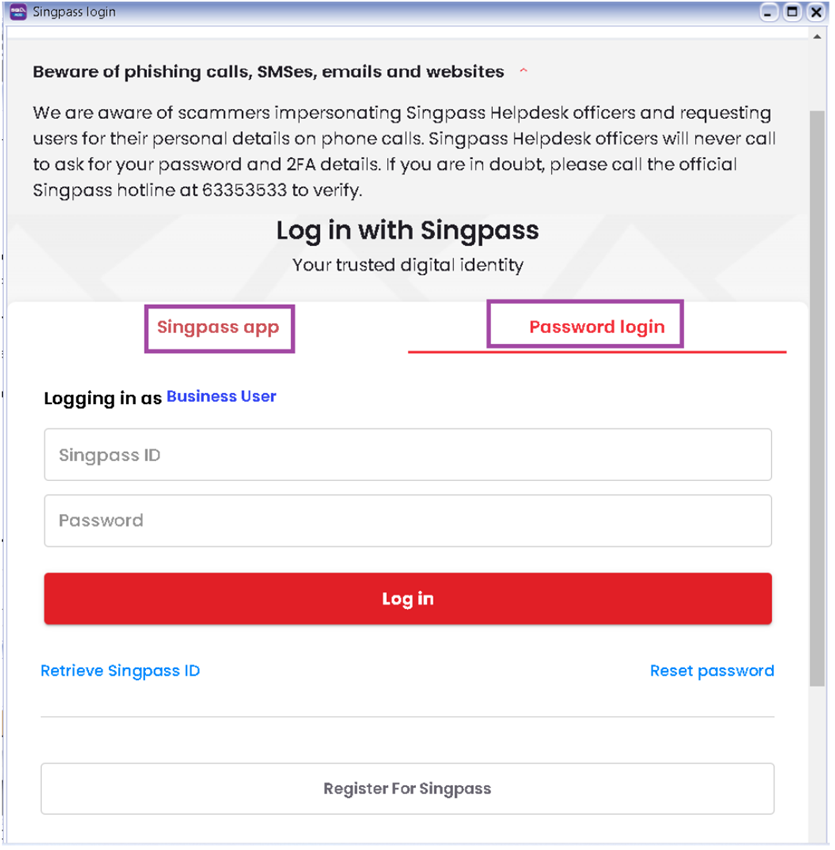
-
May logon and follow wizard to submit to IRAS
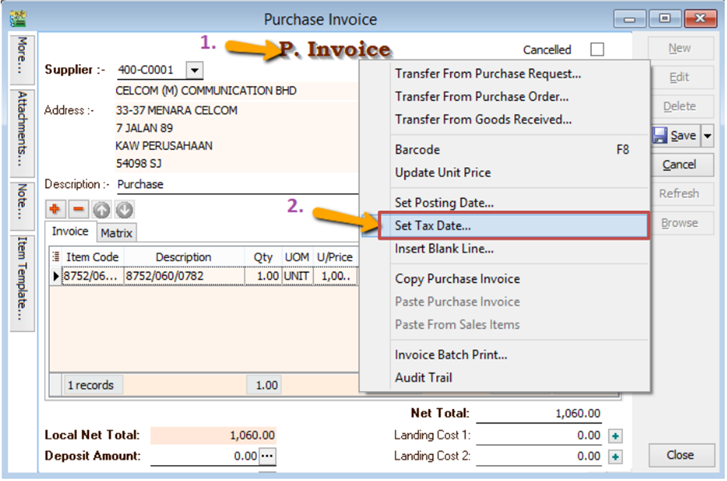
9.6 Set Tax Date
When you received a Purchase Tax Invoice which is dated in the previous taxable period (back-dated) and you want to claim that input tax in your current GST Return.
-
Key in your purchase invoice as usual. Right Click on Purchase Invoice Title.
-
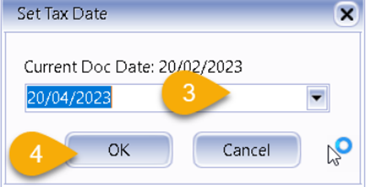
Select Set Tax Date.
-
Insert the date that you want to claim the input tax. This is normally the date when that you received the tax invoice. Then click OK.
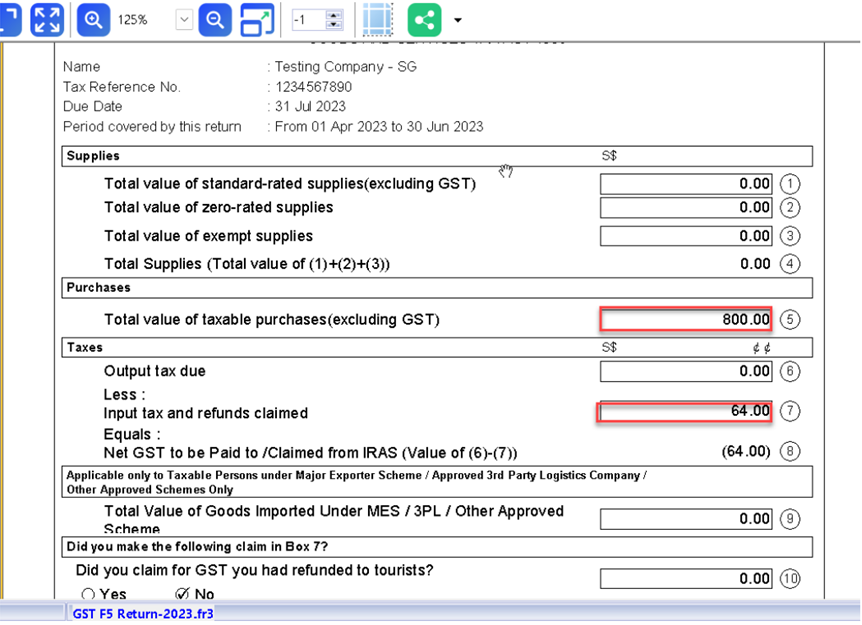
-
When you process the next cycle of New GST Return, it will show in Box 5 “Purchases” as usual.
9.7 Generate GST Audit File (IAF)
IAF = GST Audit File.
The purpose of a GAF is for Customs to audit the accuracy of your GST Return but GAF submission is only required upon request. It is not required to be submitted with GST-F5.
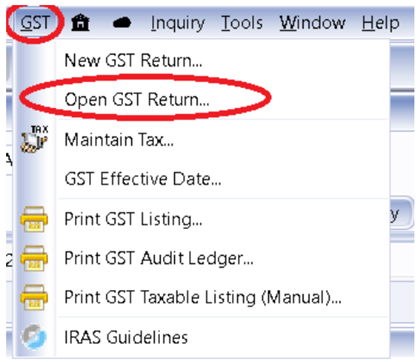
-
Click on GST | Open GST Return
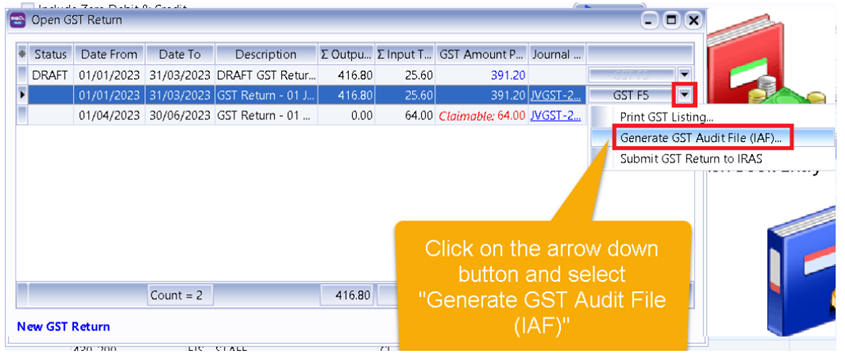
-
Select the cycle for the GAF that you want to generate. Then click on the arrow down button and select Generate GST Audit File(GAF).
-
The result is generated based on General, Sales & Purchase Ledger for you to check your transactions before submitting to Customs for auditing purposes.
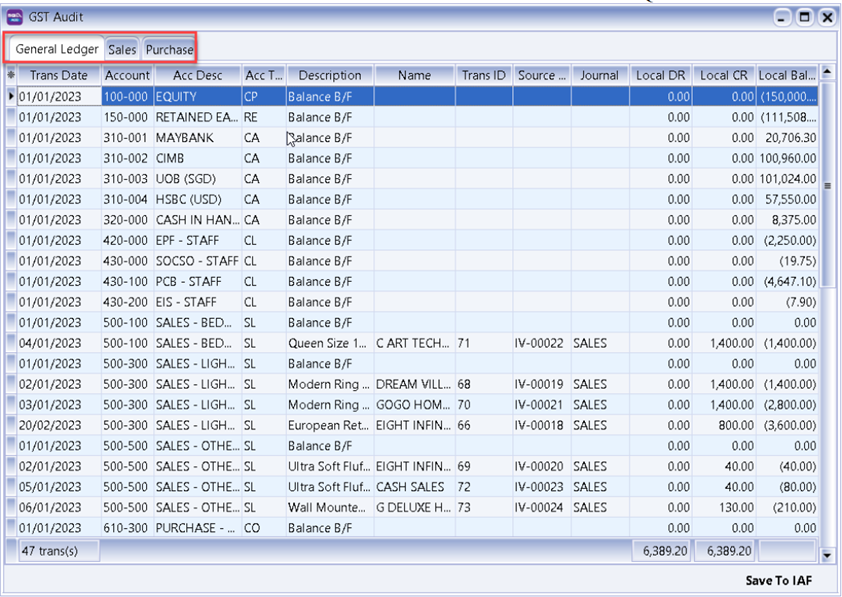
-
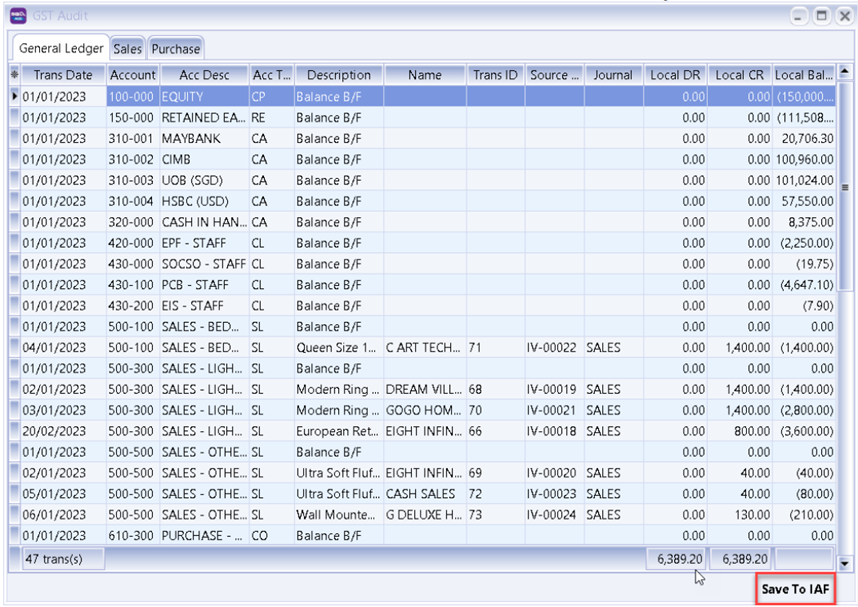
You may check the report.
-
Click on Save To IAF
-
Save your IAF text file to desktop.
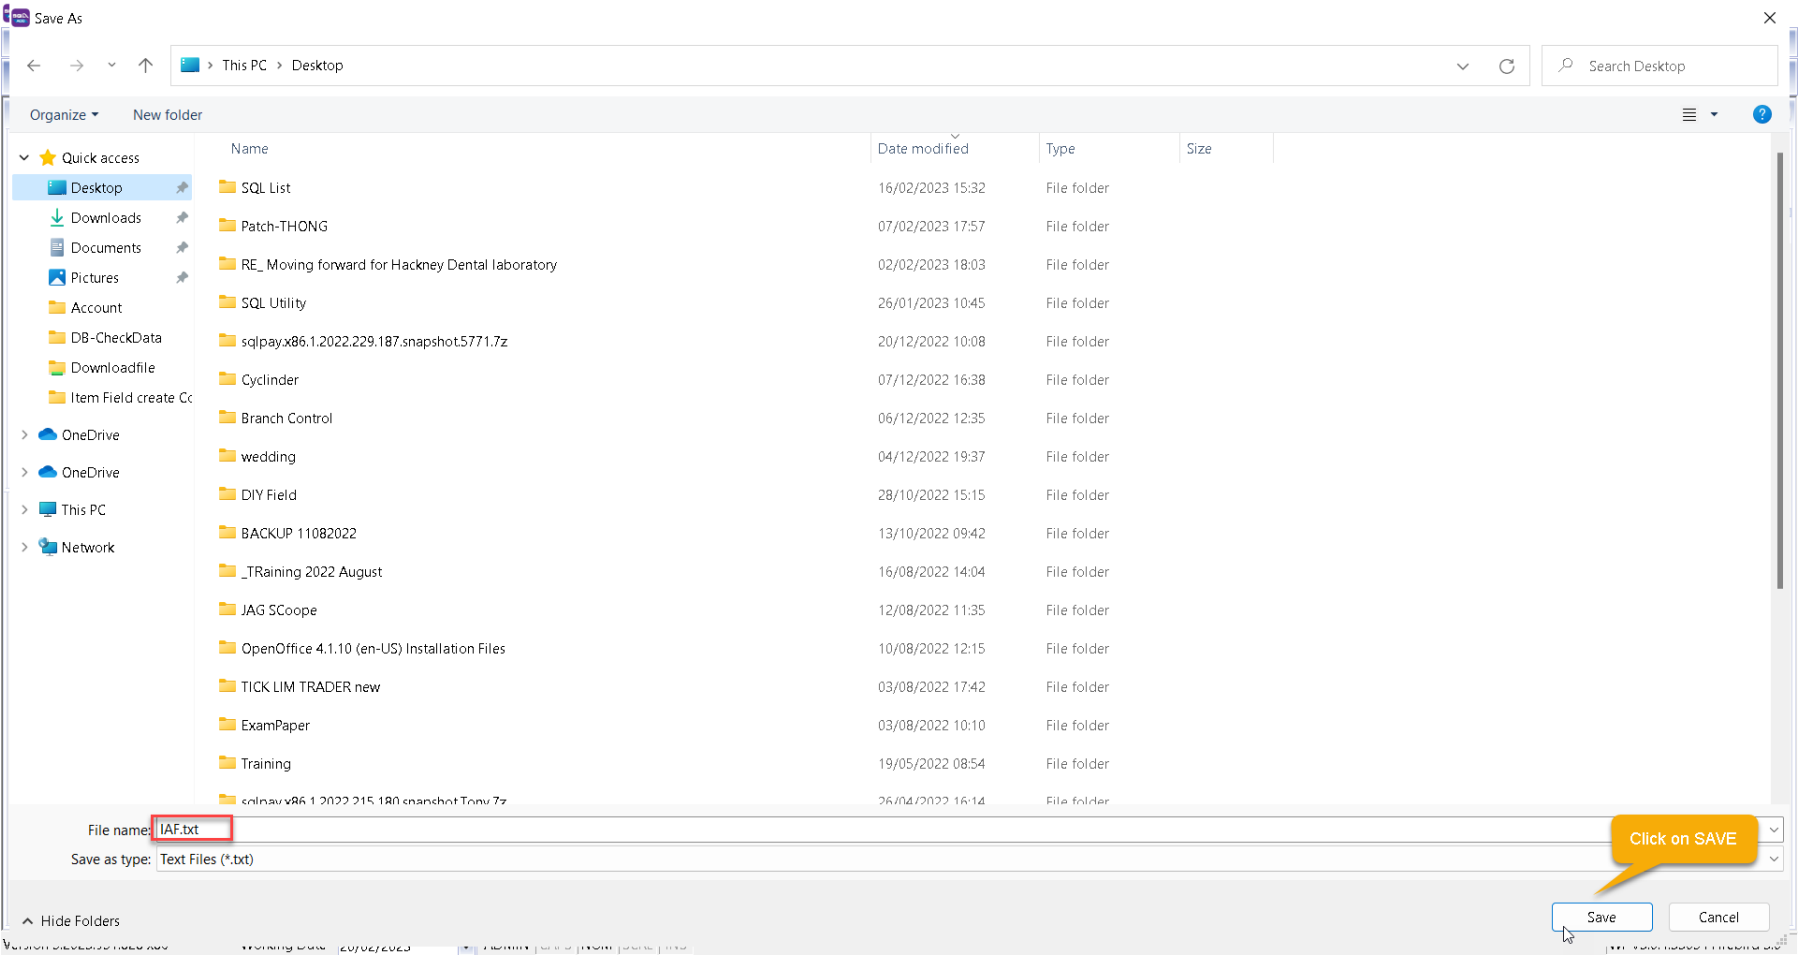
-
After saving, the message “File generated successfully” will automatically pop-up, just click OK.

-
Go to desktop to select the GAF.txt file. The output will be similar to the image below:
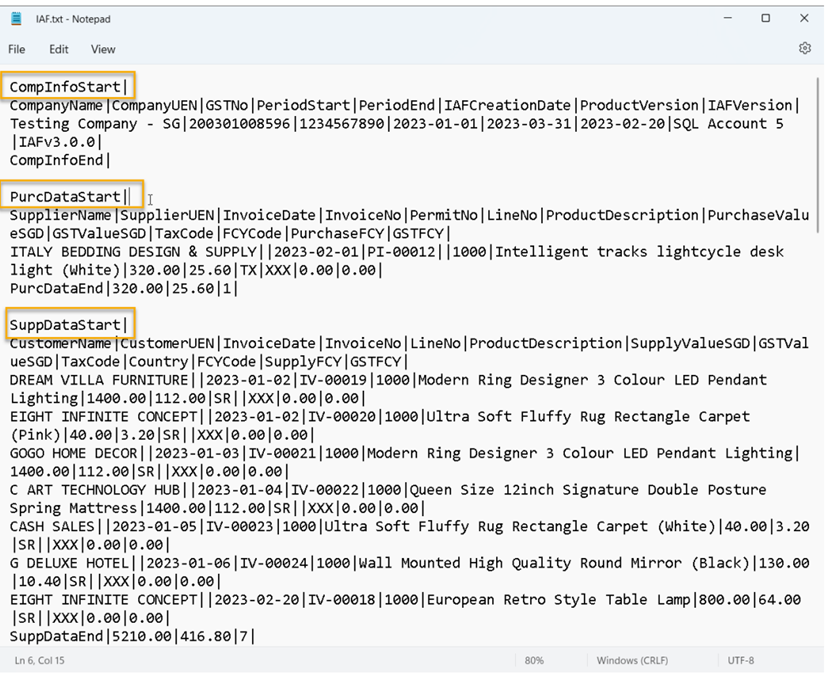
The above is the exported file that has fulfilled all requirements by IRAS
CompInfoStart= Company Information
PurcDataStart = Purchase Transaction
SuppDataStart = Sales Transaction
GLDataStart= General Ledger transaction
You have to submit IAF File upon request by IRAS.
9.8 GST Listing Report
This report is to analyse the detail of GST transactions grouped by tax type. It can be used to check against GST-F5
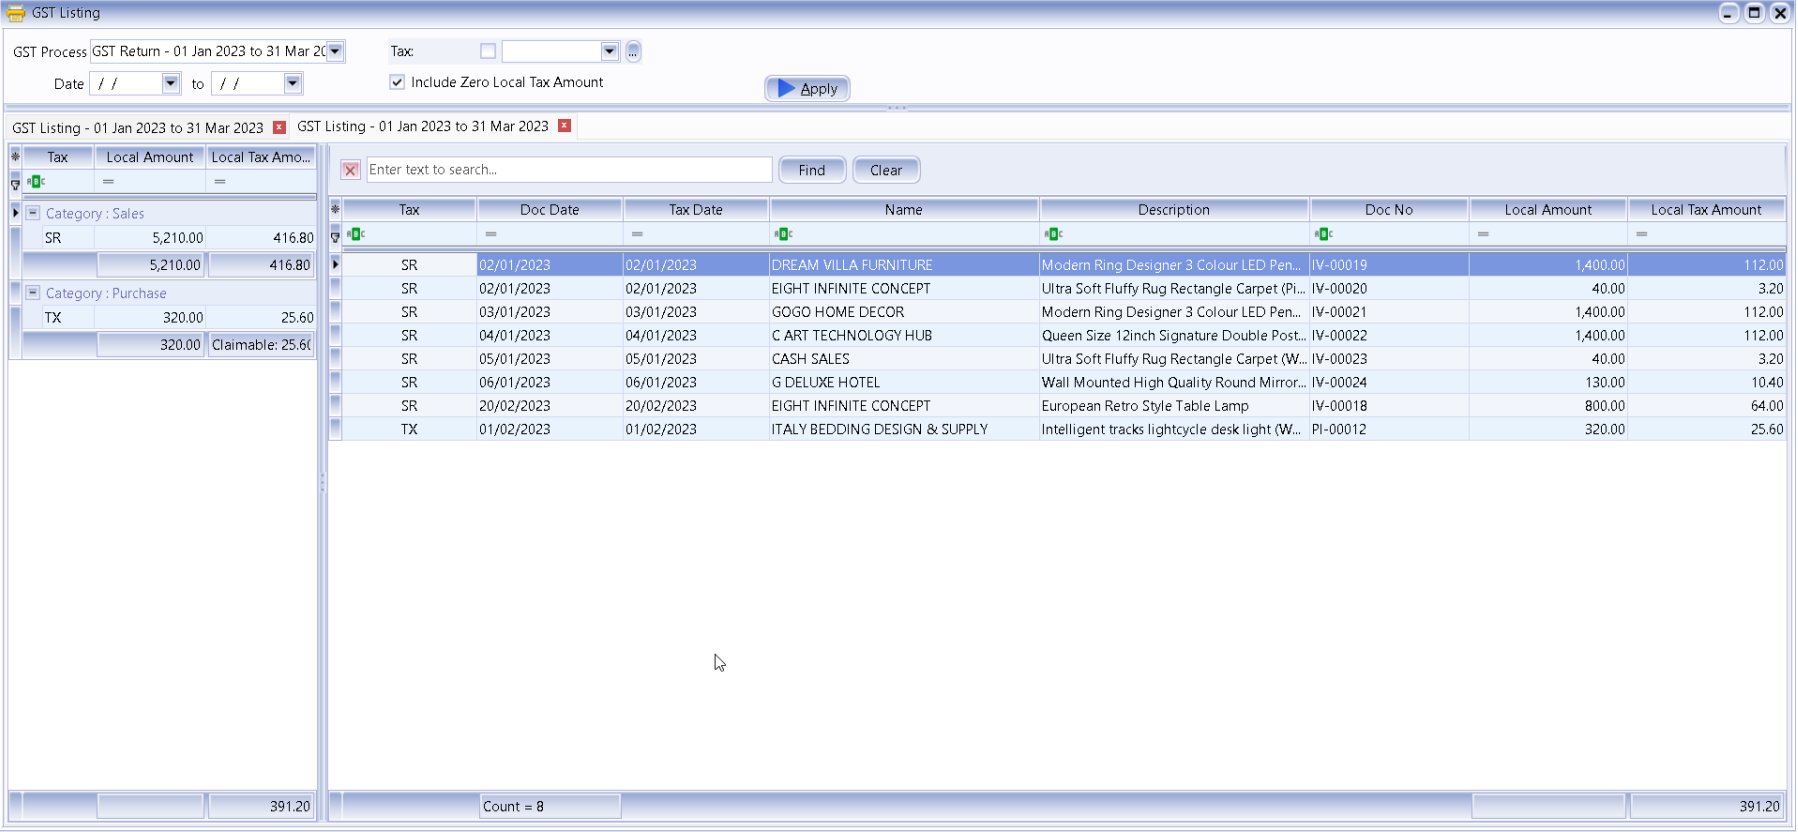
-
GST | Print GST Listing.
-
Filter the date range that you want to apply or you can filter by GST Process, tax code.
-
Click Apply.
-
You can filter any keyword, system will auto filter based on keyword you key

10 Advance GST Info
10.1 Bank Charges Reversal
There are two methods to handle for bank charges GST Reversal :
10.1.1 Direct key bank charges during payment receipt
-
Supplier | Supplier Payment | Bank Charges = Bank Charge Amount (RM 0.50) + GST Amount (RM 0.03).
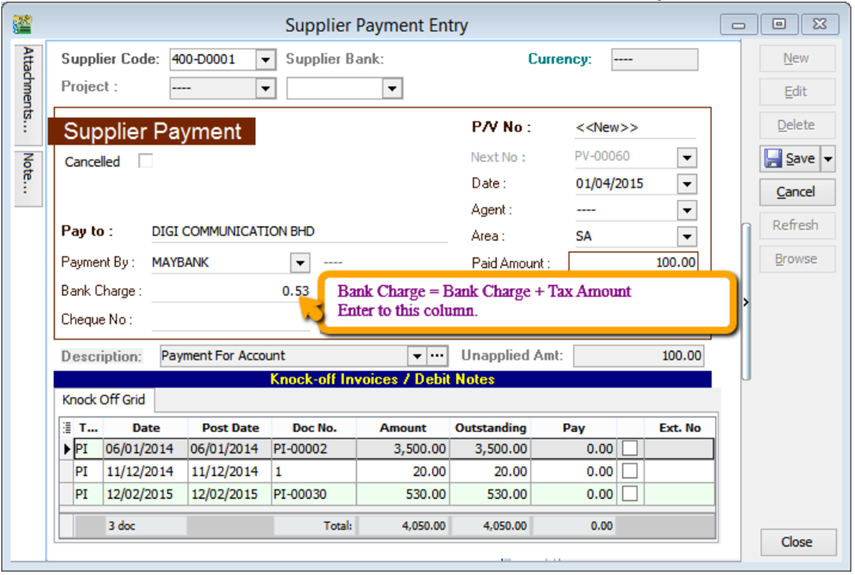
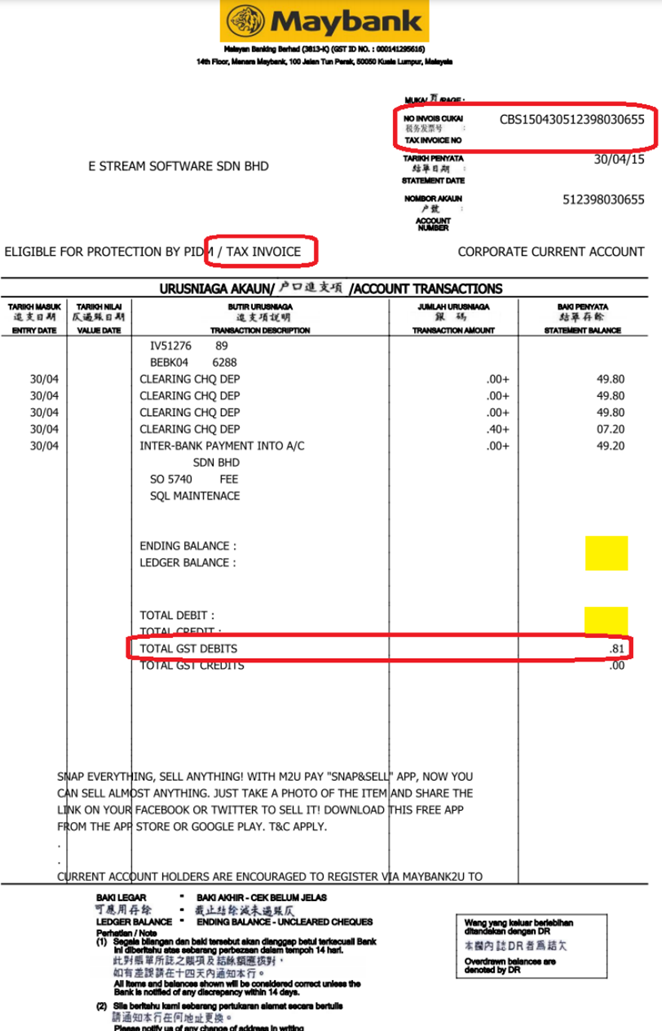
At the month end, you should reverse back total how much for bank charge Tax Amount, may get it from bank Statement. May refer your bank statement as below:
-
GL | Journal Entry | New | Select Bank Charges – GST Reversal.
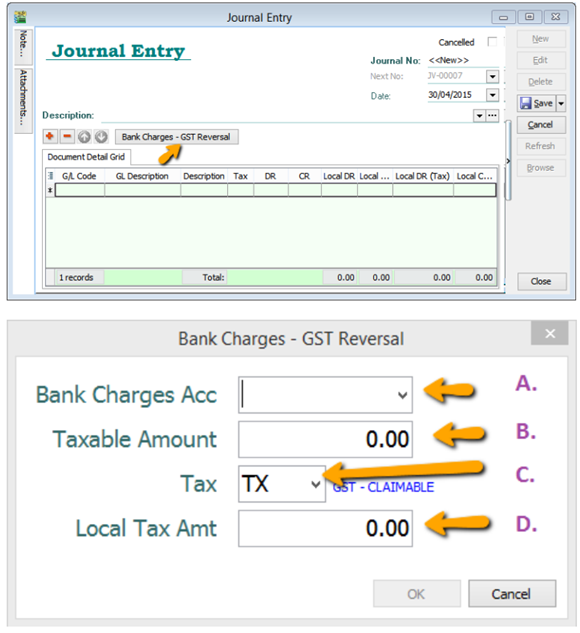
A : Select Bank Charges Account to reverse out.
B : Enter Bank Charges Taxable Amount. (The total bank charges before GST)
C : Select the Tax Code.
D : Enter Bank Charges Tax Amount. (May get it from Bank Statement)
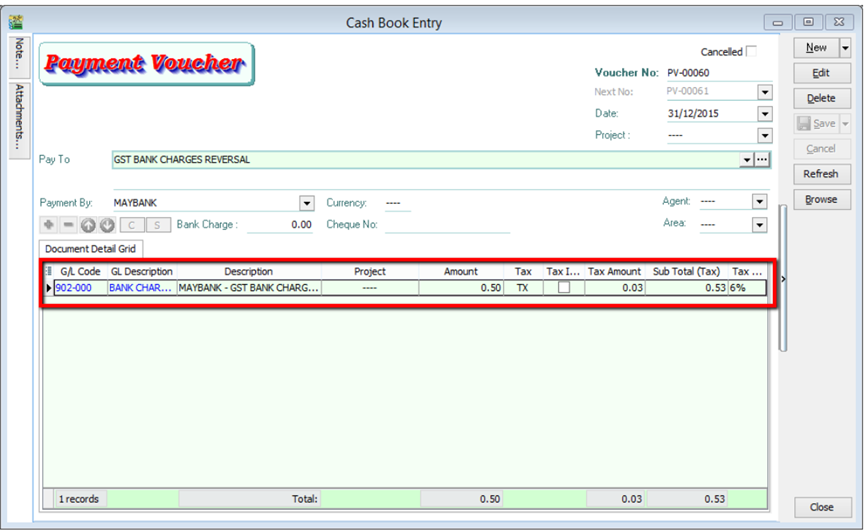
10.1.2 Key Bank Charges Using Payment Voucher
You may use Payment Voucher to capture the bank charges with GST after you received your monthly bank statement. With this method, you don’t have to do GST Reversal at Journal Entry anymore.
- GL | Cash Book Entry | Payment Voucher key in as below :
10.2 Gift / Deemed Supply
When you give away gifts for free (for example, to your customer or your staff), you will need to account for output tax based on the Open Market Value (OMV) of the gifts if:
- The cost of the gift is more than $200 (excluding GST); and
- You had claimed input tax on the purchase or import of the gifts. If you had imported the gifts with GST suspended under a GST scheme such as the Major Exporter Scheme (MES), input tax is regarded as claimed.
10.3 Bad Debt Relief (12 Months)
What is 12 Months “Bad Debt” Relief?
A bad debt situation occurs when money that is owed cannot be recovered. You can apply for bad debt relief from the Comptroller of GST for return of the output tax previously accounted for and paid by you.
On the other hand, if you as a customer have not paid your supplier within 12 months from the due date of payment, you are required to repay to the Comptroller the input tax that you have previously claimed (if any). For more details, please refer to If I have claimed GST before paying my supplier
Company issued an Invoice at 5th January 2022. The 12th month expires as at end of 5th Dec 2022. The bad debt relief can be claimed after in Jan 23 taxable period.

Claiming Bad Debt Relief
- Complete the Self-review of Eligibility to Claim Bad Debt Relief (DOC,128KB) checklist.
- Proceed to make a claim in Box 7 (input tax and refunds claimed) of your GST return if you satisfy all the conditions in the self-review checklist.
You need not submit the self-review checklist to IRAS but you should keep it as part of your records. You may be asked to provide this checklist in the course of an audit.
Time Limit for Claiming Bad Debt Relief
The bad debt relief claim has to be made within 5 years from the date of your supply.
What is 12 Months “Bad Debt” Recover?
When you recover a bad debt i.e. receive payment from your customer after you have claimed Bad Debt Relief, you should repay to the Comptroller the amount calculated according to the following formula:

Scenario B : Invoice issued at 15th January 2022. The 12th month expires at the end of Jan 2023 and the bad debt relief claim in Jan 2023. Payment recovered from debtor in 20th Apr 2023. Then Bad Debt recovered GST must be paid immediately in April taxable period.
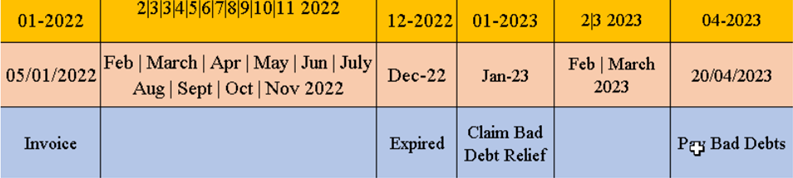
WARNING: “Bad Debt” goes both ways. If you didn’t pay your supplier, then 12 months later you are required payback Kastam then input tax that your business have claim earlier
10.3.1 Bad Debt Relief
In GST era, you are required to take sufficient efforts to recover your customers’ outstanding payment before you claim Bad Debts Relief.
How to be more effort to avoid “bad debt” relief?
Customer Statement
-
Customer | Print Customer Statement | Filter the options accordingly | Apply | Preview | Print.
Customer Overdue Letter
-
Customer Print Customer Due Document Listing | Filter the options accordingly | Select Group By “ Customer Name” | Apply | Preview | Select report “ Customer Overdue Letter” | OK.
The following scenario demonstrates how the system handles Bad Debt Relief automatically. Refer to the listing below there are few invoices in January 2023, assuming company submits GST on a quarterly basis.
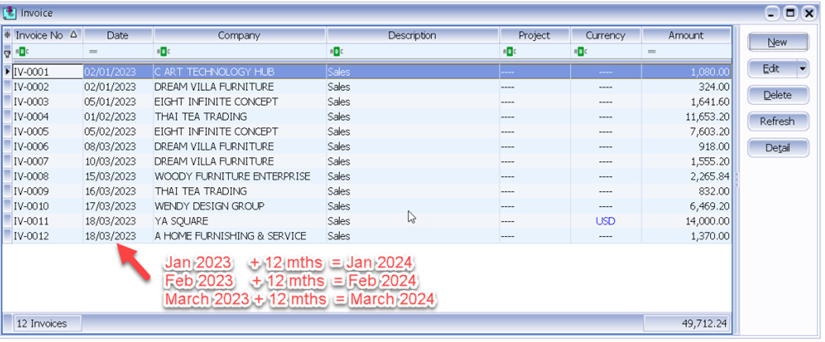
When you process which is from 01/01/2024 until 31/03/2024, the screen below will prompt out :
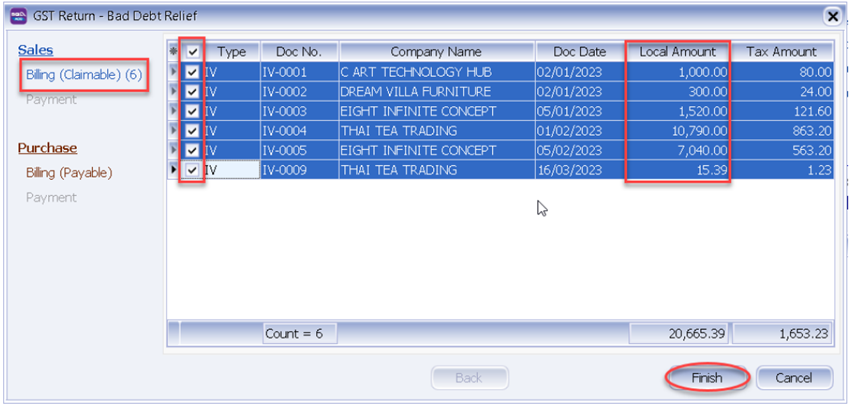
Bad Debt Relief applies to both sales and purchases. In the case of outstanding purchase invoices for which you had claimed input tax 12 months ago, you are required to refund the corresponding amount to IRAS. However, there's no need to worry as the system will automatically handle this issue for you.
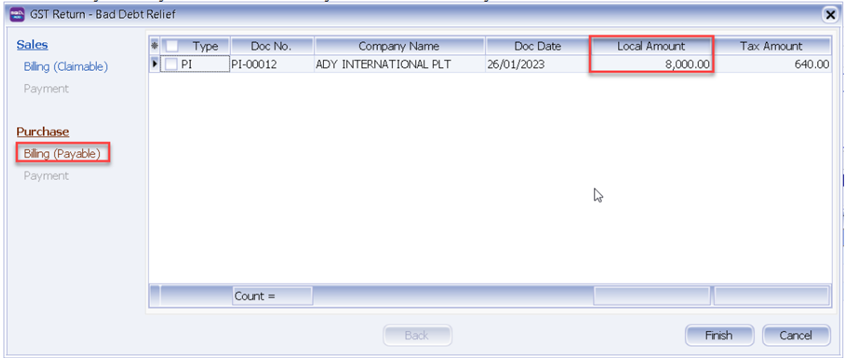
And you can see those outstanding purchase invoice will appear in the list under Purchase | Billing (Payable).
10.3.2 Bad Debt Recover
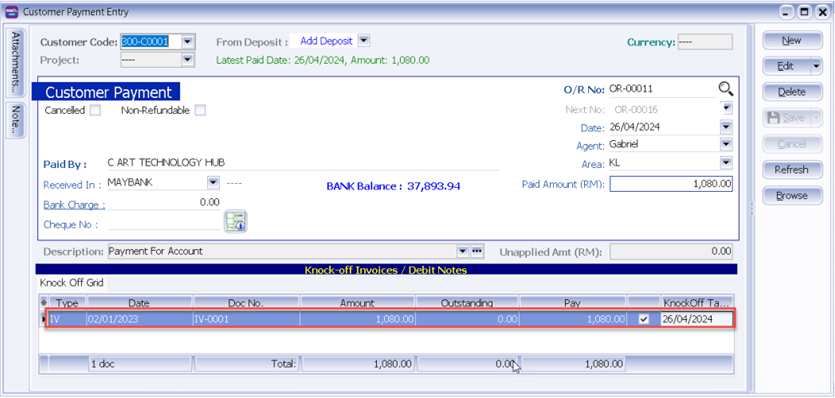
Bad Debt Recovery occurs when customer makes their outstanding payment after you have processed the Bad Debt Relief. For instance, if we received customer payment on 26/4/2024, refer below step:
-
Issue Customer | Customer Payment | and knock off the invoice which have 12 months bad debt relief.
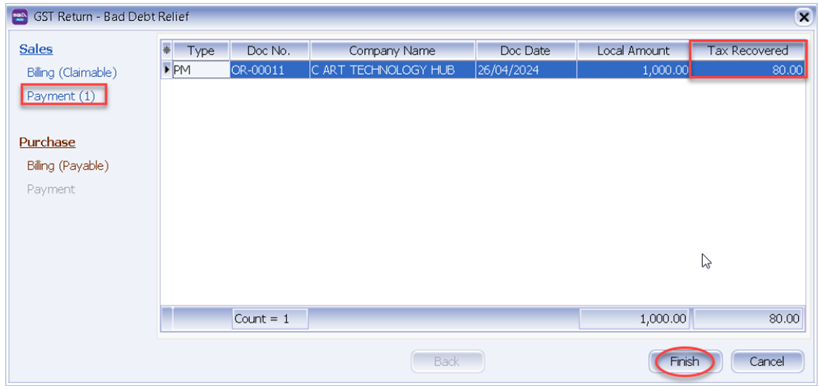
-
After this we process to GST Return from 1/4/2024 until 30/06/2024, system will auto list you the both payment with the tax recover figure.
10.3.3 Double Entry (Bad Debt Relief)
Bad debt relief and recovered the double entries are auto posting when process the GST Return as follow:
-
For customer bad debt relief claim
Tax invoices over 12 months not payment has received from Customer (GST registered). Output tax has been paid to Custom in previous GST Return, it can be claim back from Custom as Input Tax (GST Claimable).
A/c code A/c Description Tax Code DR CR GST-101 GST-Claimable SL-AJP-BD 80 GST-202 GST-Sales Deferred Tax SL-AJP-BD 80 -
For customer bad debt relief recovered
Input tax has been claimed as bad debt relief and later on received a payment from customer. It has to be pay back to Custom as the Output Tax (GST Payable).
A/c code A/c Description Tax Code DR CR GST-202 GST-Sales Deferred Tax SL-AJS-BD 80 GST-201 GST-Payable SL-AJS-BD 80 In ledger report,
- GST-Sales Deferred Tax
Year.Month Description Tax Code DR CR Balance Balance B/F 0 2024.03 Any adjustment made to Input Tax (e.g: Bad Debt Relief) SL-AJP-BD 80 (80) 2024.06 Any adjustment made to Output Tax (e.g : Bad Debt recover & outstanding invoice more than 6 months) SL-AJS-BD 80 0 -
For supplier bad debt relief payable
Any supplier tax invoice has claimed the input tax and no payment have been made over 12 months. Input tax has been claimed in previous GST Return, it has to be paid back to Custom as Output Tax (GST Payable).
A/c code A/c Description Tax Code DR CR GST-102 GST-Purchase Deferred Tax PH-AJS-BD 640 GST-201 GST-Payable PH-AJS-BD 640 -
For supplier bad debt relief recovered
Output tax has been paid back as bad debt relief payable and later on made a payment to supplier. It can be claim back from Custom as the Input Tax (GST Claimable).
A/c code A/c Description Tax Code DR CR GST-101 GST Payable PH-AJP-BD 640 GST-102 GST-Purchase Deferred Tax PH-AJP-BD 640 In ledger report,
- GST-Purchase Deferred Tax
Year.Month Description Tax Code DR CR Balance Balance B/F 0 2024.03 Any adjustment made to Output Tax (e.g : Bad Debt recover & outstanding invoice more than 6 months) PH-AJS-BD 640 640 2024.06 Any adjustment made to Input Tax (e.g: Bad Debt Relief) PH-AJP-BD 640 0
11 E-Invoicing
11.1 Register for Peppol
-
Go to File
-
Click on Company Profile
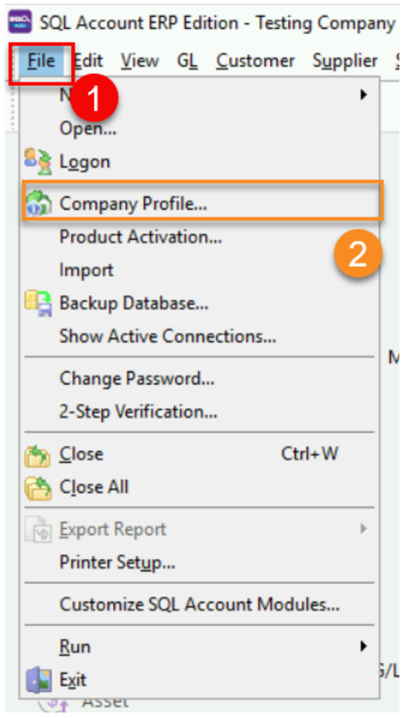
-
Click on Peppol Tab
-
Click on Register As Peppol User to register your own company Peppol ID
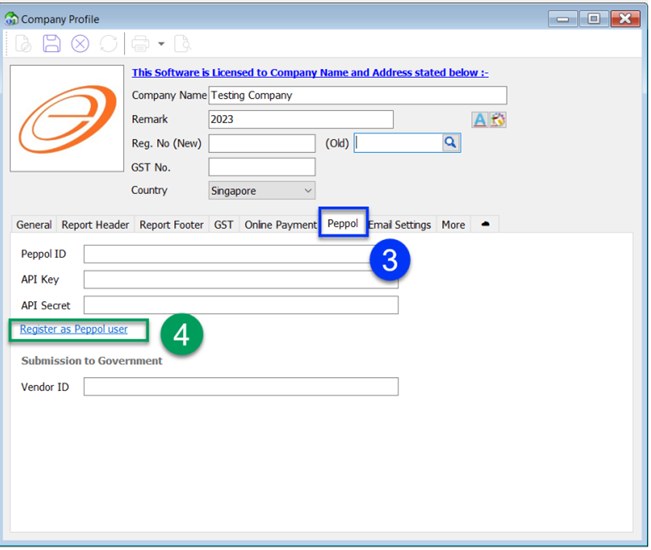
-
It will be directed to our website to complete the required details
Upon successful registration, user will receive notification email from Datapost within 1 to 3 working days. Once registered , your company Peppol ID will be listed in Singapore Peppol Directory

Please note that obtaining the API Key and API Secret will incur additional charges
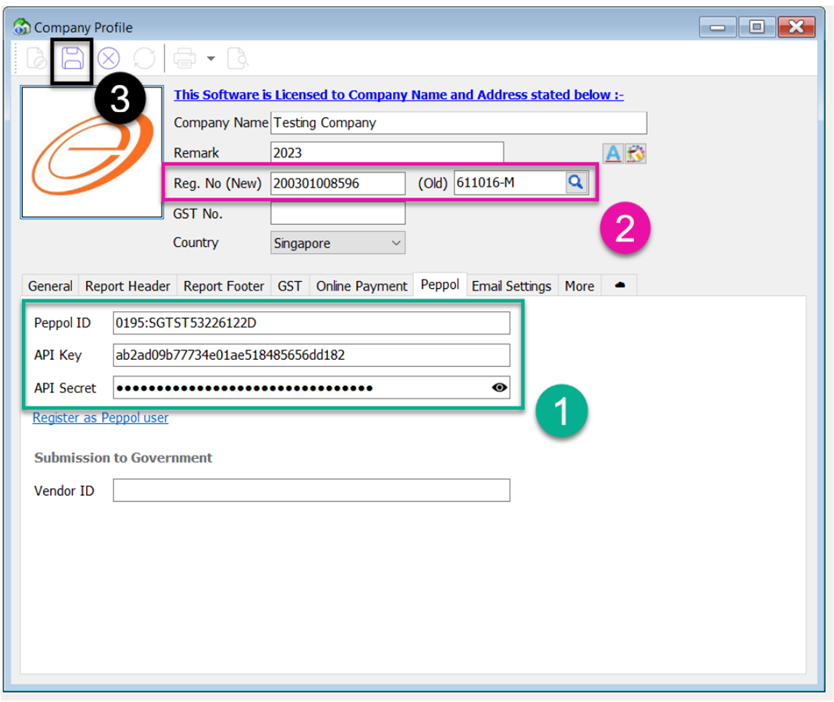
11.2 Setting Peppol In Company Profile
11.2.1 B2B (Business To Business)
-
Once received, key your Peppol ID , API Key and API Secret in Peppol Tab
(API key and API Secret can be found in your Peppol online portal)
-
Fill in your company UEN Number in Reg.No (New)
-
Save
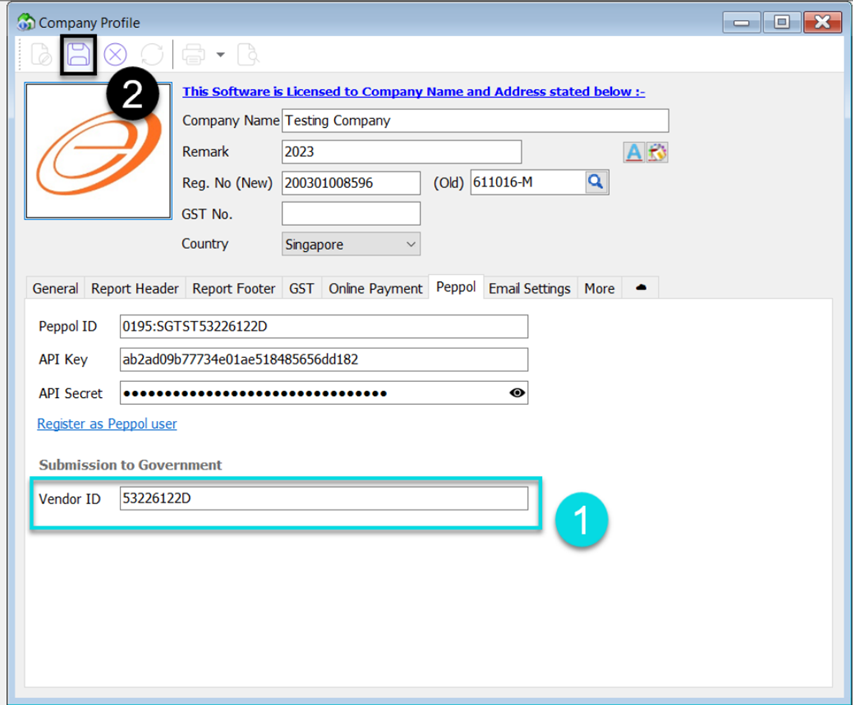
11.2.2 B2G (Business To Government)
-
Fill in your Vendor ID registered on Vendors@Gov
-
Save
11.3 Maintain Customer & Supplier Peppol ID
-
Go to Customer
-
Click on Maintain Customer > Double Click your customer
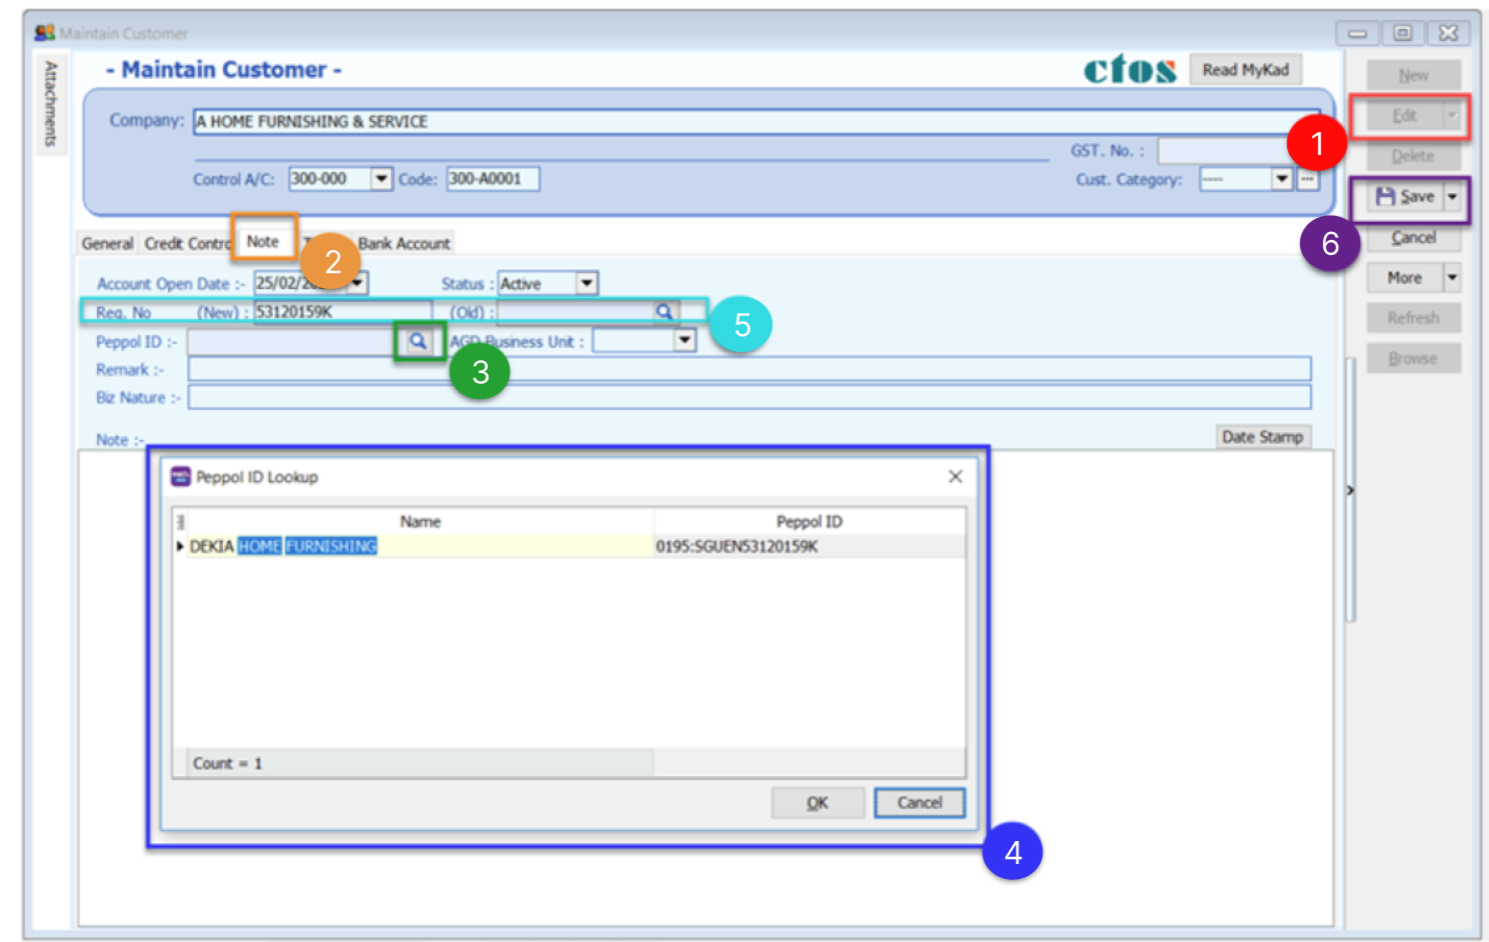
11.3.1 Peppol B2B (Business To Business)
-
Click on Edit
-
Select Note Tab
-
Click on the ‘magnifier’ button to search customer peppol ID
-
Select the Customer Company Name to get Peppol ID (When you input your Peppol details, the system will automatically update your UEN Number. Please double check to ensure its accuracy.)
-
Fill in customer UEN number in ‘Reg. No (New)
-
Click Save
11.3.2 Peppol B2G (Business To Government)
-
Peppol ID must be : 0195:SGUENT08GA0028A
-
Must fill in your customer Business Unit
Please enquire with your client agency to get accurate Business Unit to indicate
-
If the Business Unit given from your client agency is not listed, please type it manually and click on the blue text
For Example : IMDA1 not listed , click the IMDA1
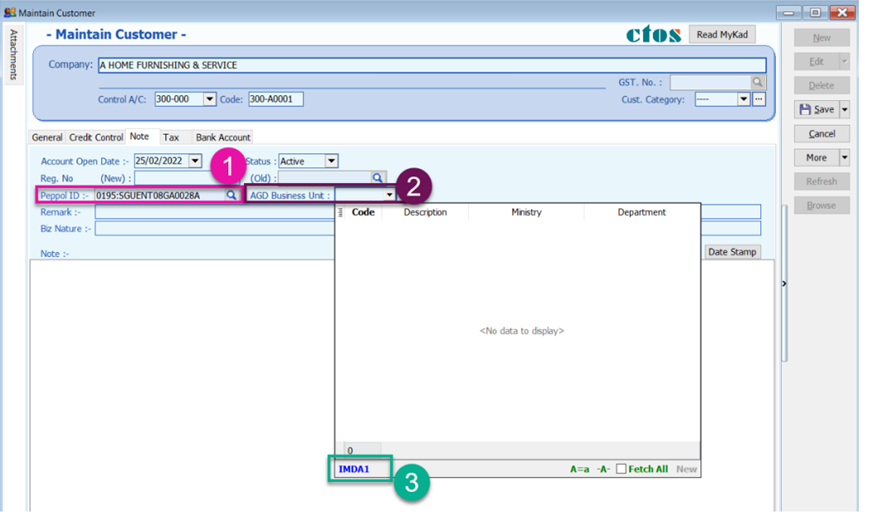
For Supplier : Go to Supplier > Maintain Supplier > Edit > Note Tab
11.4 Send Sales Document from SQL Account
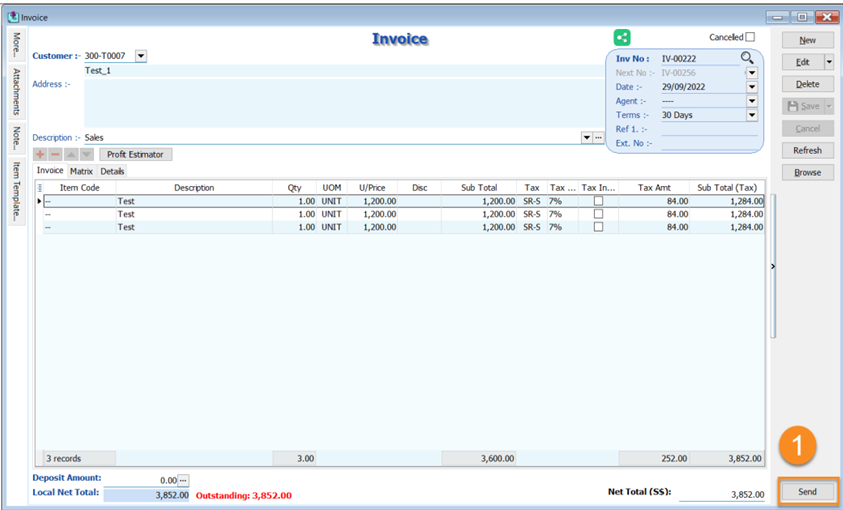
11.4.1 Send Document by B2B (Business To Business)
-
Once the sales invoice / Sales Credit Note is prepared, Click Send button to send your document to Peppol.
Make sure the Peppol ID and UEN Number had filled in correctly in Maintain Customer
11.4.2 Send Document by B2G (Business To Government)
B2G follows the same steps as B2C, but B2G's Peppol ID must be 0195:SGUENT08GA0028A (refer Topic 11.3.2). Additionally, there are additional validations for B2G transactions.
11.5 Item Code Mapping
Item codes for items in the Peppol document will be automatically selected if there is a matching description.
-
Click Stock
-
Click on Maintain Stock Item
-
Click Edit
-
Click on Supp. Item tab
-
Click ‘+’ button
-
Fill in your supplier code and description
-
Save
After done settings, when you import a document from Peppol, the items will be automatically mapped item code and displayed as shown in the picture below, as an example:
-
Supplier Code and Supplier Name matched
-
Item Description matched
-
Item Code set automatically
You can manually map item codes during the invoice import process even if you not follow this step to map item code
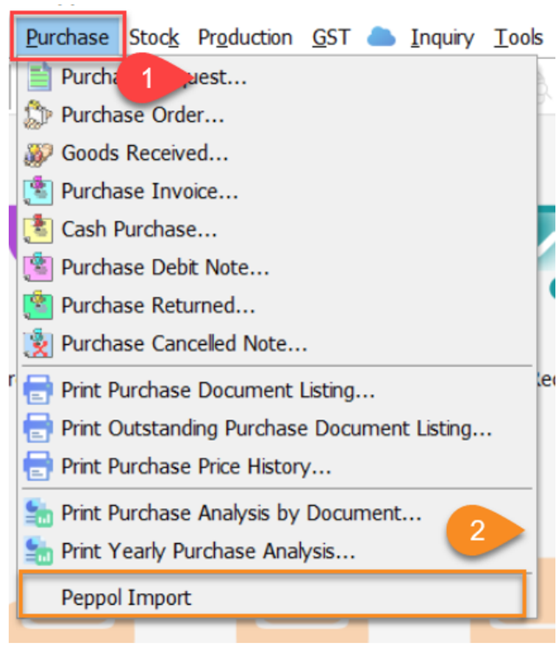
11.6 Import Purchase Document into SQL Account
-
Purchase
-
Peppol Import
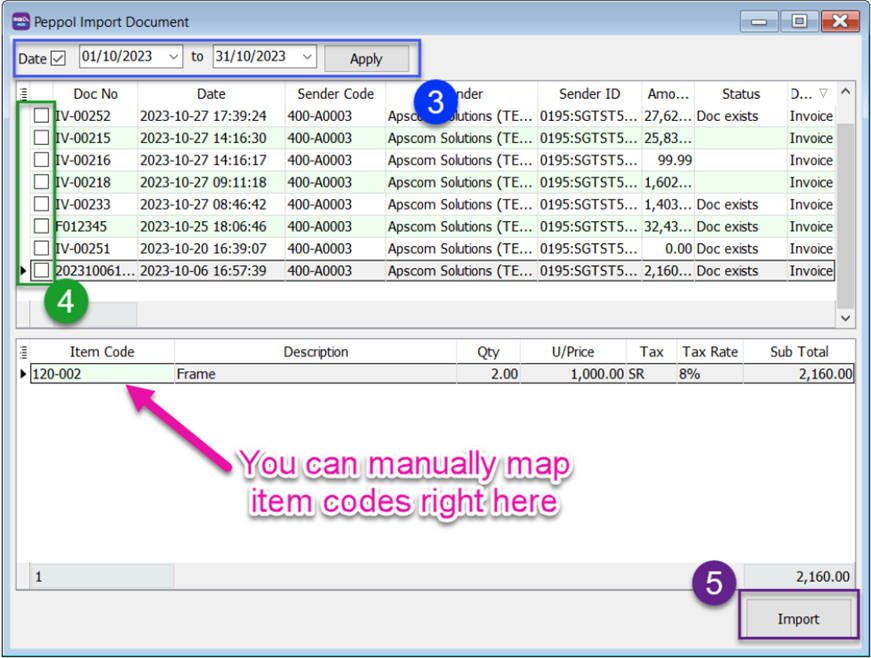
-
Select date range and click Apply
-
Tick the checkboxes to select documents to import
-
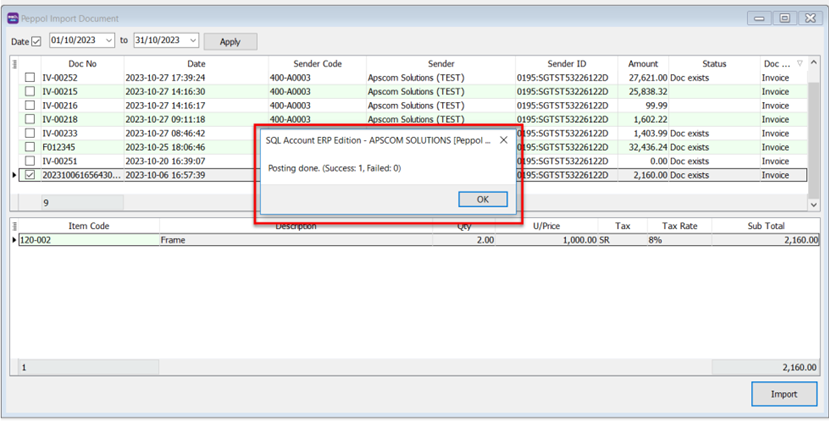
Click Import button
A pop up message will show for Posting Done
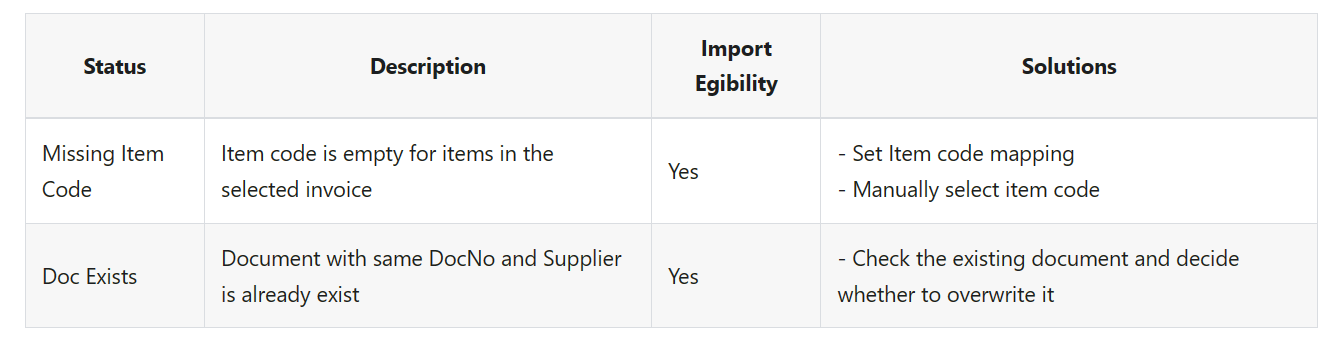
11.7 List Of Status
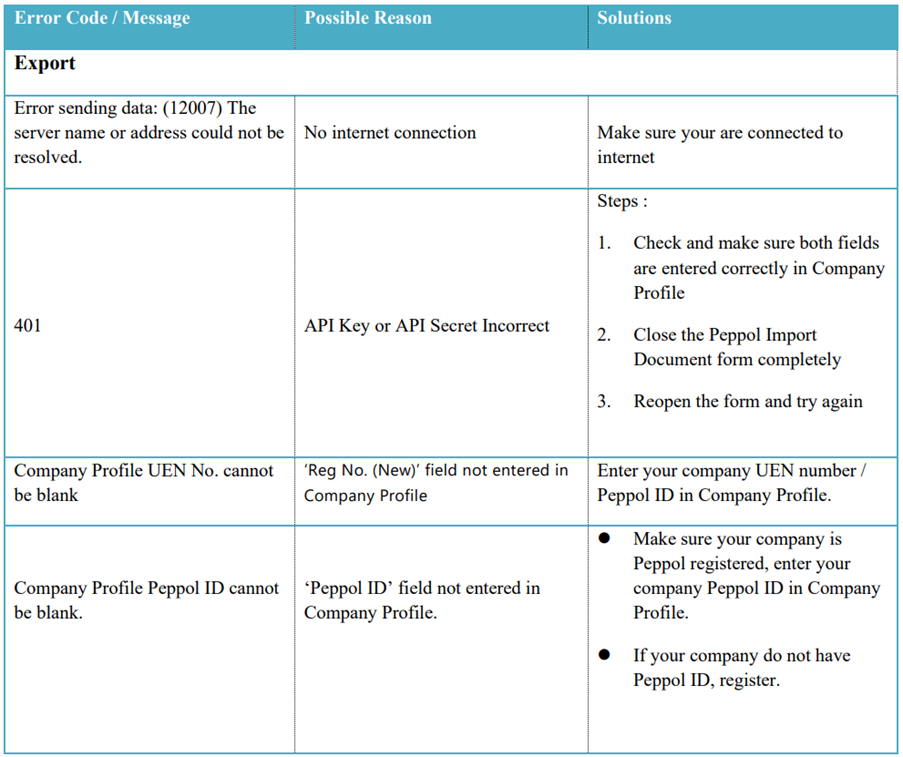
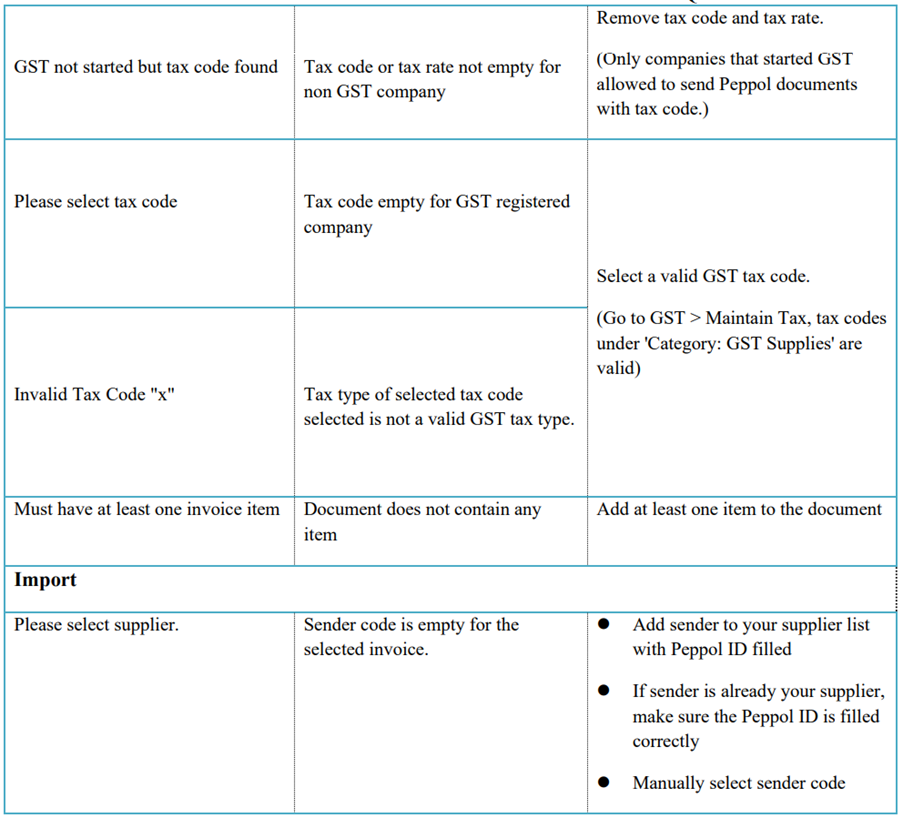
11.8 Error code and Message
12 Tools
12.1 Maintain User
-
Select Tools | Maintain User | New
-
Enter the Code and Name (both can be the same e.g. Code = ALI, Name = ALI)
-
Click on More Options and look for Change Password.
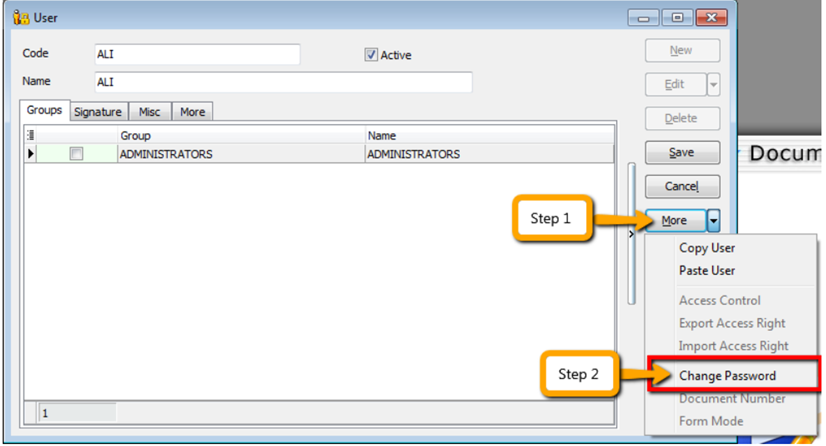
-
Click Save. Your new user account is now created.
infoSQL User license is per concurrent basis (i.e. how many users can login to the system at the same time). This mean that if you have 5 staffs in the office who can access SQL but you only 3 license for 3 concurrent users, you can still maintain all 5 users in the system but only 3 users can login and access at the same time.
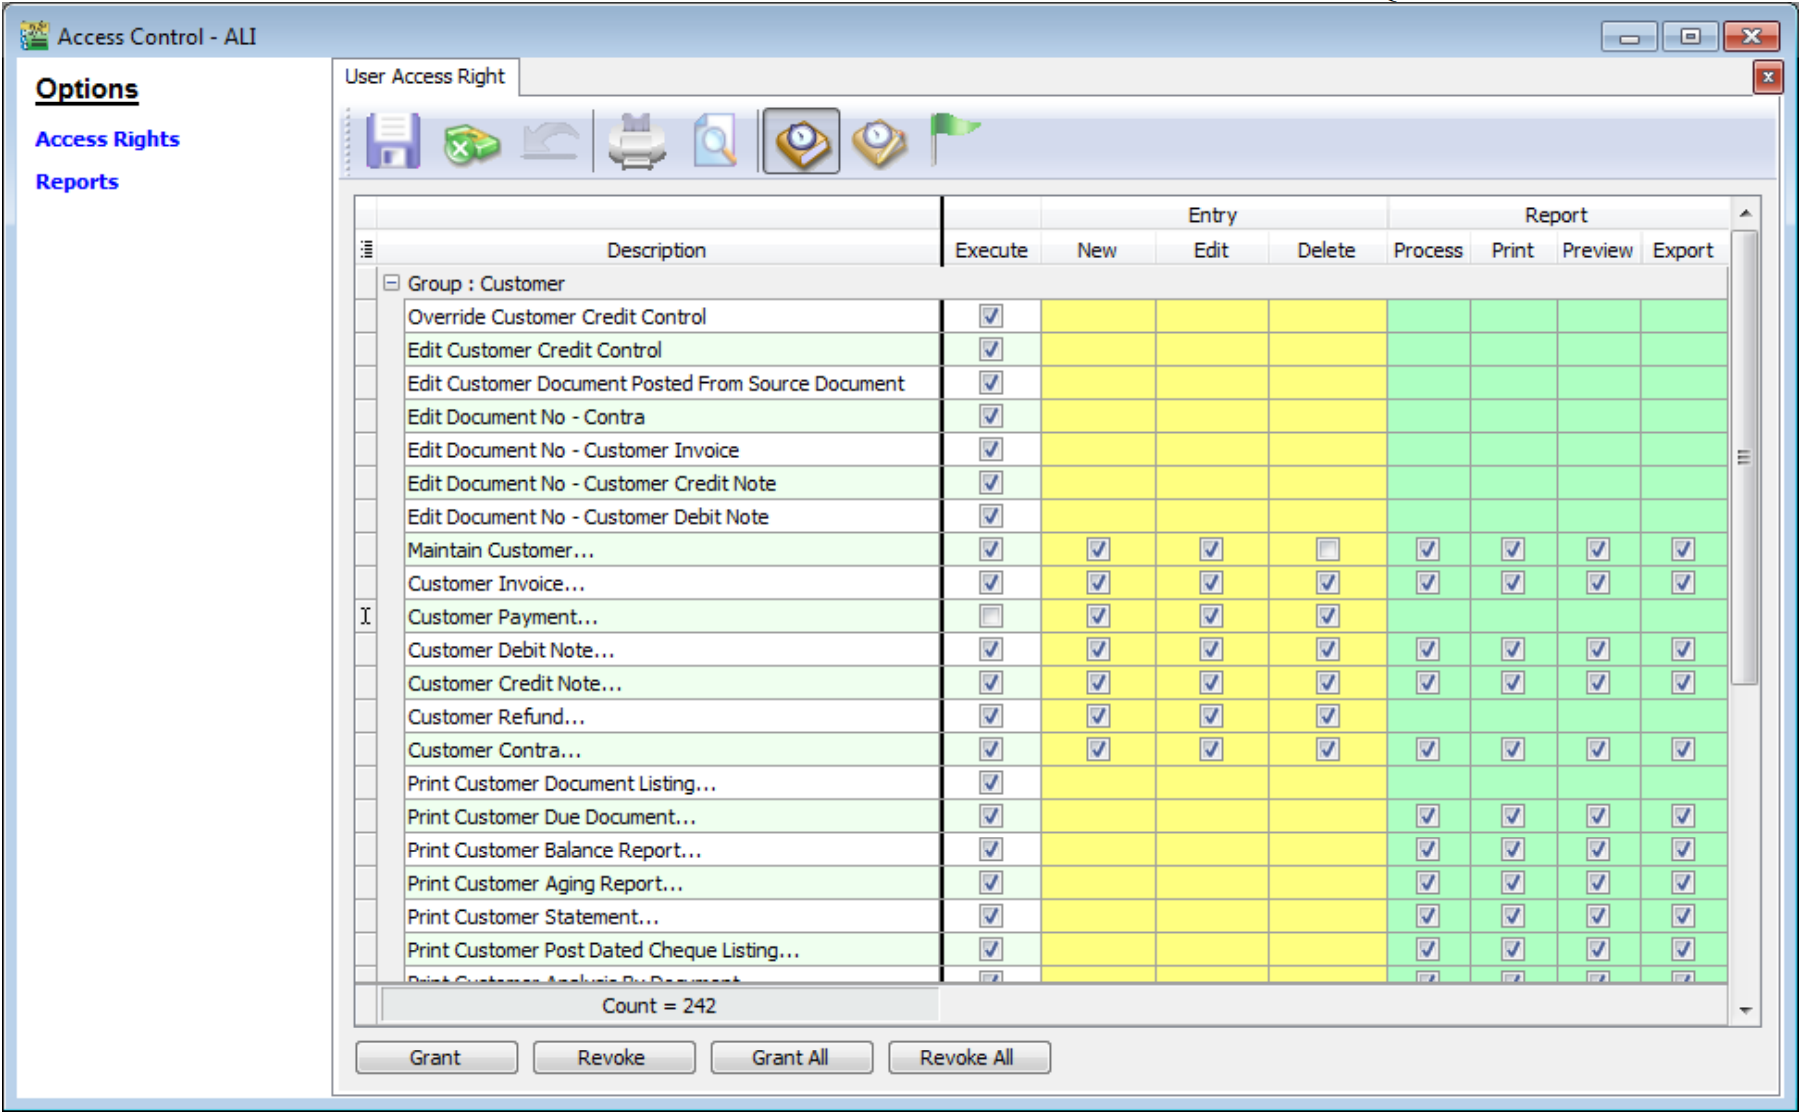
12.1.1 User Access Right
Not every user is going to have the same access rights as ADMIN, and ADMIN user might want to set security control settings in system.
-
Select Tools | Maintain User | Edit for the user that you want to set the access right fors.
-
Click on More Options and look for Access Right.
-
You need to check the transactions / functions (row), compare with the user (column) and tick = Allowed or untick = Disallowed, the action for a particular user for particular transactions. For example, base on the setting in the following images, the user is not allowed to delete Customers or to view Customer Payments.
12.2 Maintain Document Number
You can maintain document number format and next number.
-
Tools | Maintain Document Number.
-
Insert description for the particular set of document and select a document type (e.g. Payment Voucher)
-
The system’s defaults is the Format %.5d, where “%” is the formula which allows the function to auto-run for the document number while 5d stands for 5 digits.
Standard Numbering format:
Format Descrption %.nd n is the numeric value (i.e. the number of character to be shown e.g. %.5d = 5 character) {@dd/mm/yyyy} This will follow the document date. E.g. If the document date is 15 Jan 2016 then it will show as 15//01/2016 followed by the running format eg {@dd/mm/yyyy -%.5d}, next number is 12345 then output will be 15/01/2016-12345 -
You can select the Frequency option as Never Reset or others.
-
Set the Next Number for this document.
12.3 Maintain Acceptable Transaction Date
Maintain Acceptable Transaction Date allows you to control which documents you are allowed to maintain (New, Edit) based on their dates.
Brief – Any document which date falls within the allowed transaction dates. CAN be edited vice-versa, any document which date falls outside the allowed transaction dated CANNOT be edited/created.
-
Tools | Maintain Acceptable Transaction Date
-
Click on Append (Icon with + symbol)
-
Choose the period which you want to allow transactions
-
Save.
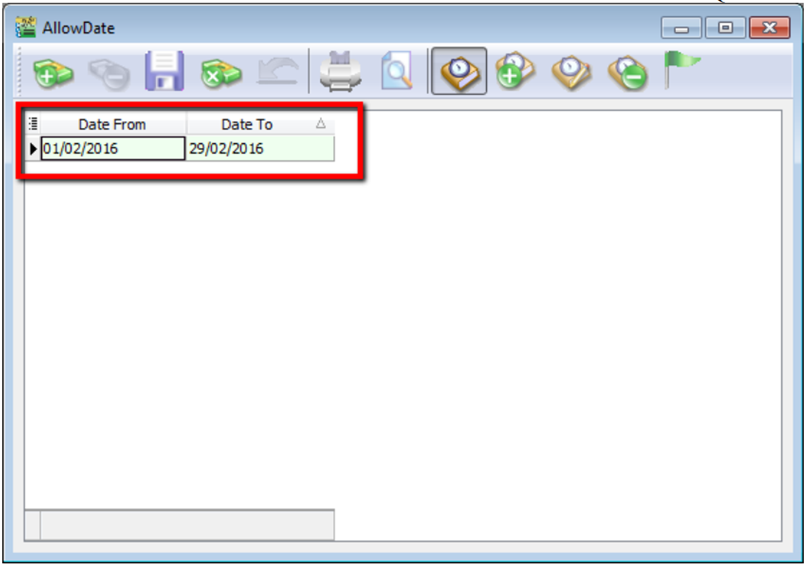
Example: Date From (01/02/2016) & Date To (29/02/2016) allows an Invoice with date (08/02/2016) to be edited/created.
If a user tries to enter the date of an Invoice as (01/01/2016) which falls outside the allowed period, it will be blocked. An error message of “Transaction date {dd/mm/yyyy} falls outside acceptable transaction date. Do you want to save it?” If the user click “Yes” a dialogue box will request override permission by ID/PW with rights to override it.
Please maintain access rights before allowing any user to override the acceptable transaction date.
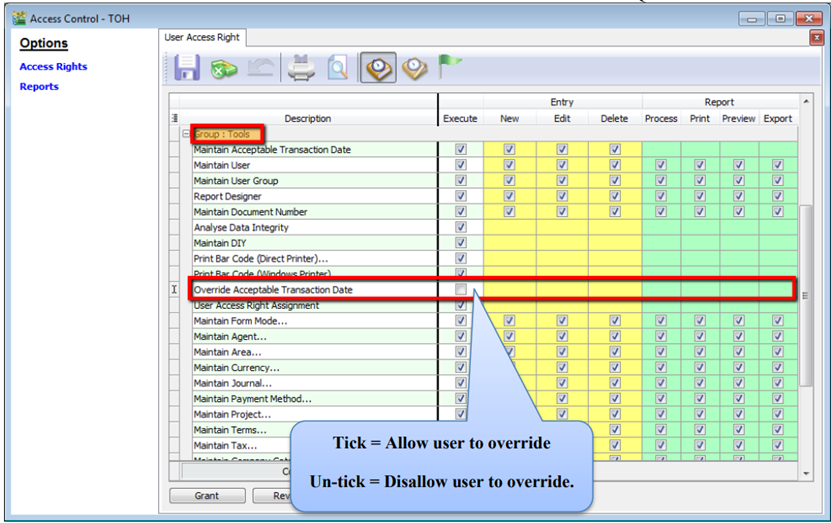
12.3.1 Override Acceptable Transaction Date
To override i.e. save a document that falls outside the acceptable transaction dates, you will need to be logged-in as a user with the right to override acceptable transactions dates.
-
Tool | Maintain User. Double click on the user that you want to edit.
-
Click on More | Access Control
-
Under Group Tools, tick or untick the option of Override Acceptable Transaction Date to allow or deny the user from having the overriding right to save a document out of the acceptable transaction period.
-
Save the access right.
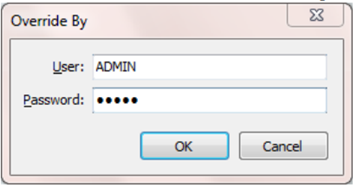
If the user Is not permitted to override, the system will prompt with an option and you can choose either
- OK = cancel saving
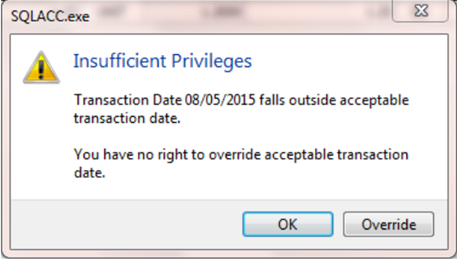
- Override = Enter user the ID and password of a user who can override then save the transaction.
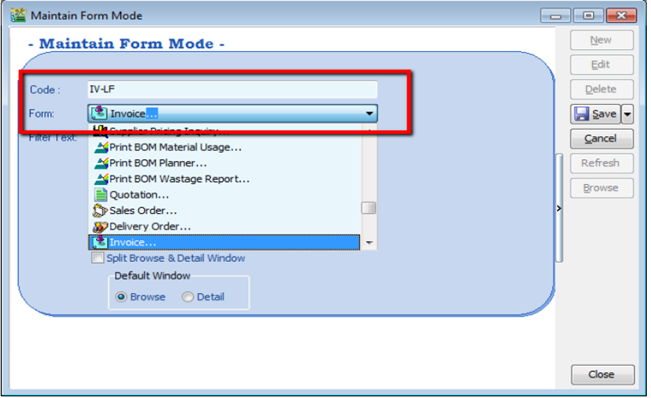
12.4 Maintain Form Mode
Form Mode helps to filter data based on defined criteria. It is used to restrict users to view only specific sets of data for a certain document. For example, agent Lip Fong' can view and access the sales invoices belonging to his agent code LF ONLY.
-
Tools | Maintain Form Mode | New.
-
Enter Code & Select the document form that you want to filter, e.g. Invoice
-
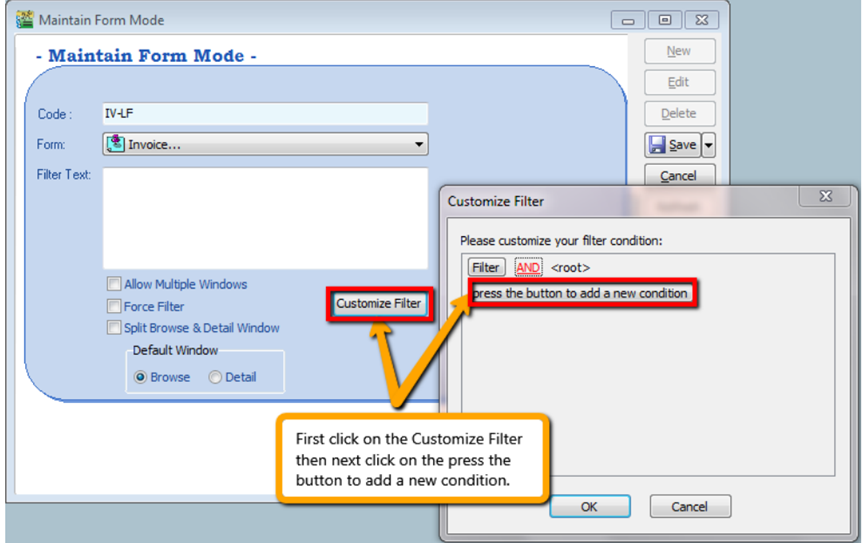
Click on the Customize Filter and then click on the press the button to add a new condition.
-
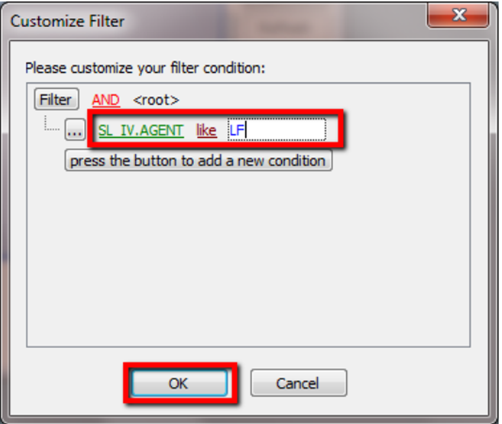
Change the “SL_IV.DOCKEY” to “SL_IV.Agent” because right now I need to filter based on sales invoice agent field, then change the “= equals” to “like” after that enter the agent code that you want to filter and click on OK.
-
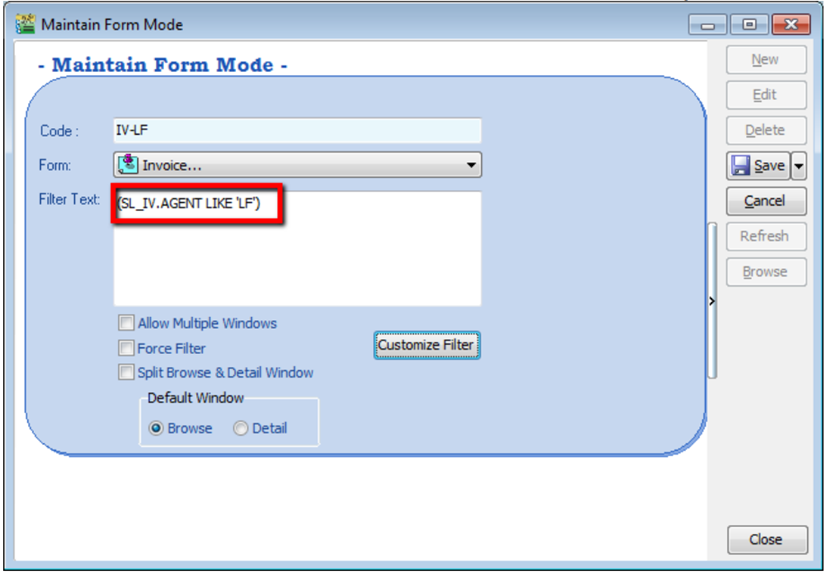
Make sure the info is updated correctly then you can Save
Other optional setting:

-
If you have set more than 1 form mode, once you click Sales | Invoice | you will get the prompt browse mode to choose which form mode that you want to apply.
12.4.1 Form Mode VS User
How do I apply the format mode on a specific user?
-
Tools | User Access Right Assignment…
-
Under the list of security, click on form mode
-
Select the user, eg: user code: LF (Lip Fong)
-
Tick to apply the form mode, e.g. tick form mode: IV-LF and click Save
12.5 Maintain Terms
Maintain Terms allows the user to maintain their Customer and Supplier terms. In SQL there are 3 types of different terms for you to assign.
-
Tools | Maintain Terms | New
-
Insert Code, Description and allocated Term Type.
- Due in number of days – Means how many days until document is due, e.g. if you set 30 days then the document will be due on the 30th day from the document date
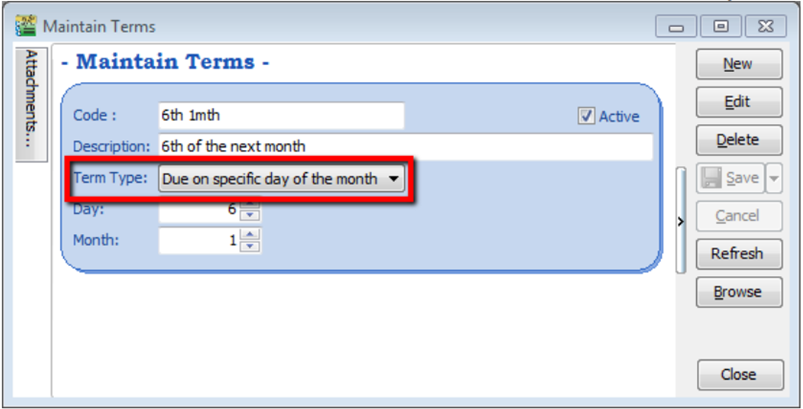
- Due on specific day of the month – Means how many months and which day the document is due, e.g. if you set it as 1 Month 6 Days the document will be due on the 6th of the next month.
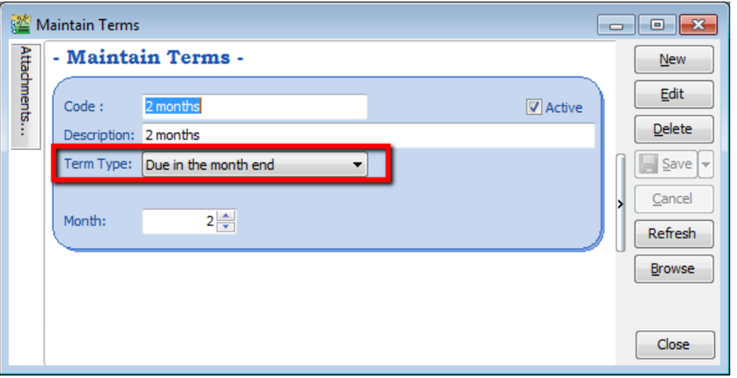
- Due in the month end – Means how many months until the document is due at the end of the final month, e.g. if you set it as 2 months, the document will be due at the end of 2nd month.
12.6 Maintain Currency
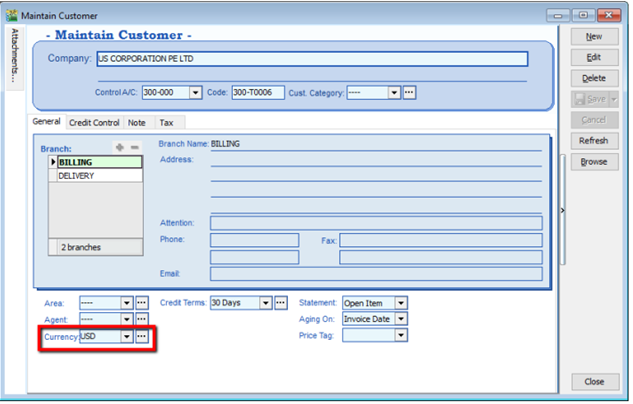
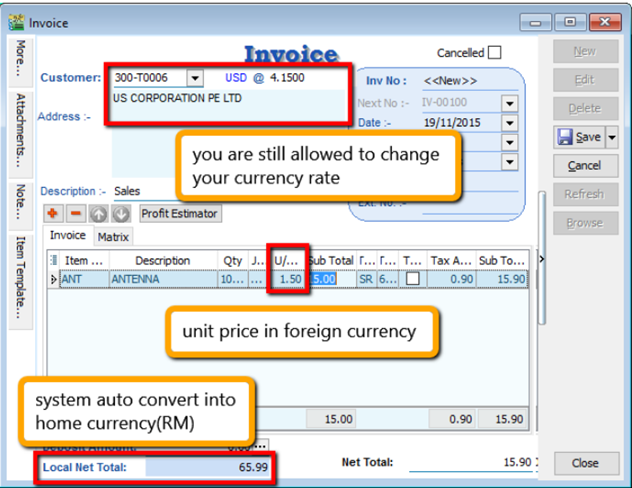
You can bill overseas customers & suppliers in foreign currencies e.g. USD, SGD, Euro & etc. (Prof Package Inclusive)
-
Tools | Maintain Currency | New
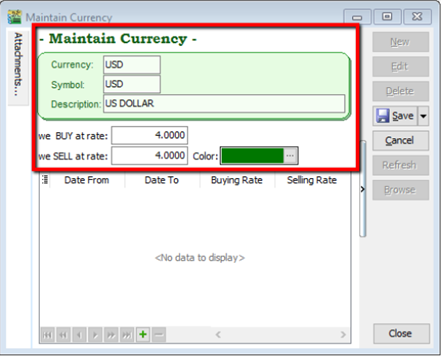
-
Maintain Customer / Supplier to assign the currency
-
Sales document, select the customer, sample as below:
12.7 Maintain Payment Method
Maintain Payment Method allows user to maintain cash and bank account, you cannot create new entries under maintain payment method because its follows the setting of GL | Maintain Chart of Account, you are only able to change some settings in maintain payment method.
-
Tools | Maintain Payment Method | Edit.
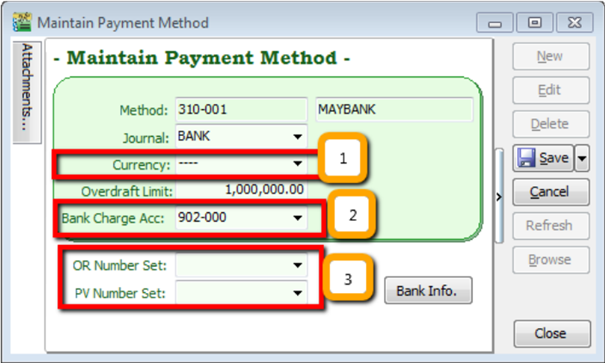
- Currency – You can select the currency for the particular payment method, so that the payment method will be in foreign currency payment. (Requires Advance Currency Module)
- Bank Charge Acc – You can pre-set bank charges account to the payment method accordingly.
- OR & PV Number Set – Set default running document number for the particular payment method.
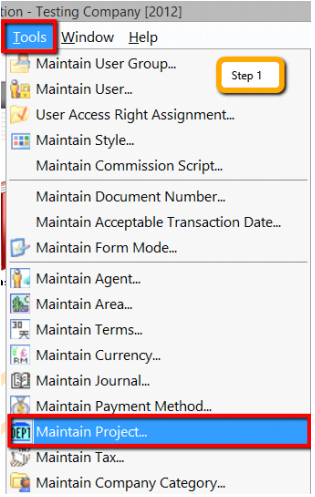
12.8 Maintain Project (Required Project Module)
This module allows the user to maintain the project accounting on a branch or departmental basis, the user can use this module for simple construction business as they get to view Profit and Loss / Balance Sheet by Project.
-
Click on Tools | Maintain Project.
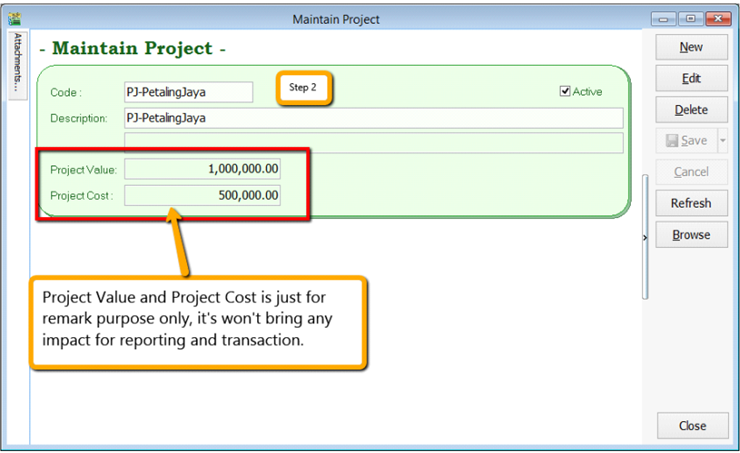
-
Insert Project Code & Description. Project Value and Project Cost is not compulsory fields to fill in, if you have filled in then it is for remark purpose.
-
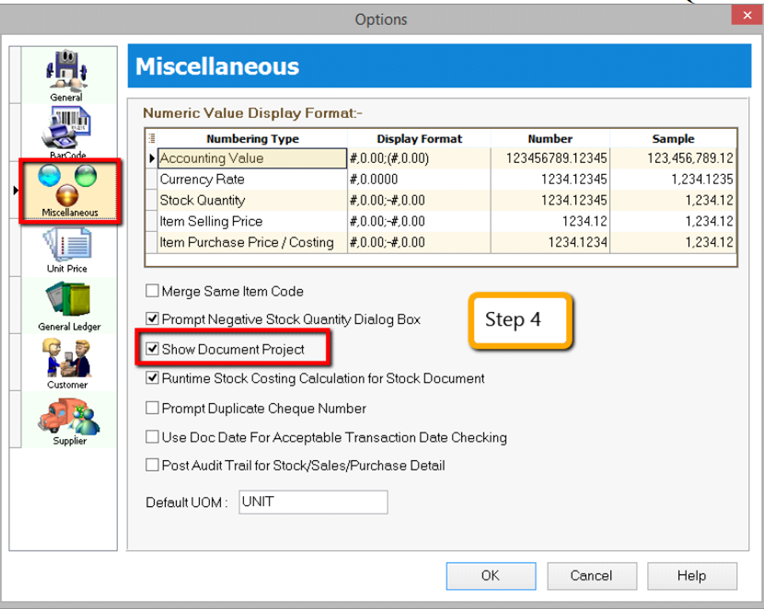
Click on Tools | Options.
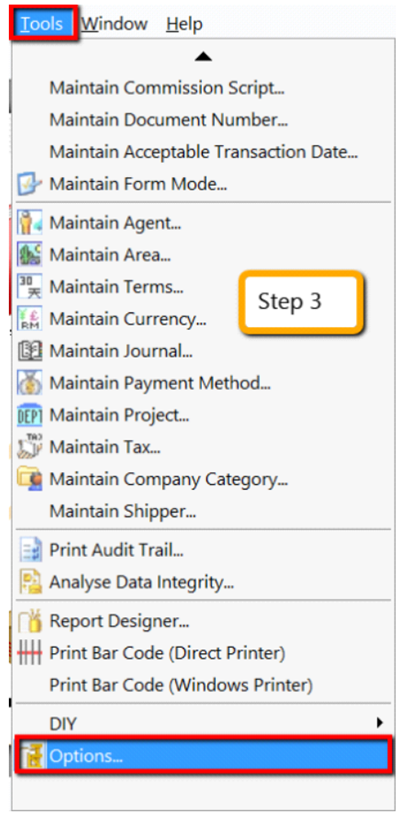
-
Then look for Miscellaneous | Make sure the option “Show Document Project” is ticked.
-
During sales and purchase transactions, make sure you can the project column, then update accordingly
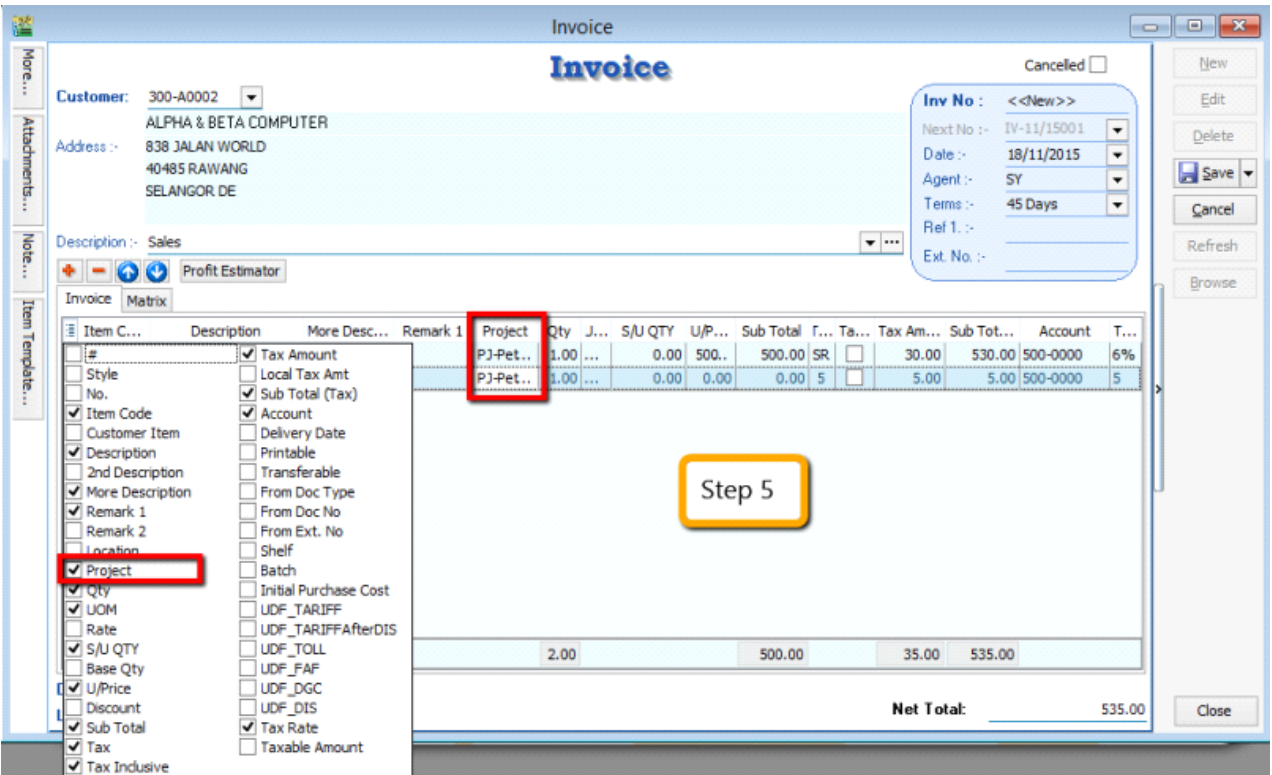
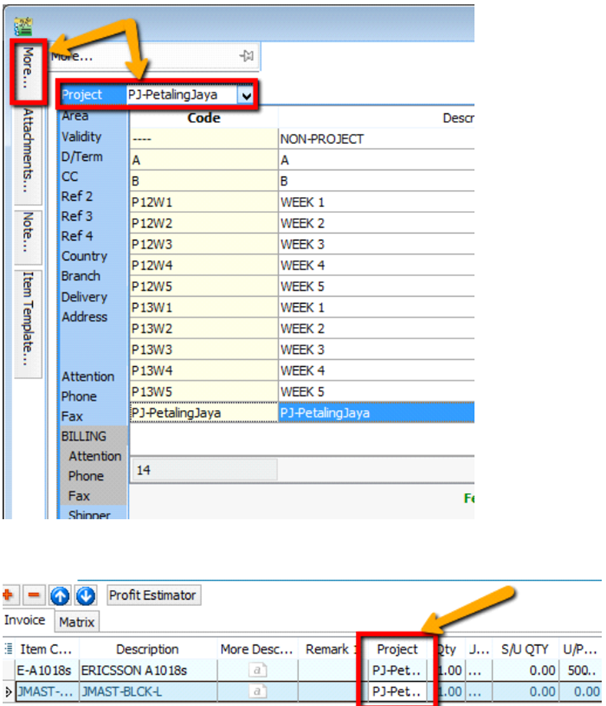
When keying-in a transaction, some users will ask why is there a project at item detail and another beside the Customer | More tab?
What is the difference between More | Project |(Document Project) and Item Detail | Project (Item Project )?
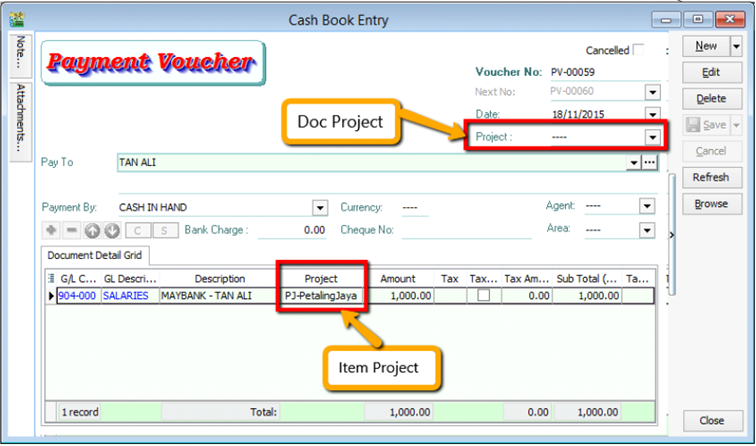
The project feature is also available for GL | Cash Book Entry.
QuestionAfter updating the document with project, how to view report with project and compare by project? For example: GL | Print Profit & Loss Statement.
-
Filter by the date that you want to view for the P&L report, then if you want to perform a project-to-project comparison then choose “Comparison – Project (6 columns)”
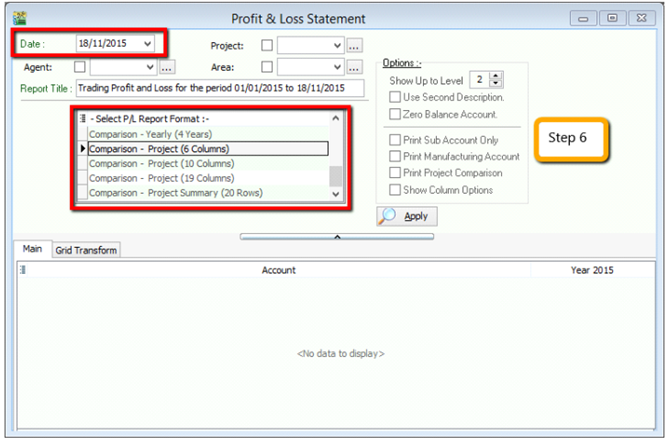 info
info6 Columns = up to 6 projects
10 Columns = up to 10 projects
19 Columns = up to 19 projects.
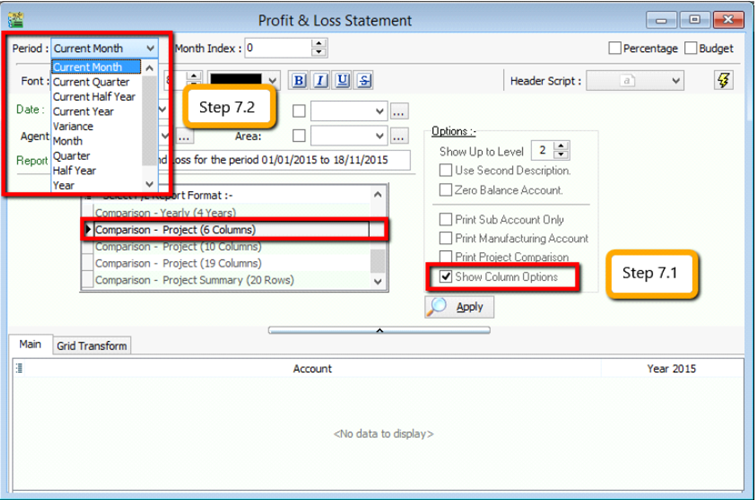
-
Step 7
- After selecting the report that you need, make sure to tick the “Show Column Options”, then the top of the report will show column options.
- You may change the period that you want to view, e.g. by default it will be “Current Month”. If you want to view the whole year figures, then you have to change to “Current Year”.
-
After changing the column options, you have to tick the “Print Project Comparison”, then the project tab will appear on the right hand site, you can select which project that you want to view then click on Add.
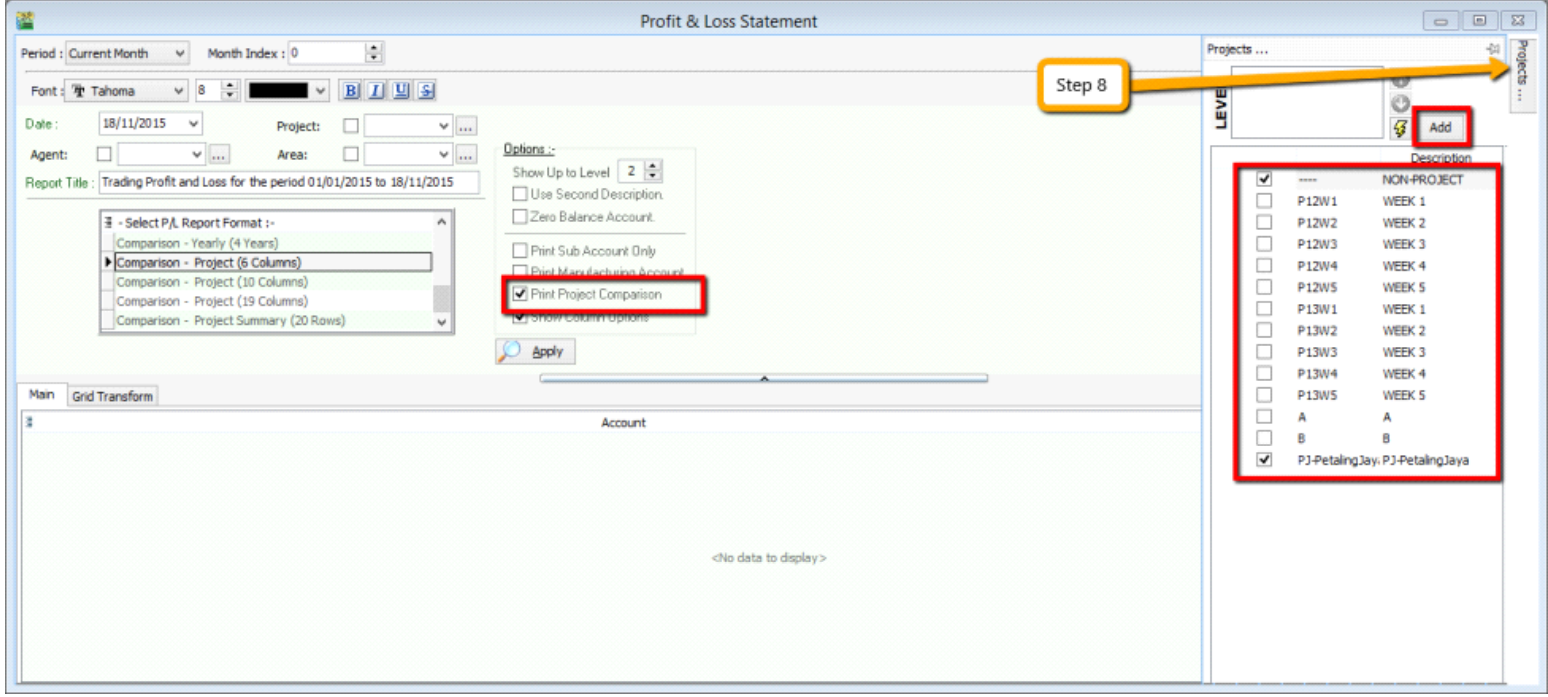
-
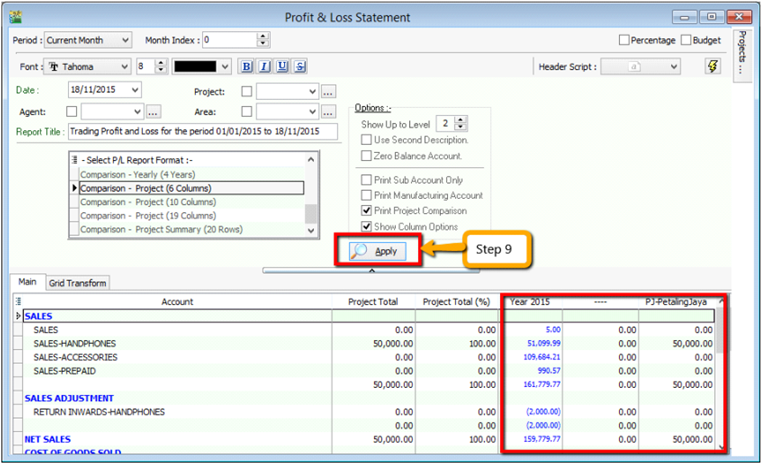
Click on Apply and you will see the result. The P&L report will compare each project that you select.
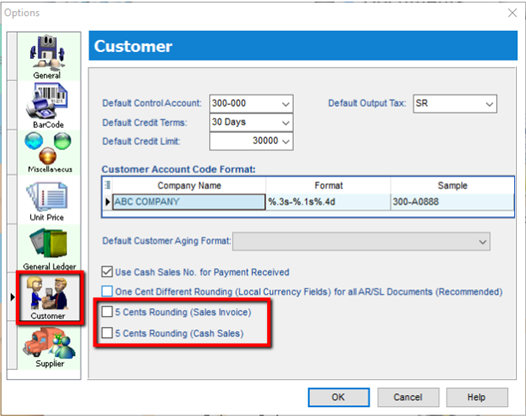
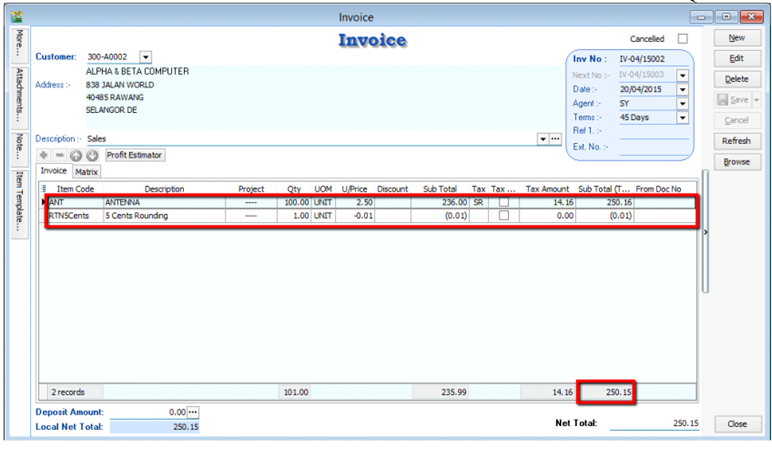
12.9 5 Cents Rounding
We can pre-set the system to automatically round your invoice or cash sales amounts to the nearest 5 cents.
-
Tools | Options | Customer
-
Tick 5 Cents Rounding for Sales Invoice/ Cash Sales
13 Interbank GIRO (IBG)
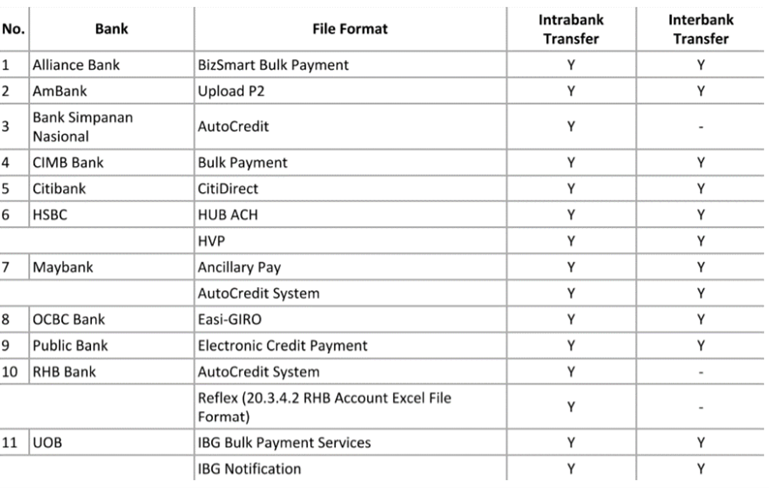
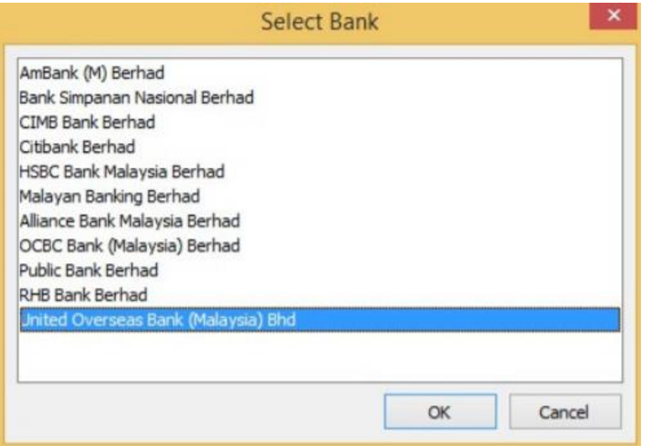
13.1 Bank credit – Supplier Payment IBG
The following shows list of banks file format that are currently supported.
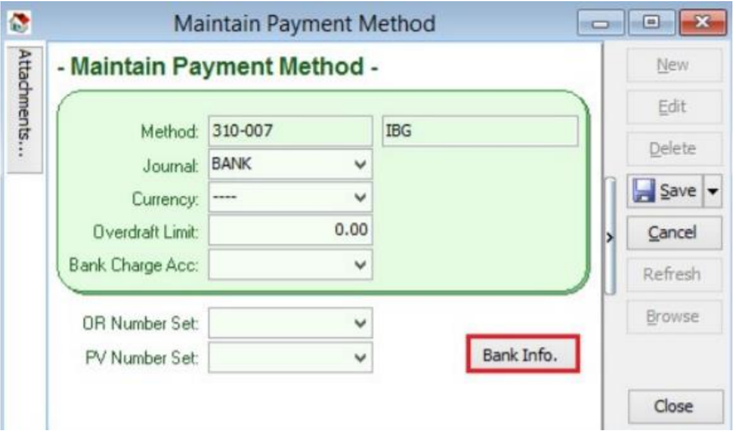
-
Tools | Maintain Payment Method | Edit | Click on the Bank Info.
-
Choose a Bank.
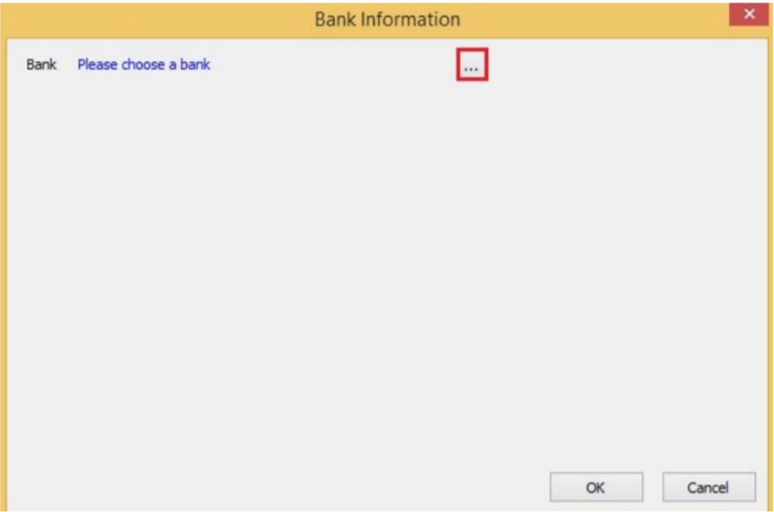
-
Click Ok.
-
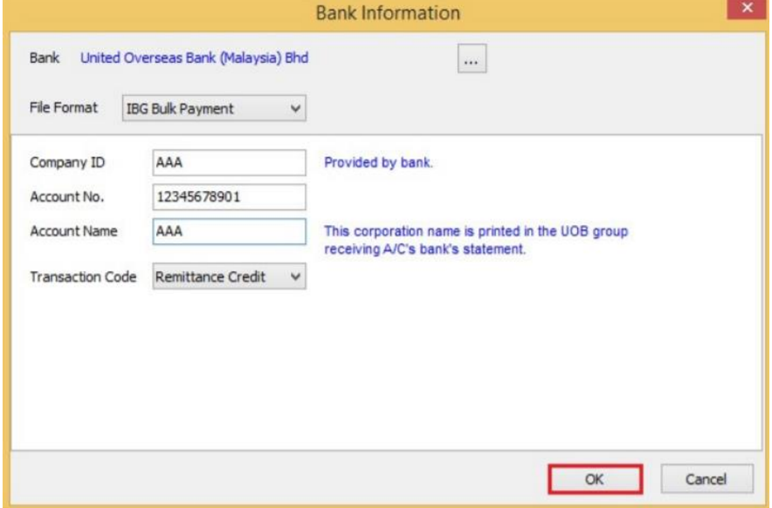
The bank you've choose may have more than one file format, please ensure you've chosen the right file format.
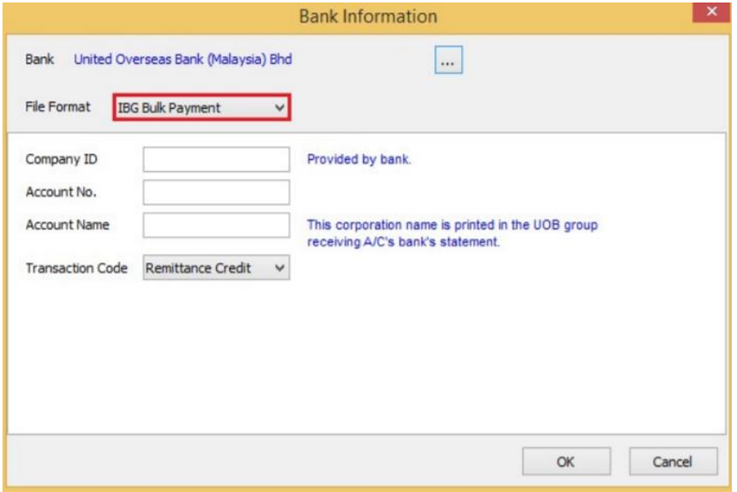
-
Enter bank information | Click OK button | Save.
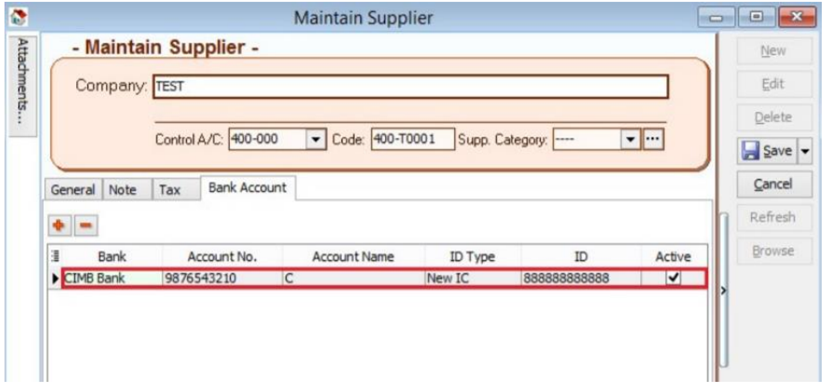
13.2 Supplier Bank Account
-
Add Bank Account and Save.
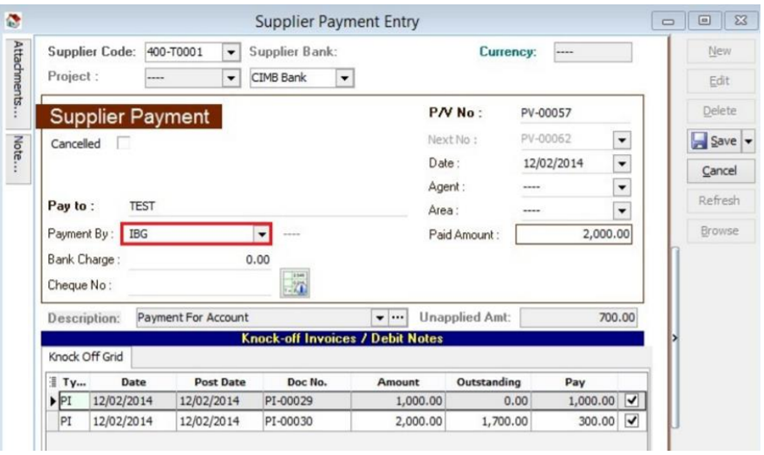
13.3 Supplier Payment Method
-
Select Supplier Bank from drop down list.
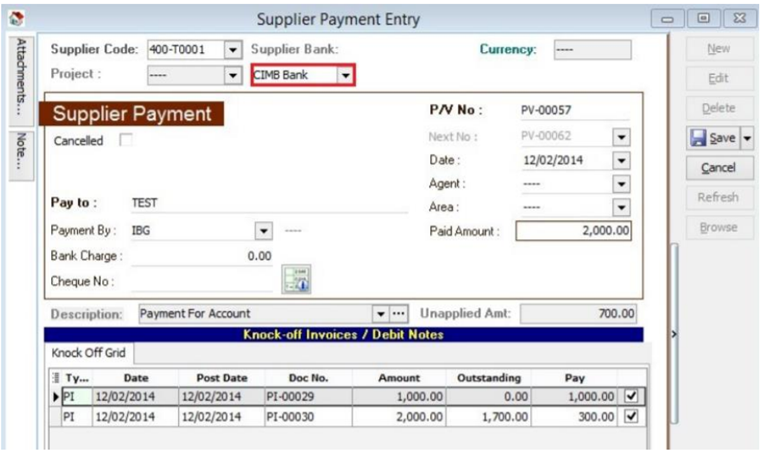
-
Choose the payment method that contains bank information then Save.
13.4 Print Supplier Document (Interbank GIRO) Listing
-
Click on the Giro button.
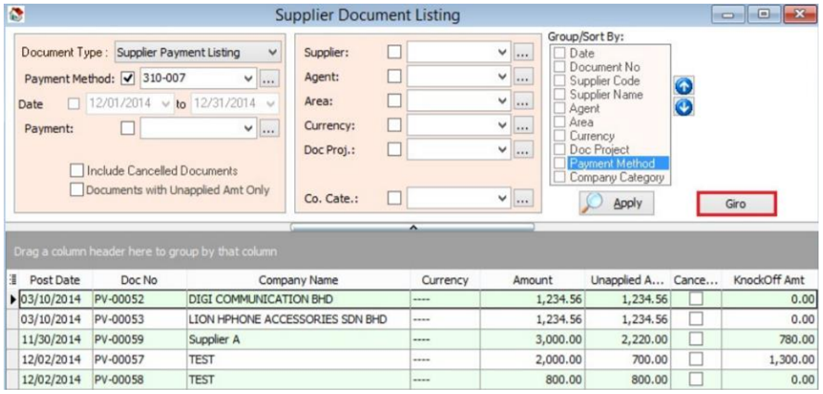
-
Enter additional information and click on Save.
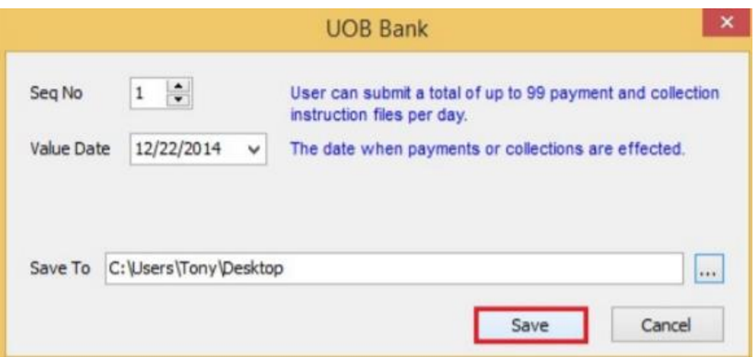
-
You can now upload bank instruction file to bank host.