Guide
Customer Guide (Account Receivable)
The Customer (AR) module allows you to manage customer profiles, track outstanding balances, and process payments.
Customer Workflow
The following diagram illustrates the standard Customer (AR) process workflow in SQL Account:
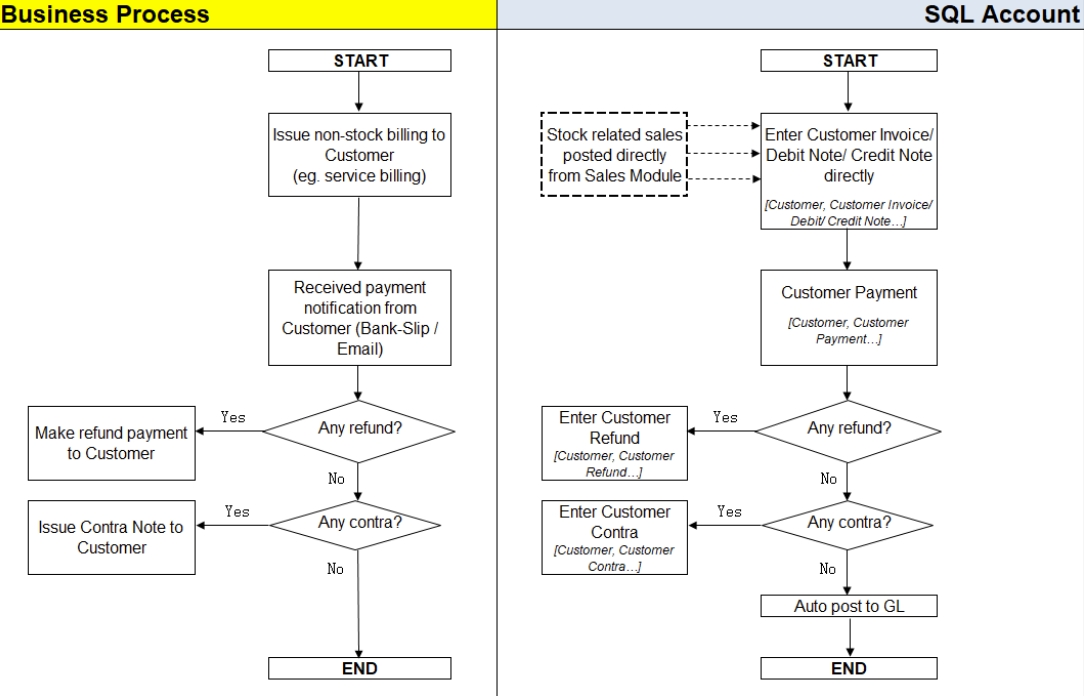
AR (Account Receivable) is used to maintain customer profile data, including addresses, contact details, credit limits, and terms.

Maintain Customer
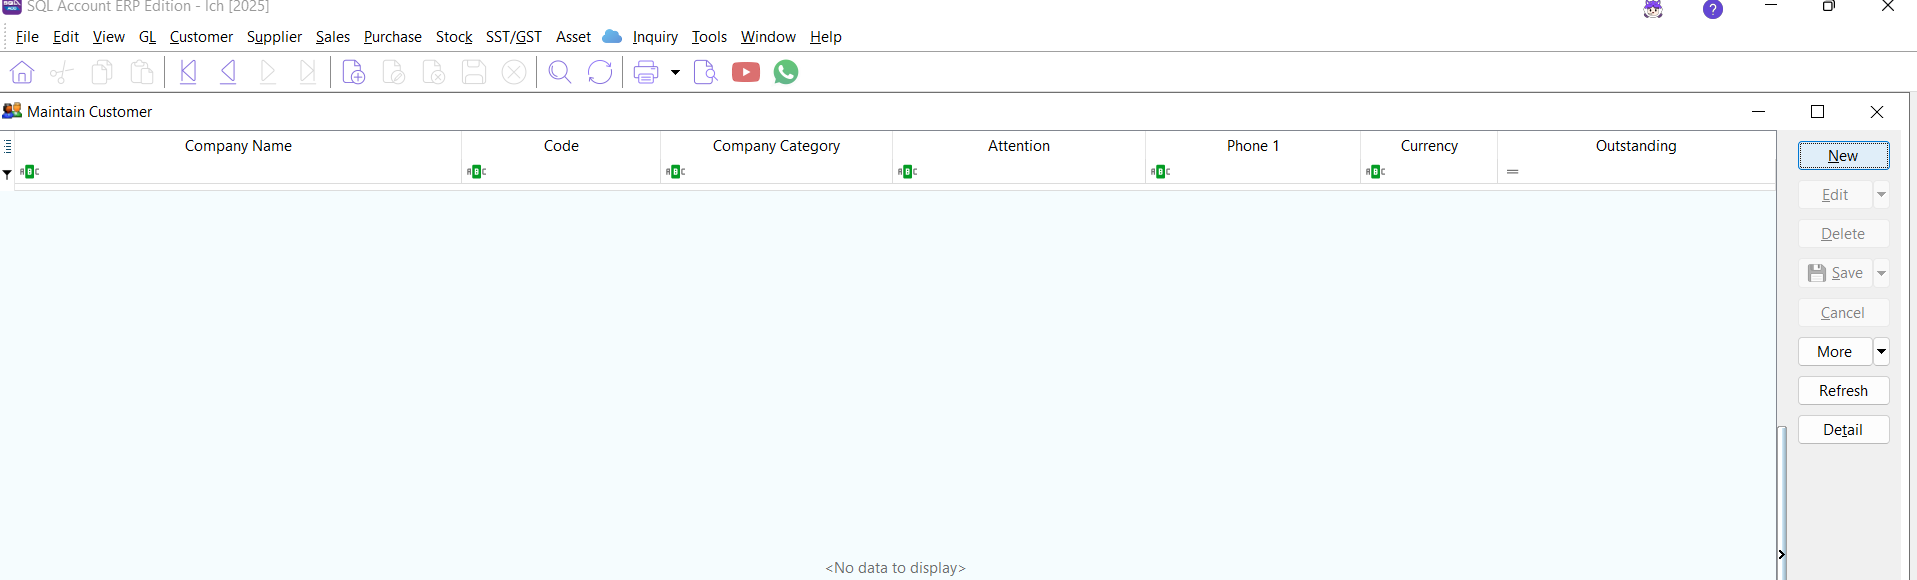
To create a new customer record:
-
Go to Customer → Maintain Customer.
-
Click the New button.
-
Enter the customer's details in the entry screen.
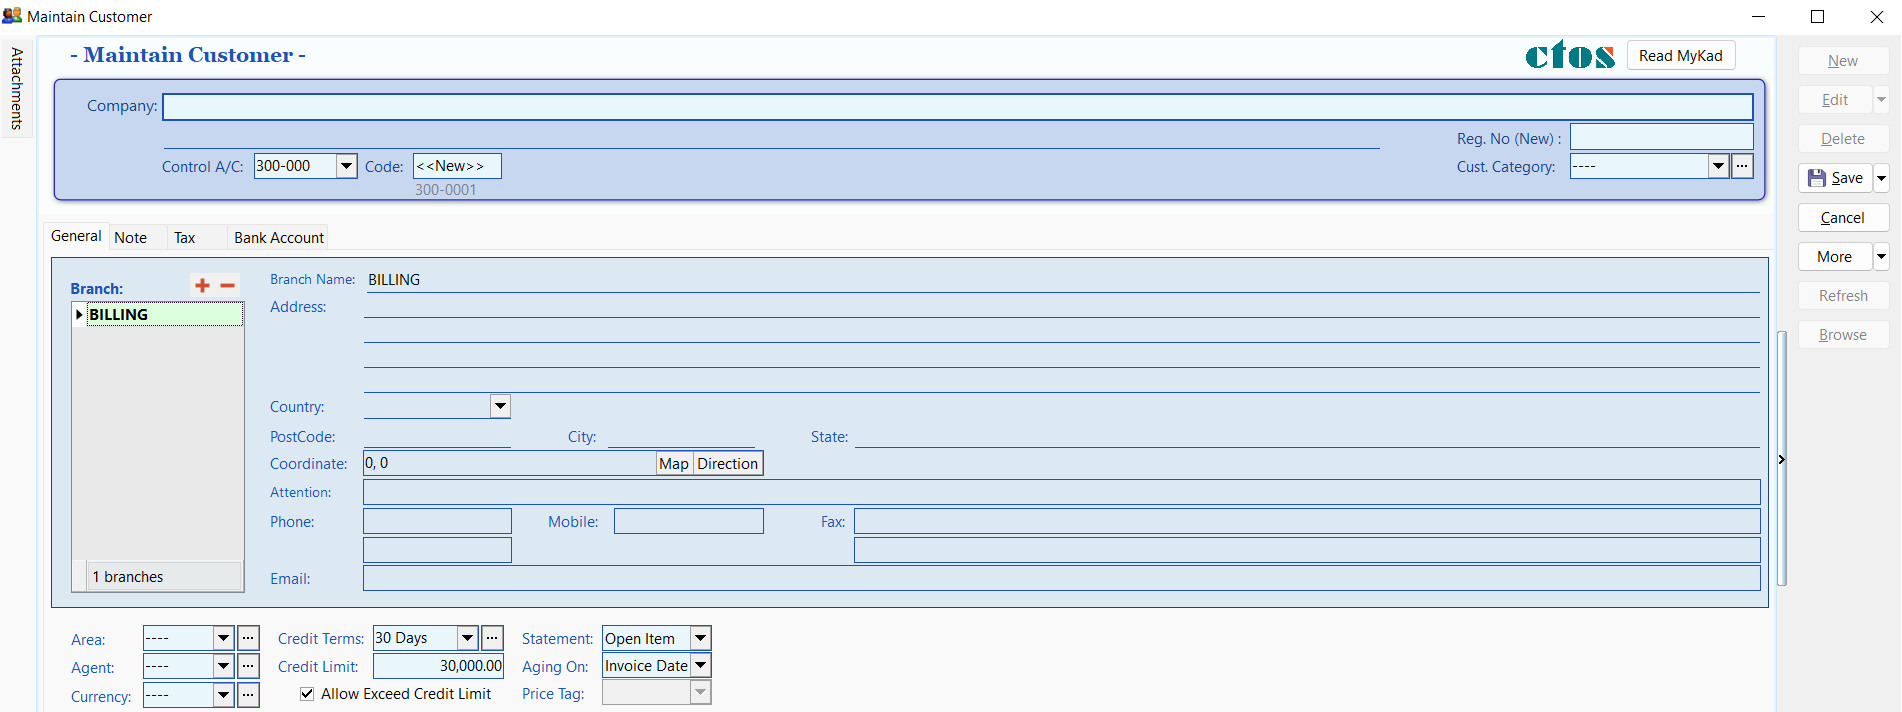
Key Fields in Maintain Customer
| Field Name | Explanation & Properties |
|---|---|
| Company | The customer's billing company name. (Alphanumeric, Max 100 chars) |
| Description 2 | Optional field for translated names, former names, or registration numbers. (Alphanumeric, Max 100 chars) |
| Control A/c | The GL Control Account for posting customer documents. (Lookup from Maintain Accounts) |
| Code | The unique Customer Code (can be auto-generated or manual). |
| Cust Category | Used to categorize customers for reporting purposes. |
Customer Profile Tabs
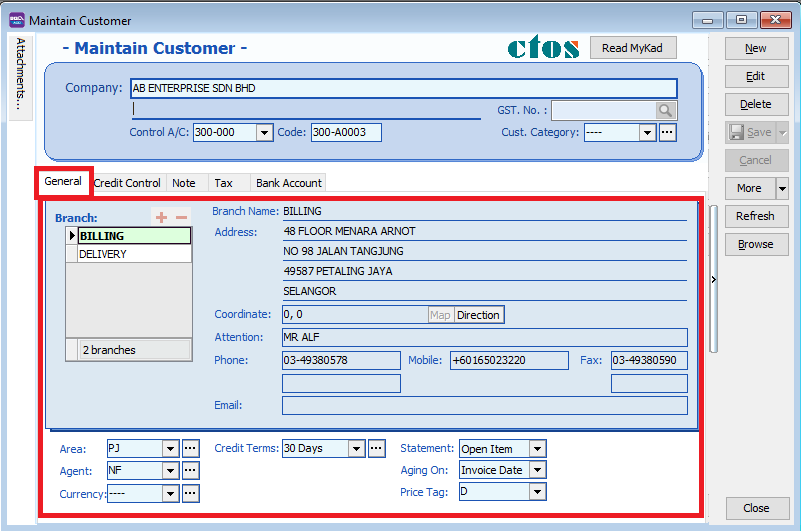
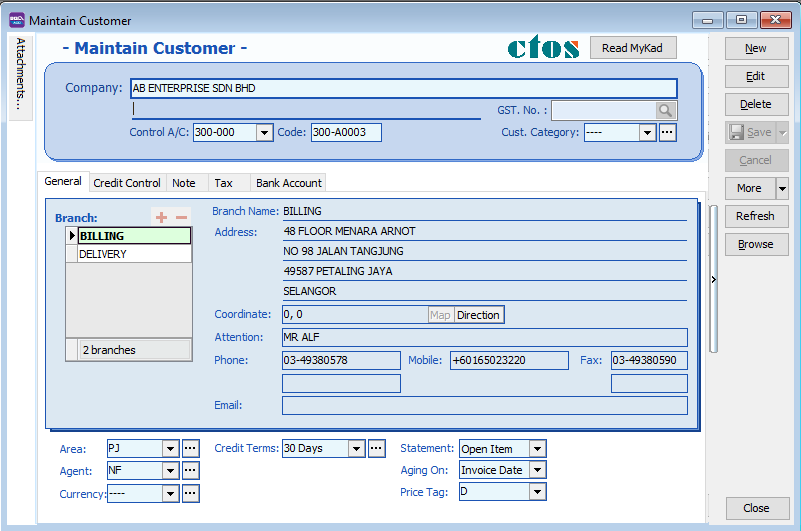
General Tab
The General tab contains primary contact and credit information.
| Field Name | Description |
|---|---|
| Branch Name | Used to maintain multiple addresses (Default: BILLING). |
| Address | The company's billing or delivery address (4 lines). |
| Attention | The primary contact person. |
| Phone / Fax | Contact numbers for the customer. |
| The customer's email address for correspondence. | |
| Area / Agent | Default Area and Agent for sales tracking and reporting. |
| Currency | The default transaction currency for this customer. |
| Credit Terms | The default payment terms (e.g., 30 Days). |
| Credit Limit | The maximum credit allowed (for basic credit control). |
| Statement | Brought Forward (Summary) or Open Item (Detailed). |
| Aging On | Calculate aging based on Invoice Date or Due Date. |
| Price Tag | Assign a specific price level to the customer. |
Note Tab
The Note tab is used for internal remarks and tracking account status.
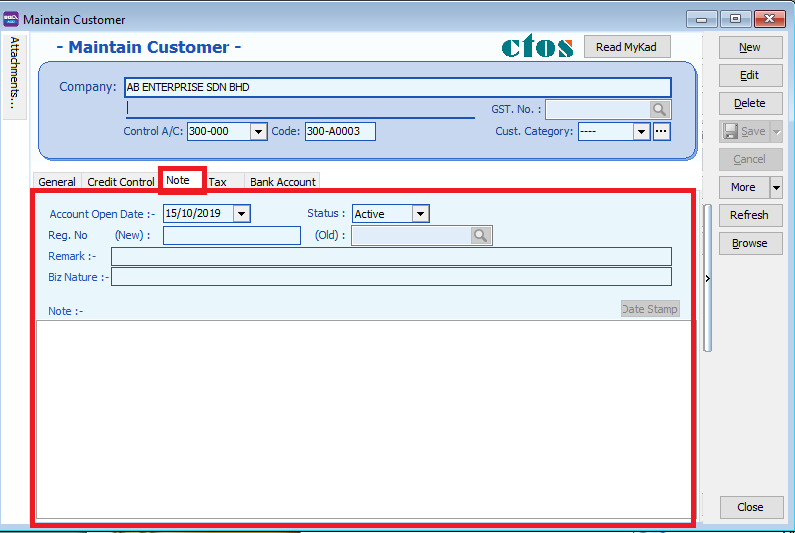
| Field Name | Description |
|---|---|
| Account Open Date | The date the account was created. |
| Remark | Internal notes that appear in Inquiry → Account Inquiry. |
| Reg No. | New and old company registration numbers. |
| Biz Nature | The customer's industry or business type. |
| Note | A rich-text field for detailed knowledge base entries (supports Date Stamp). |
| Status | Active, Inactive, Suspend, Prospect, or Pending. |
- Active: Full access to documents and statements.
- Inactive: Cannot create documents or print statements.
- Suspend: Cannot create documents but can print statements.
- Prospect/Pending: Can create documents and print statements.
Tax Tab
Configure tax-related settings and exemptions for the customer.
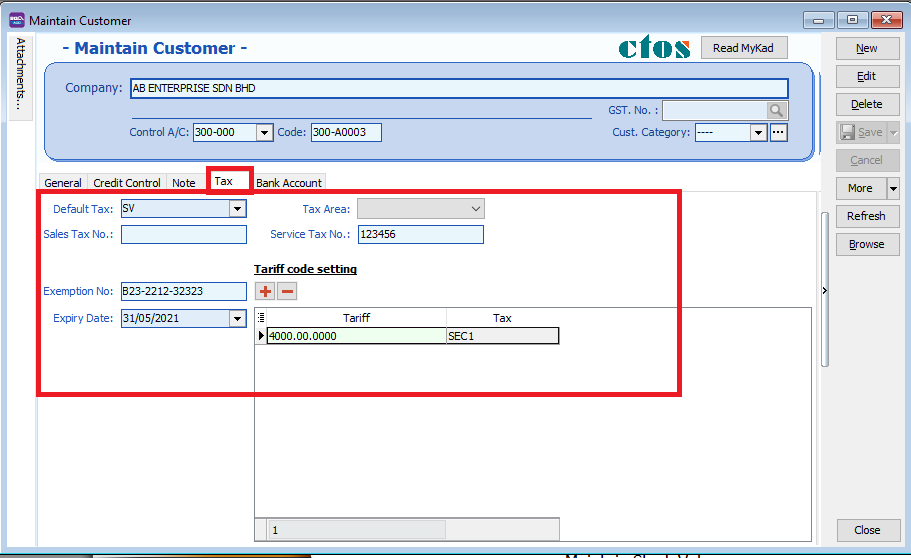
| Field Name | Description |
|---|---|
| Default Tax | The default tax code applied to this customer's transactions. |
| Sales/Service Tax No | The customer's SST registration numbers. |
| Exemption No | The Sales Tax Exemption number provided by the customer. |
| Expiry Date | The date when the tax exemption expires. |
Tariff Code Setting
This section is for customers who supply taxable goods under the Sales Tax (Person Exempted from Payment of Tax) Order 2018.
| Field Name | Description |
|---|---|
| Tariff | Add tariff codes for exempted goods. Find codes at ezhs.customs.gov.my. |
| Tax | Select the appropriate exemption tax code (e.g., SE, SEB, SEC1-5). |
Click Save once all information is entered.
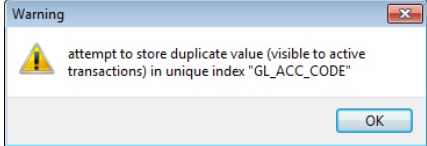
Customer Code Format
Customer codes are unique identifiers. You can configure how they are automatically generated.
If you attempt to save a duplicate code, the system will display a warning message.
Configuring Code Formats
Go to Tools → Options → Customer to set the code format.
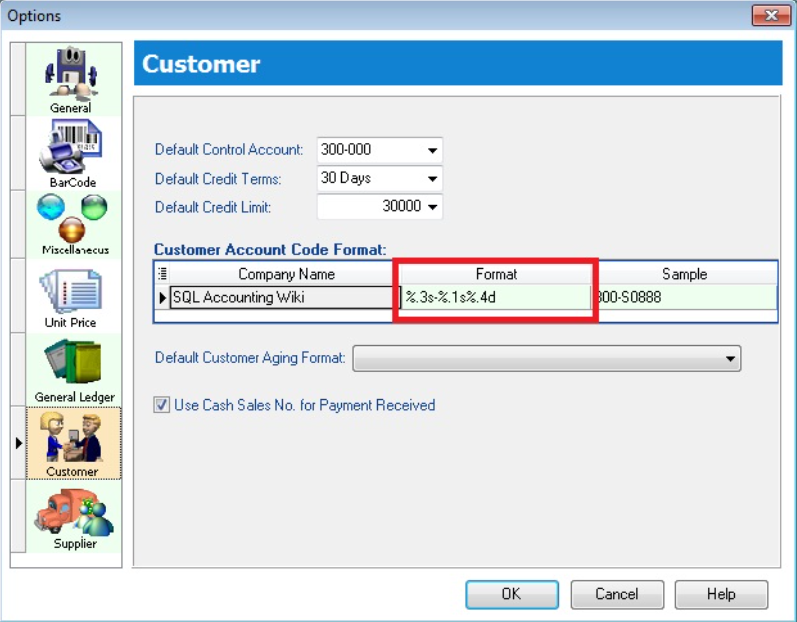
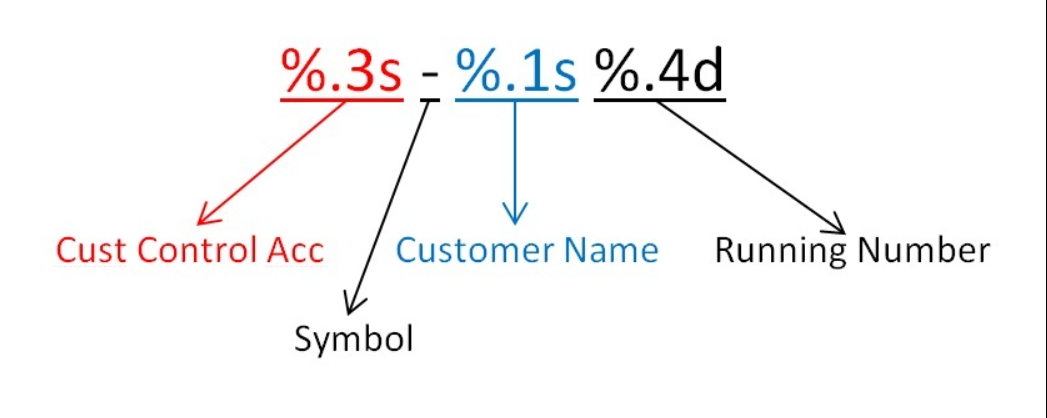
Format Explanation:
Examples:
| Company Name | Control Acc | Format | Result |
|---|---|---|---|
| ABCD SDN BHD | 301-000 | %.1s-%.1s%.1d | 3-A-1 |
| ABCD SDN BHD | 301-000 | %.2s-%.2s%.2d | 30-AB-01 |
| ABCD SDN BHD | 301-000 | %.3s-%.3s%.3d | 301-ABC-001 |
| ABCD SDN BHD | 301-000 | %.4s-%.4s%.4d | 301-ABCD-0001 |
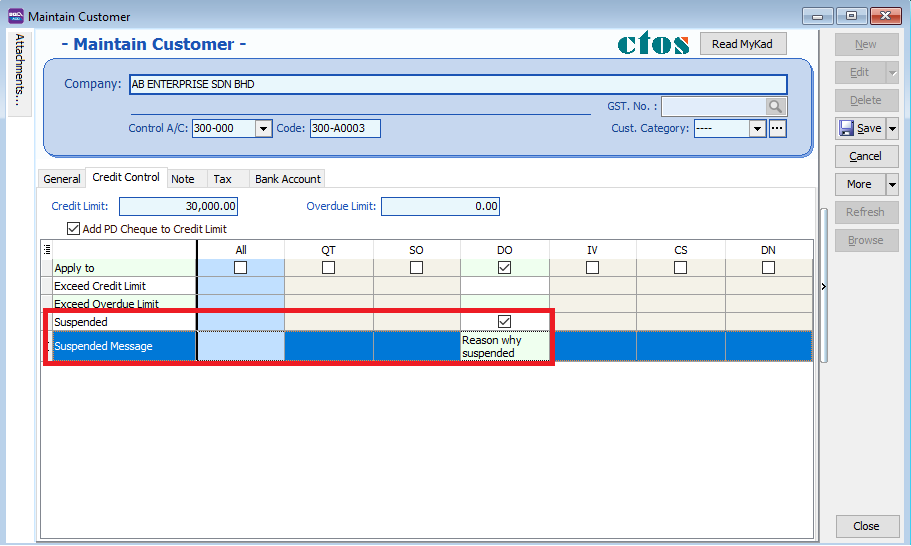
Advance Credit Control
This is a premium module that requires a separate license.
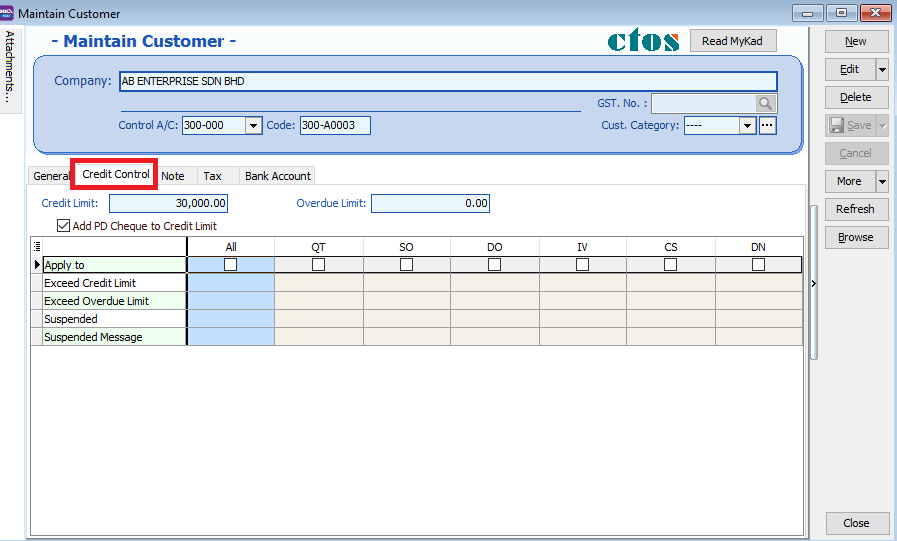
Credit Control is used to manage customer outstanding balances within specific overdue and credit limits.
- Access to Credit Control settings depends on user permissions.
- The ability to override credit limits can be granted in User Access Control.
Credit and Overdue Limits
- Credit Limit: Set based on the total outstanding balance.
- Overdue Limit: Set based only on the overdue outstanding balance.
- Add PD Cheque to Credit Limit: Check this to include post-dated payments when calculating the available credit limit.
Exceeding Limits
Credit Control can be applied to the following document types:
- QT - Quotation
- SO - Sales Order
- DO - Delivery Order
- IV - Sales Invoice
- CS - Cash Sales
- DN - Debit Note
To control actions when limits are exceeded, check the Apply To box for the relevant document type and select an action:
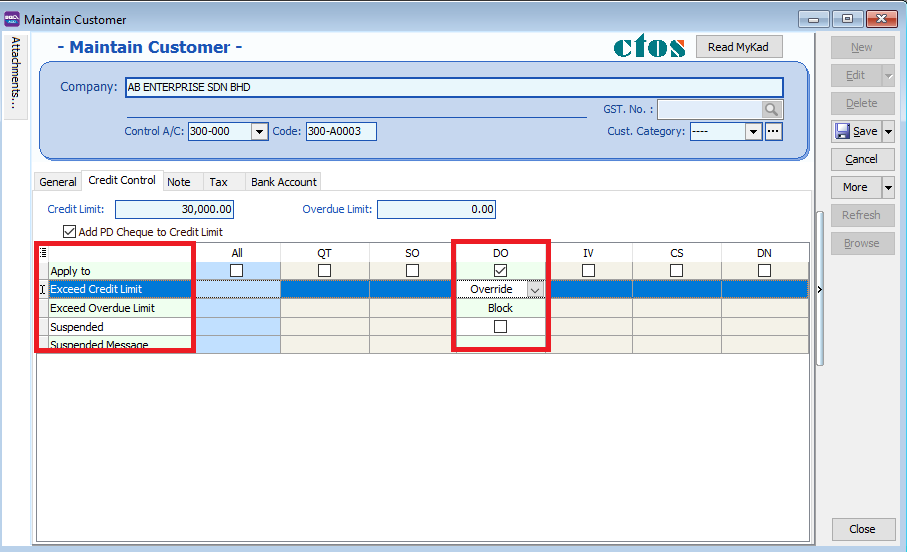
| Control Type | Action | Allow Exceed |
|---|---|---|
| Exceed Credit Limit | Unblock | Yes |
| Exceed Credit Limit | Block | No |
| Exceed Credit Limit | Override | Password Required |
| Exceed Overdue Limit | Unblock | Yes |
| Exceed Overdue Limit | Block | No |
| Exceed Overdue Limit | Override | Password Required |
Action Definitions:
- Unblock: No restrictions applied.
- Block: Document cannot be saved by any user.
- Override: Authorized users can enter their credentials to proceed.
- Suspended: Blocked with a custom suspension message.
Suspension Message
You can set a custom message to appear when a customer's account is suspended.
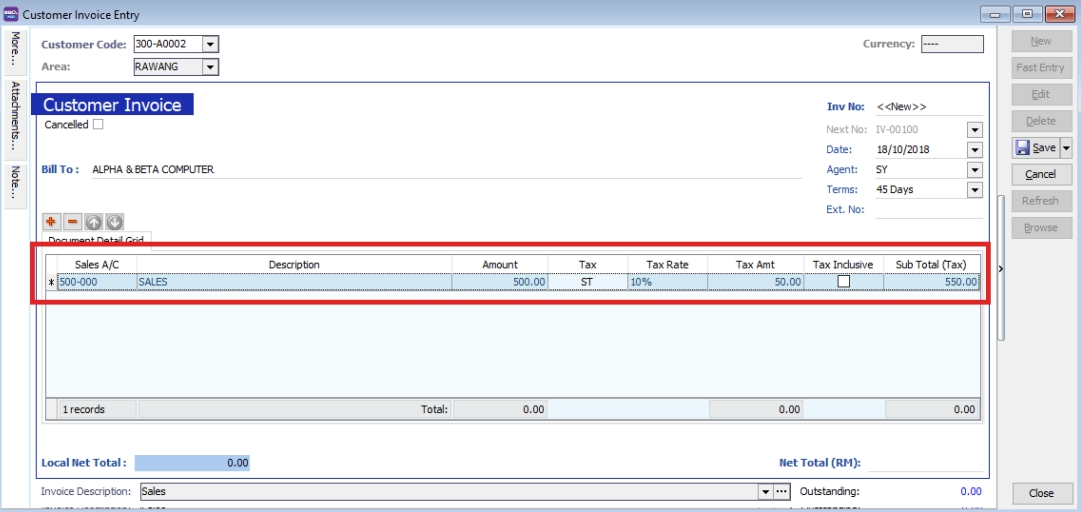
Customer Invoice
Customer Invoice vs. Sales Invoice
| Customer Invoice | Sales Invoice |
|---|---|
| Shows only GL account codes; does not track Qty or Unit Price. | Linked to Stock and Account modules. Tracks Qty and Unit Price. |
| Used for non-stock billing. | Recommended for stock-related billing. |
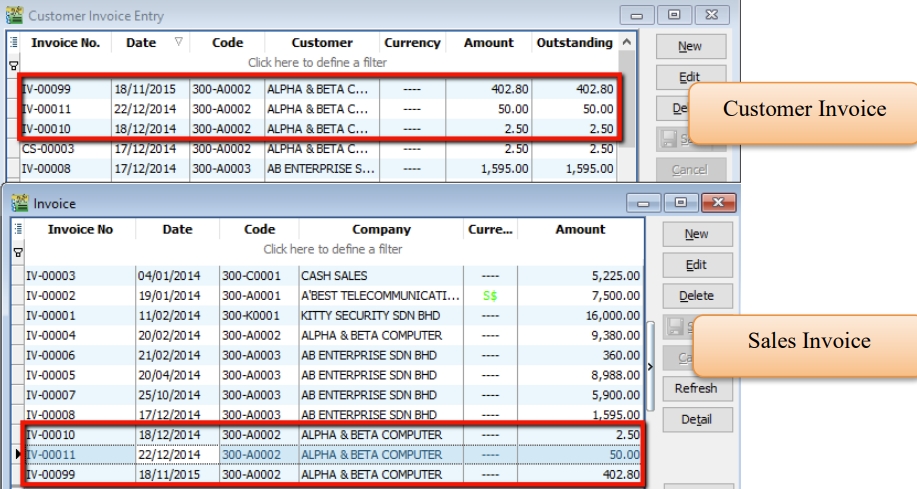
Creating a Customer Invoice
-
Go to Customer → Customer Invoice → New.
-
Select the Customer Code.
-
Enter the transaction details and amount.
-
Click Save.
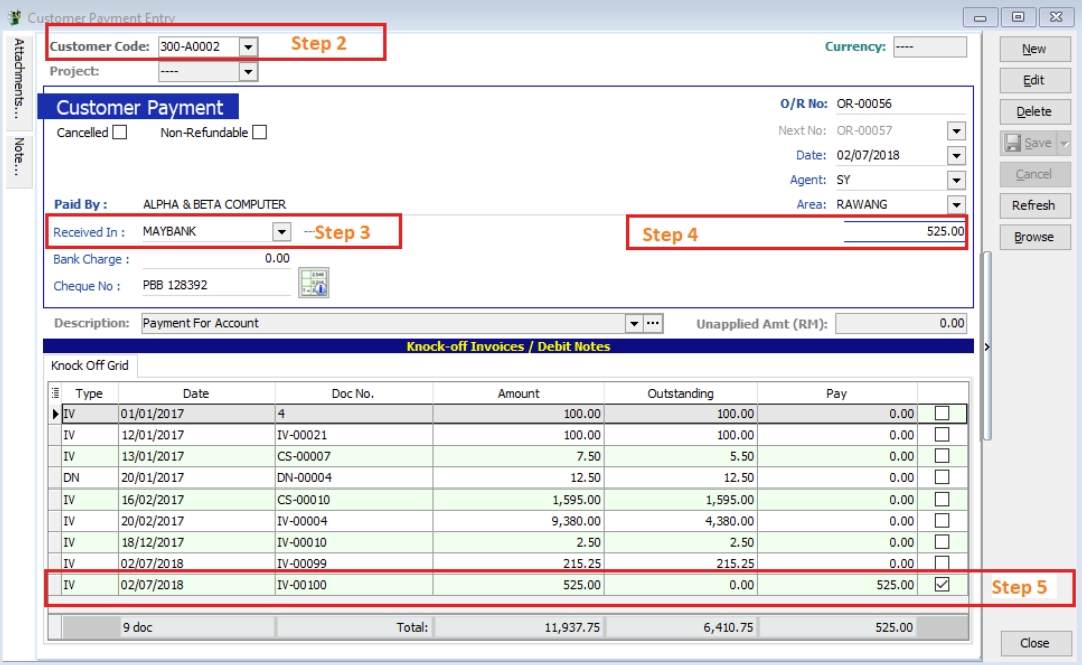
Customer Payment
Processing a Payment
Watch the tutorial here: YouTube
-
Go to Customer → Customer Payment → New.
-
Select the Customer.
-
Select the Payment Method (Bank/Cash) and enter the Cheque No if applicable.
-
Enter the Payment Amount.
-
Check the corresponding invoices or debit notes to knock off (match) the payment.
-
Click Save.
Post-Dated Cheques (PDC)
-
Locate the payment and click Edit.
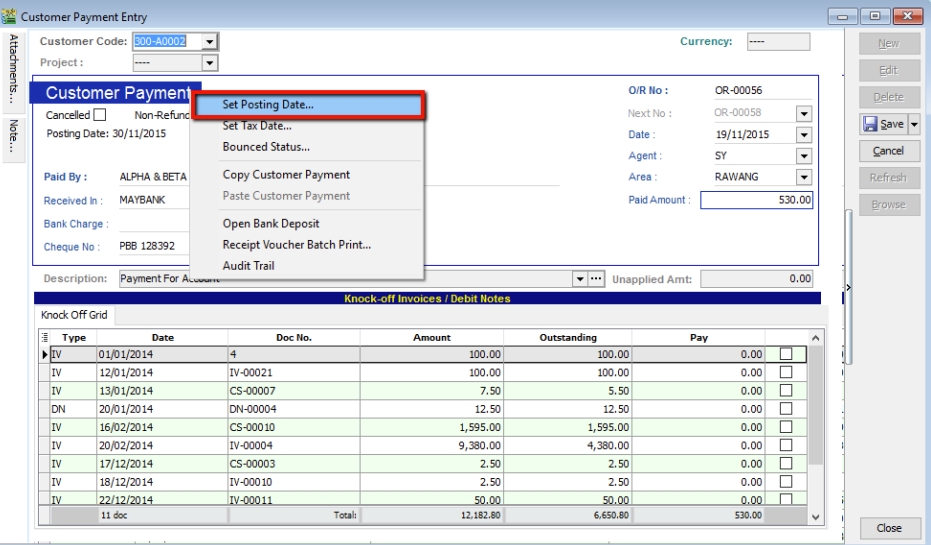
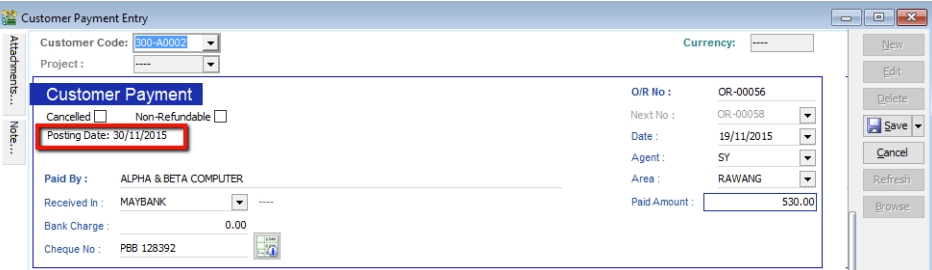
-
Right-click on the Customer Payment header and select Set Posting Date.
Bounced Cheques
-
Locate the payment and click Edit.
-
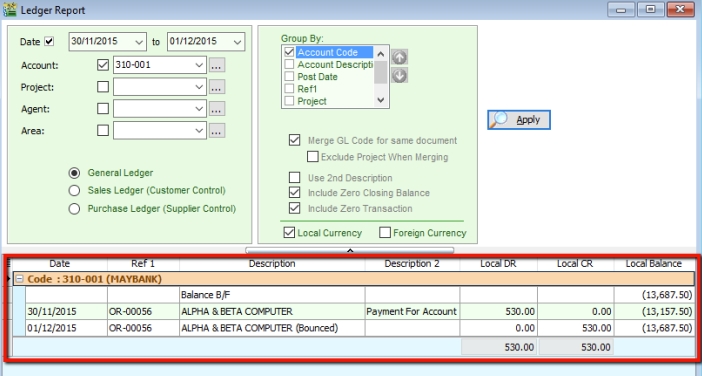
Right-click on the Customer Payment header and select Bounced Status.

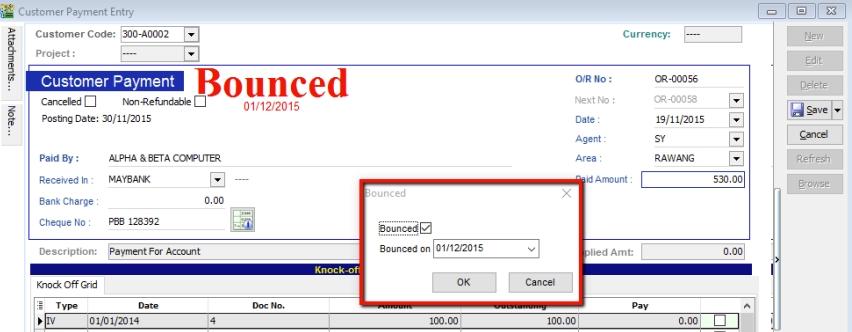
-
The system will automatically revert the payment and update the ledger.
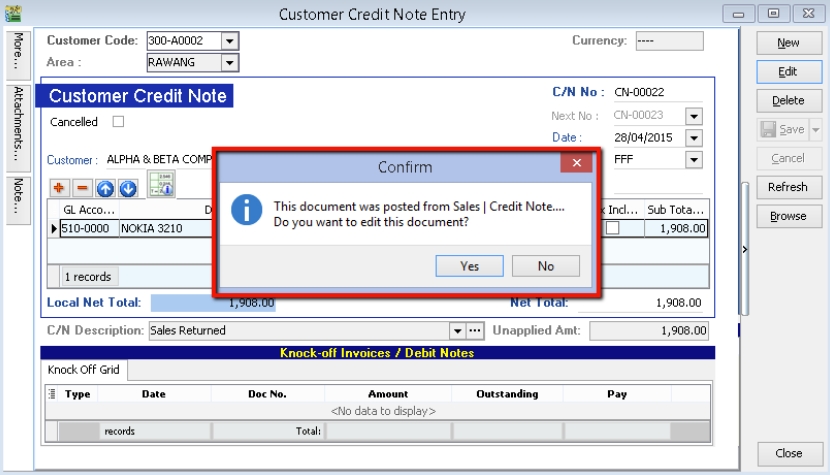
Customer Credit Note
With Stock Return
If the customer is returning stock, use a Sales Credit Note first, then knock it off in Customer Credit Note.
-
Go to Customer → Customer Credit Note.
-
Click Edit and confirm with Yes.
-
Knock off the relevant documents.
Without Stock Return (e.g., Discounts)
-
Go to Customer → Customer Credit Note → New.
-
Select the Customer and the GL Account.
-
Enter the Amount and knock off the relevant invoices.
-
Click Save.

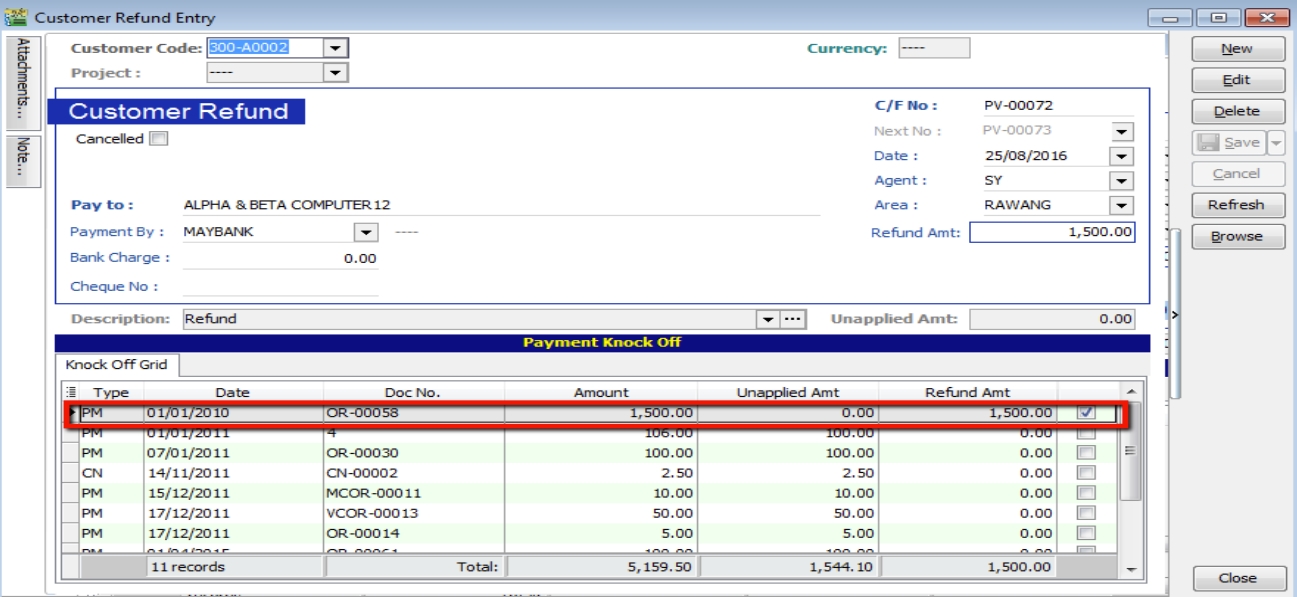
Customer Refund
Use this to refund a customer by knocking off unapplied payments or credit notes.
-
Go to Customer → Customer Refund → New.
-
Select the Customer and Payment Method.
-
Enter the Refund Amount.
-
Knock off the unapplied payment or credit note and click Save.
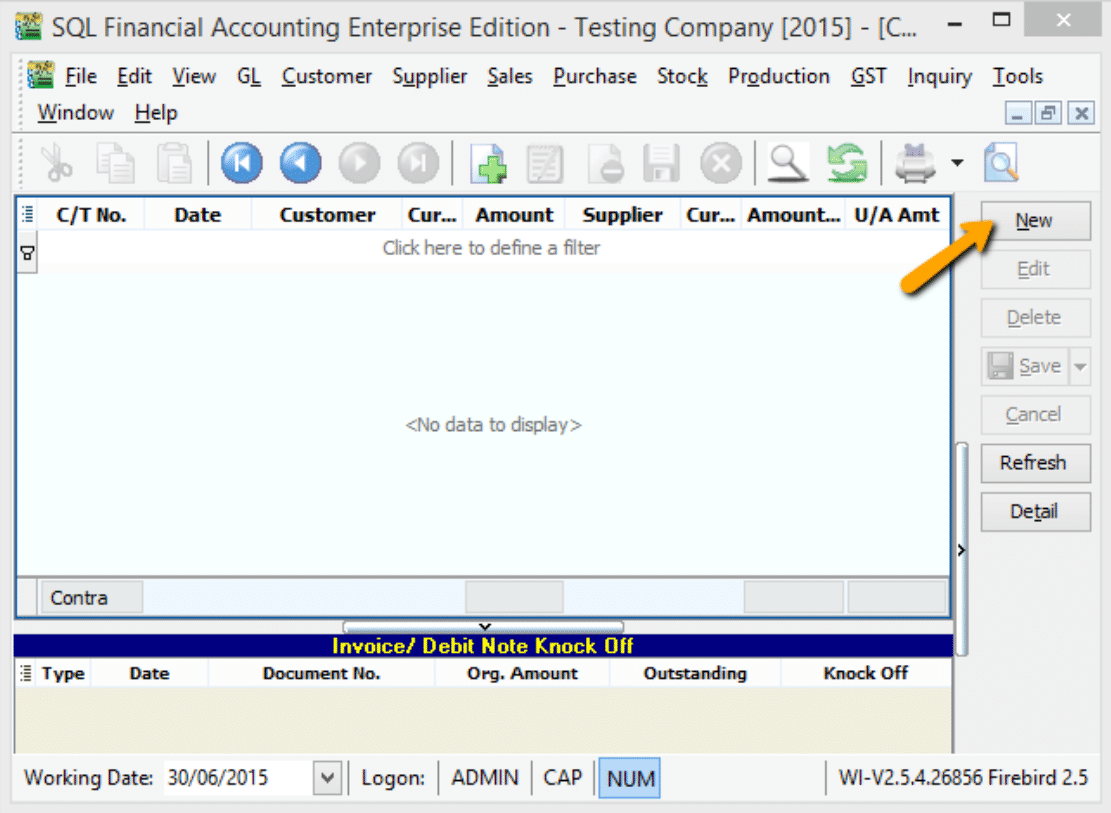
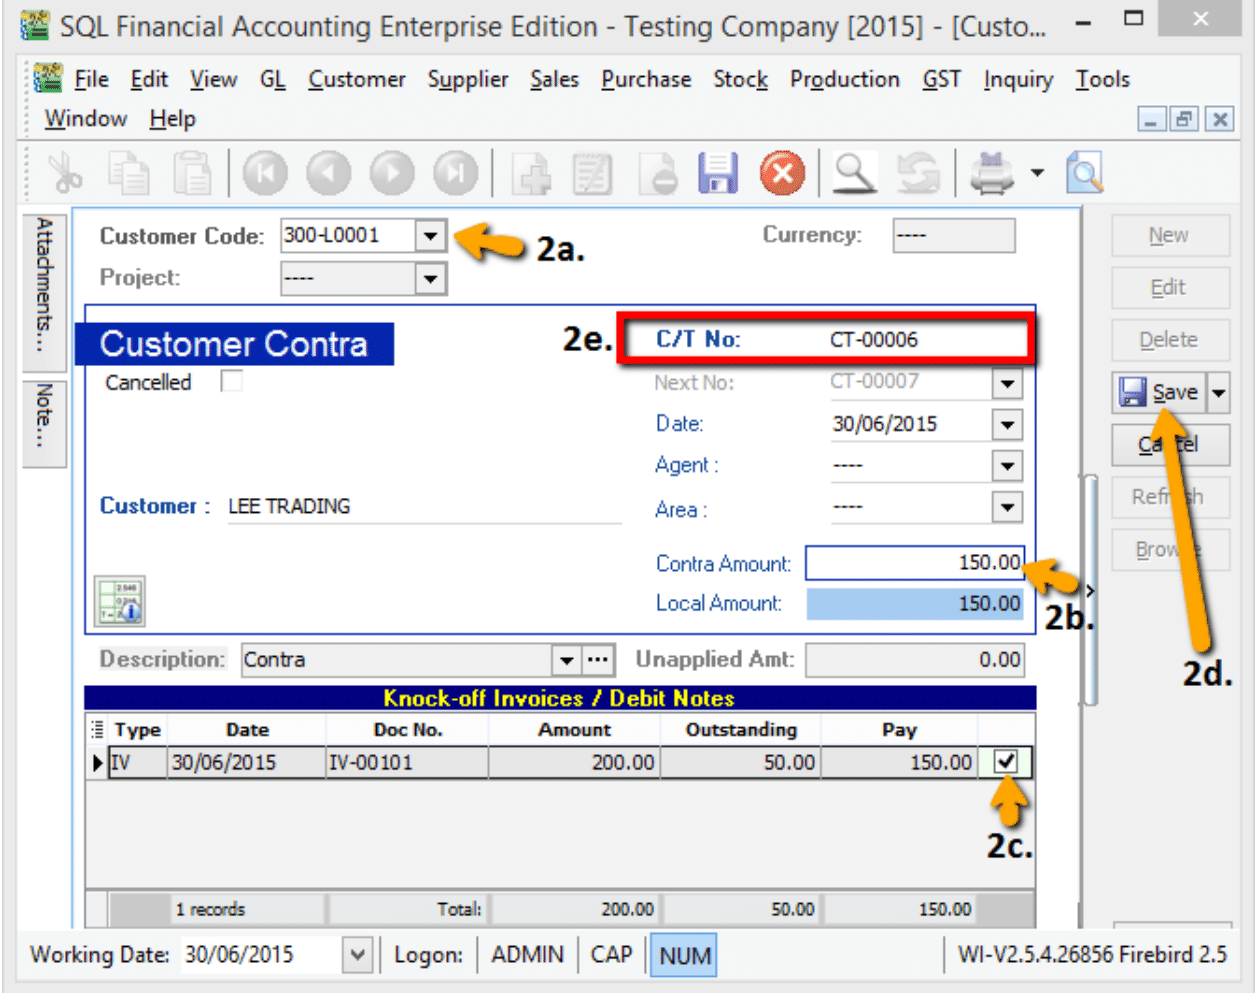
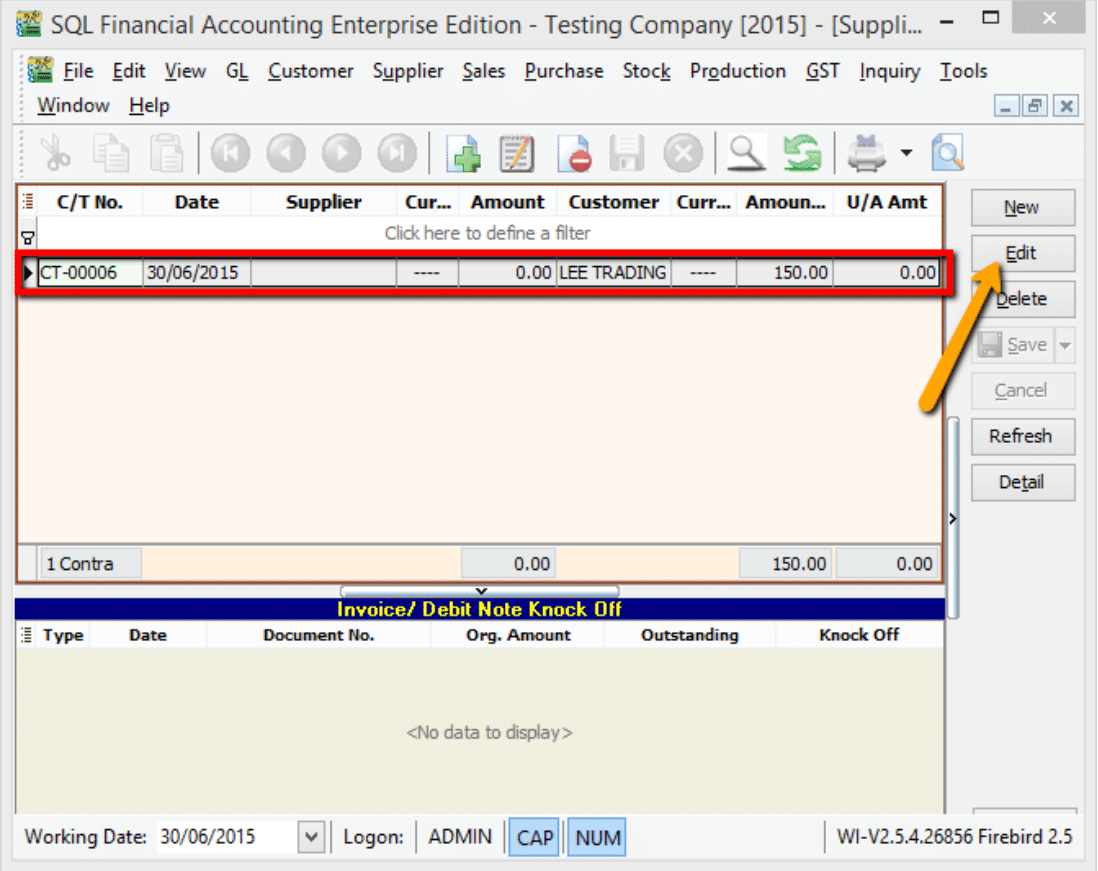
Customer Contra
A Contra Entry is used to offset outstanding balances when a company is both a customer and a supplier.
Scenario: You have a Sales Invoice for RM200 and a Purchase Invoice for RM150 for the same company. The contra amount is RM150, leaving a net balance of RM50.
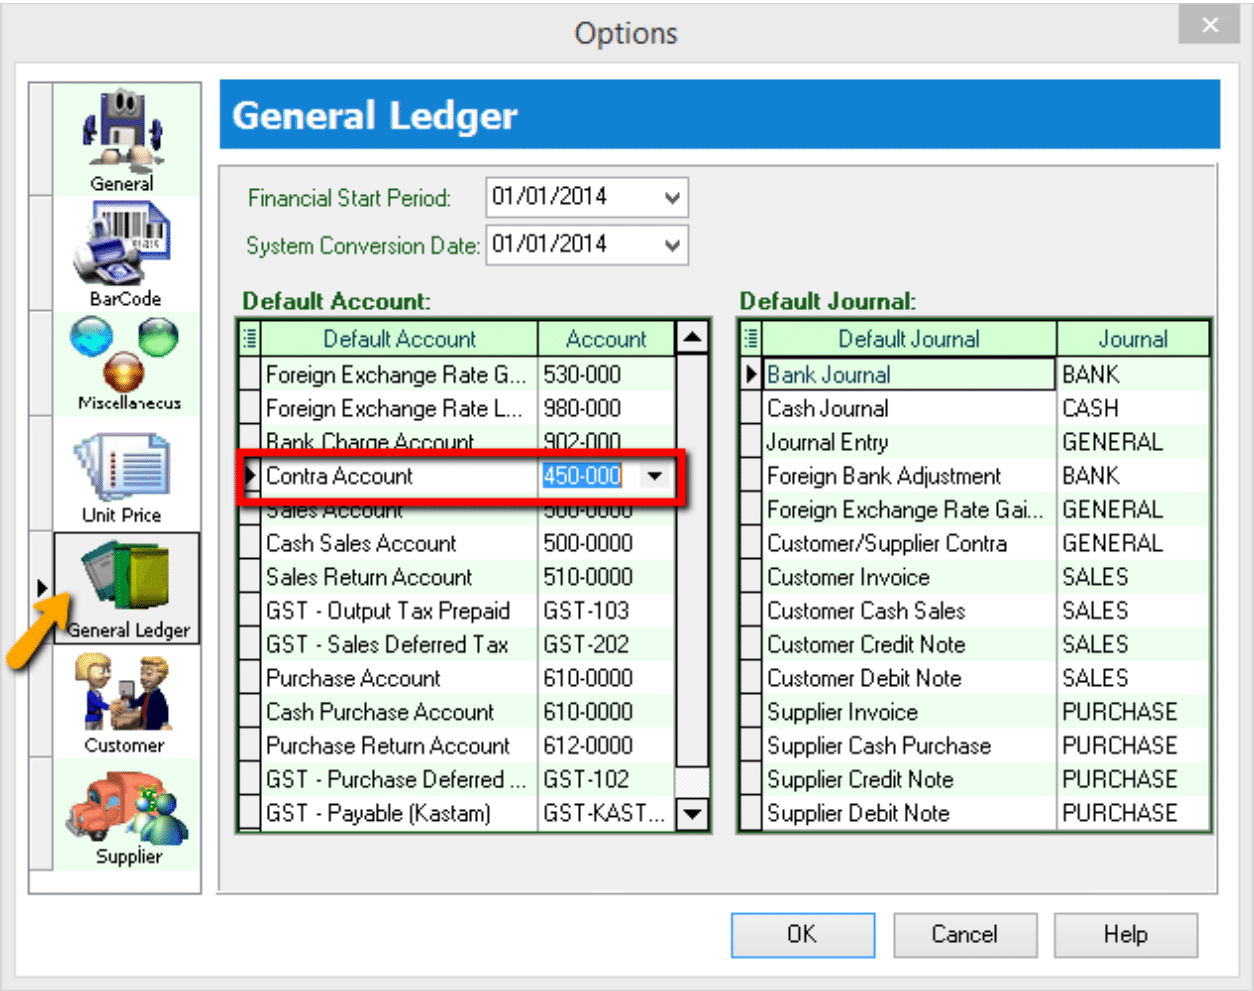
Setup: Contra Account
-
Go to Tools → Options.
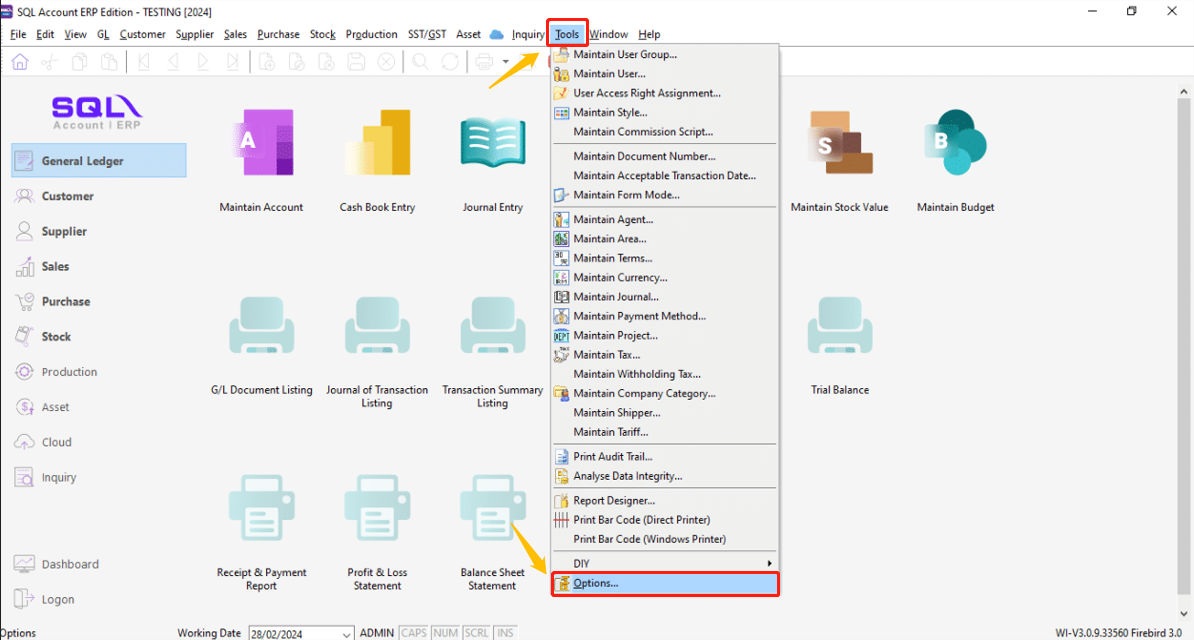
-
Select General Ledger and ensure a valid Contra Account is selected.
Processing a Contra Entry
-
Go to Customer → Customer Contra → New.
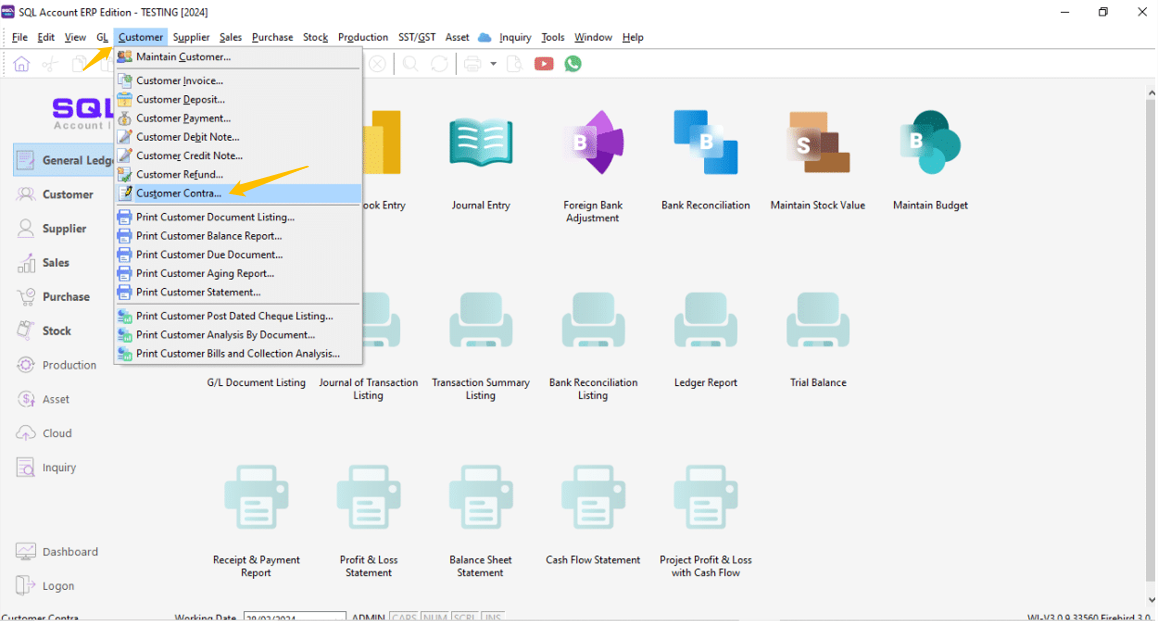
-
Fill in the corresponding details
- Select the Customer Code.
- Enter the Contra Amount.
- Knock off the Sales Invoice
- Click Save.
- Note the Contra Number generated by the system.
-
Go to Supplier → Supplier Contra.
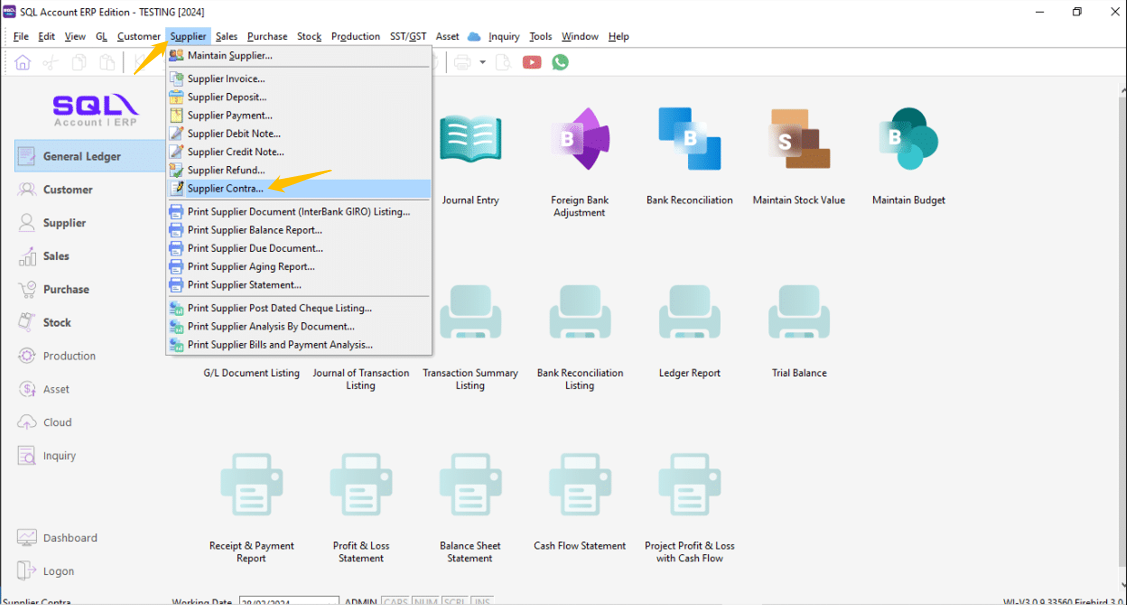
-
Locate the same Contra Number and click Edit.
-
Select the Supplier.
-
Ensure the Contra Amount matches the Customer Contra.
-
Knock off the Purchase Invoice and click Save.
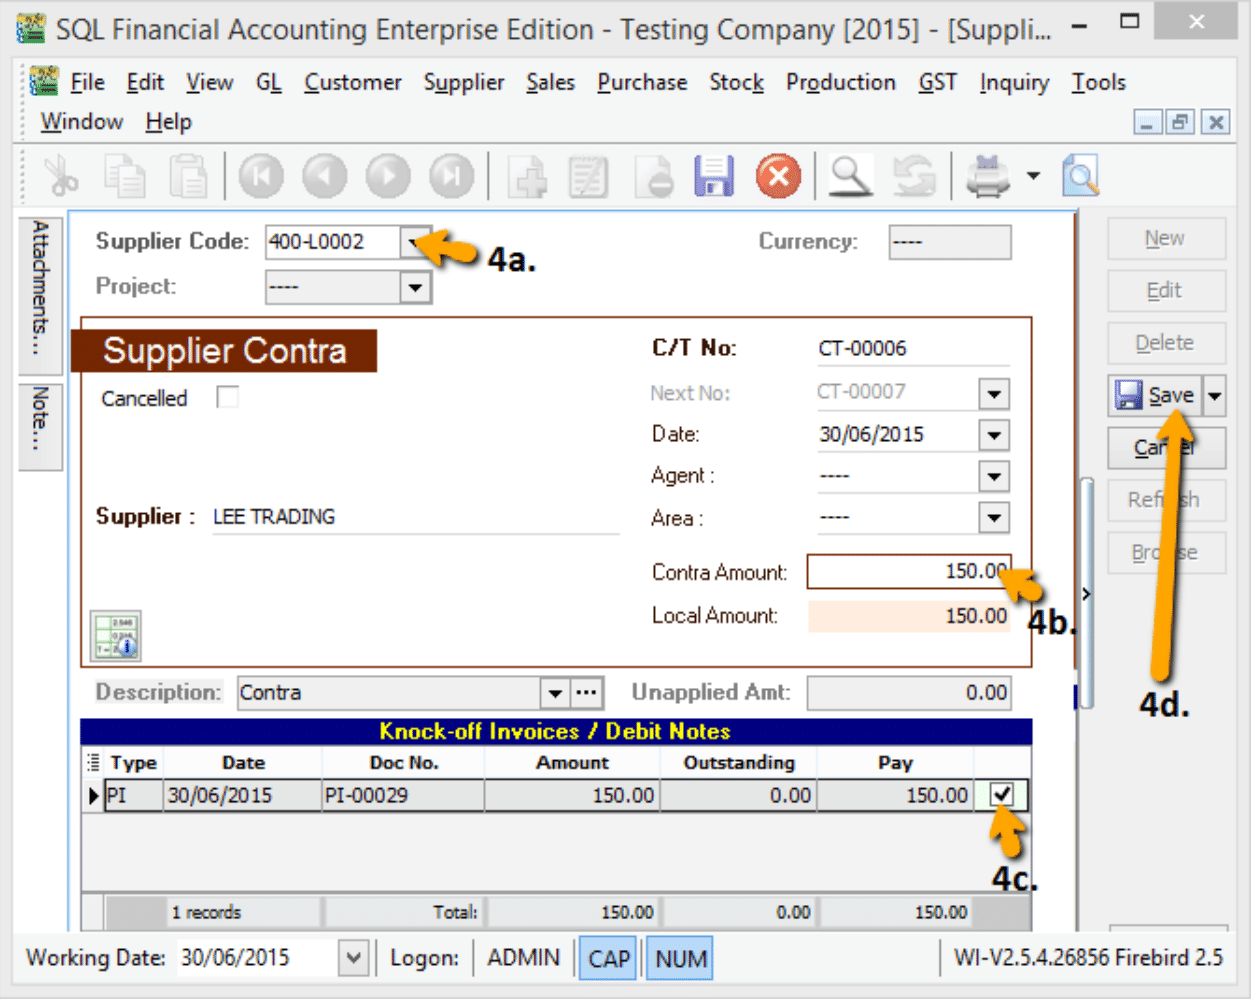
Result:
- The Sales Invoice balance is reduced (e.g., to RM50).
- The Purchase Invoice is fully settled.
- The remaining RM50 can be settled via a standard Customer Payment.