Guide
This is an additional module.
Watch tutorial video here: Youtube
Set Up
Chart of Accounts
-
Go to GL > Maintain Account.
-
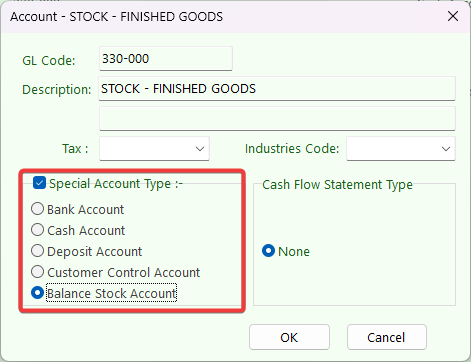
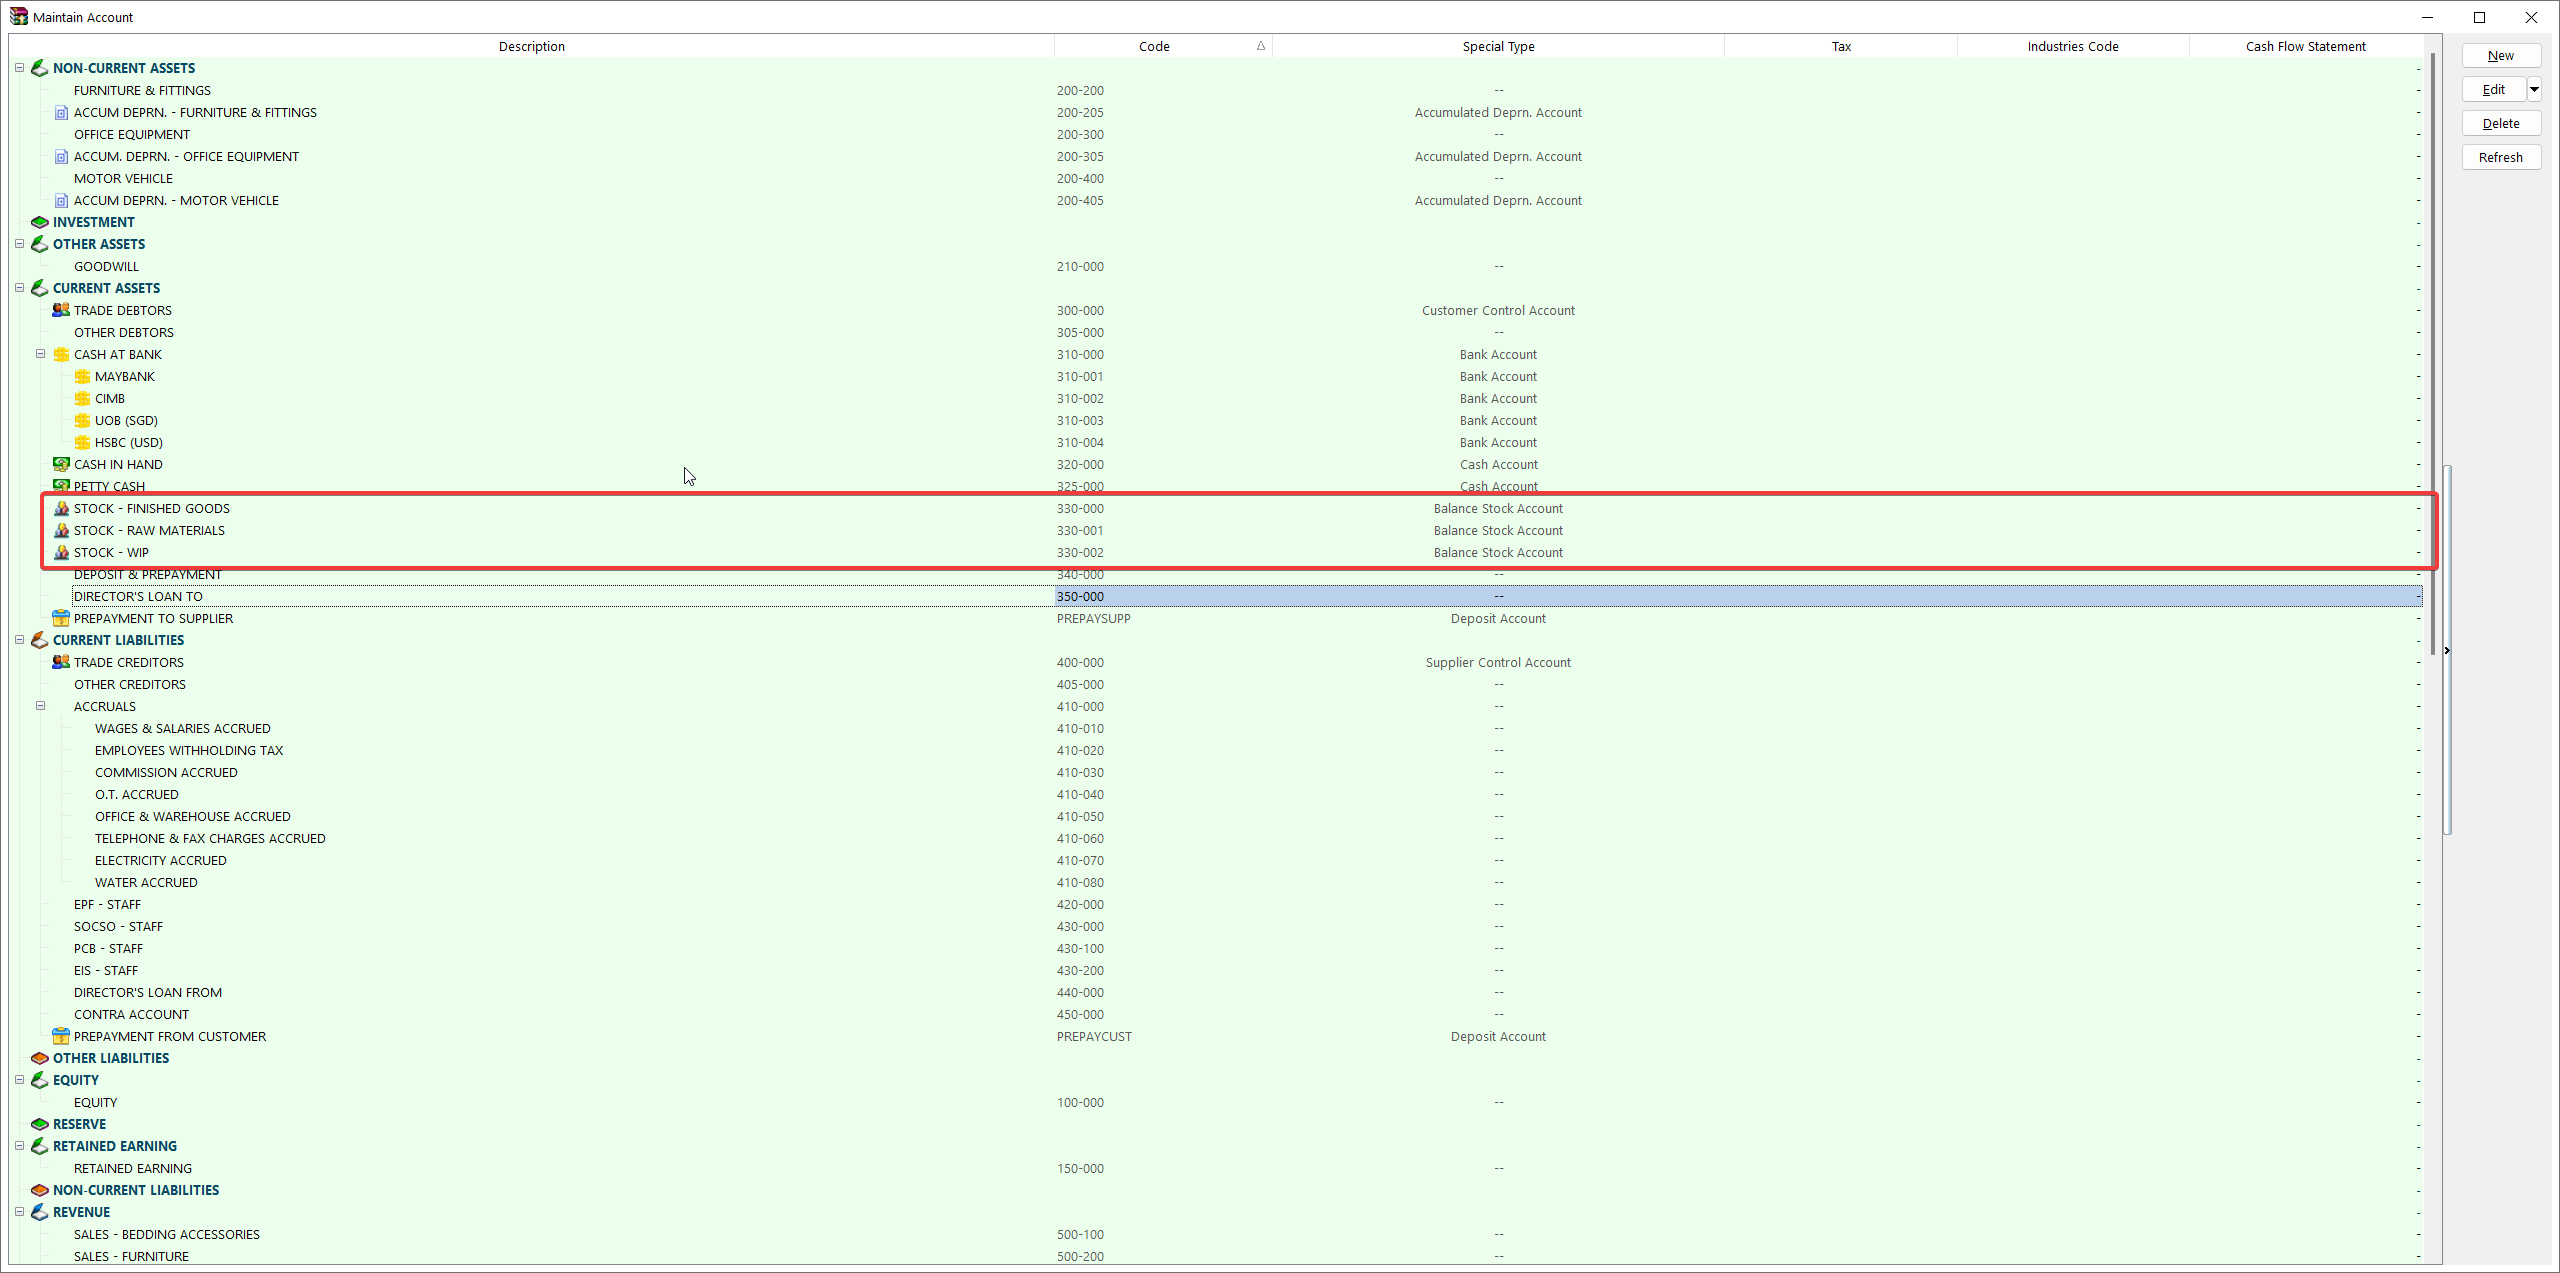
Create finished good, raw material, and WIP's closing stock account in your balance sheet current asset account as shown below.
-
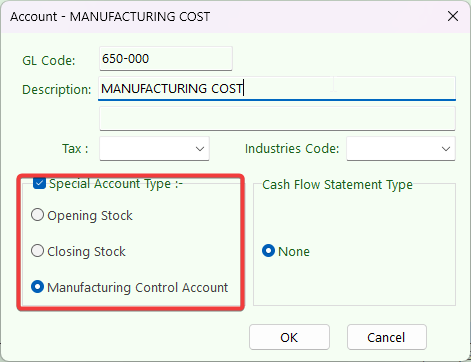
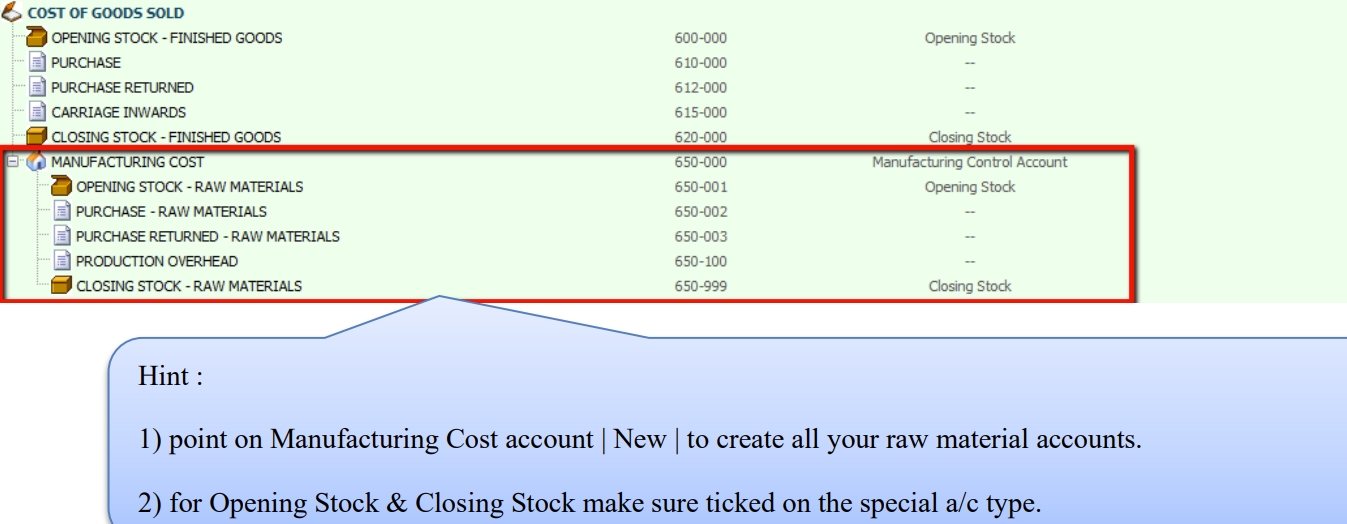
Create Manufacturing Account under Cost of Goods Sold (Profit & Loss).
-
Highlight on Cost of Goods Sold and click on the New button. Insert GL Code, Description and make sure to tick on a special Account type Manufacturing Control Account.
-
Highlight on Cost of Goods Sold and click on the New button. Insert GL Code, Description and make sure to tick on a special Account type Manufacturing Control Account.
-
Stock Group
Stock > Maintain Stock Group:
Used to differentiate the types of stocks and the costing method used for the stock, e.g., raw materials, finished goods, etc.
To produce a chemical products, the costing calculation based on stock group:
-
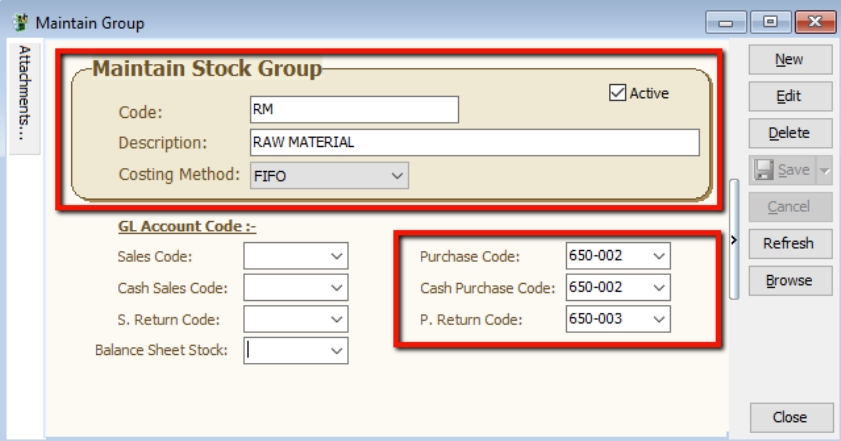
Raw Materials
- Assign your Raw Material Purchase code, Cash Purchase code, Purchase Return code.
- Costing Method: FIFO
-
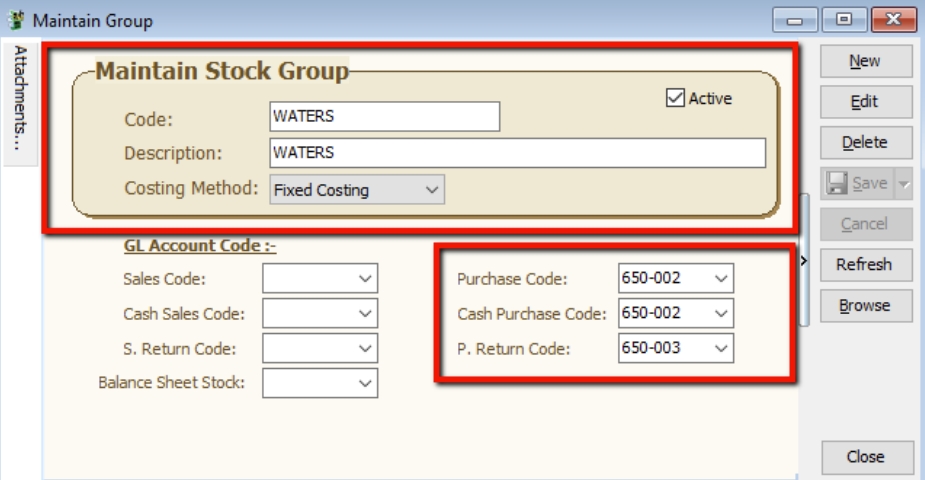
Water
- Assign your Raw Material Purchase code, Cash Purchase code, Purchase Return code.
- Costing Method: Fixed Costing
-
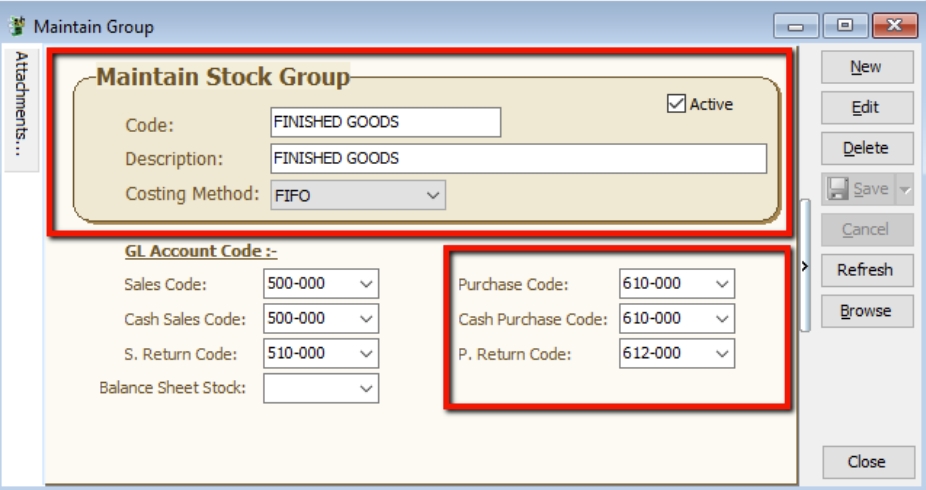
Finished Goods
- Assign your Finished Goods Purchase code, Cash Purchase code, Purchase Return code.
- Costing Method: FIFO
Stock Item
Stock > Maintain Stock Item:
Set up the stock item master data for all types of stock. e.g., raw materials, end products, trading products, etc.
-
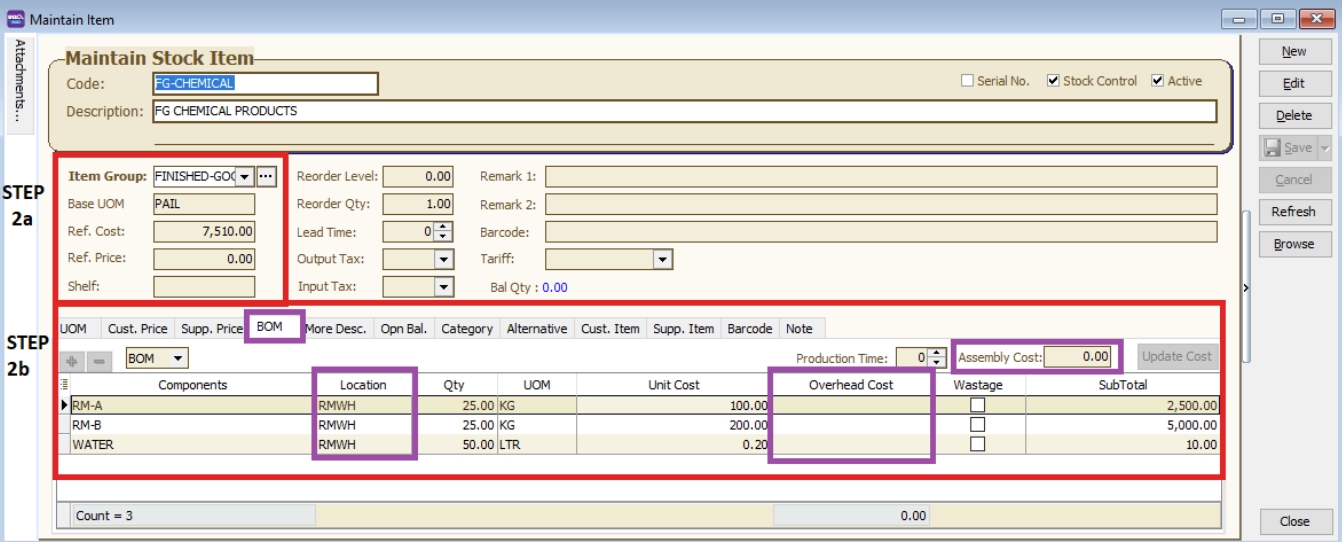
Create all your raw materials items and assign stock group respectively.

-
Create your finished goods item and assign raw materials.
-
Assign stock group, enter based UOM, ref cost and ref price.
-
Go to the BOM tab, choose this product as a BOM item, and assign all the raw materials, quantity needed.
- Location is the Raw Materials kept and deducted from which warehouse.
- Overhead Cost is a fixed additional cost to the material cost incurred during each material process.
- Assembly Cost is a fixed cost incurred to the entire process for final products.
-
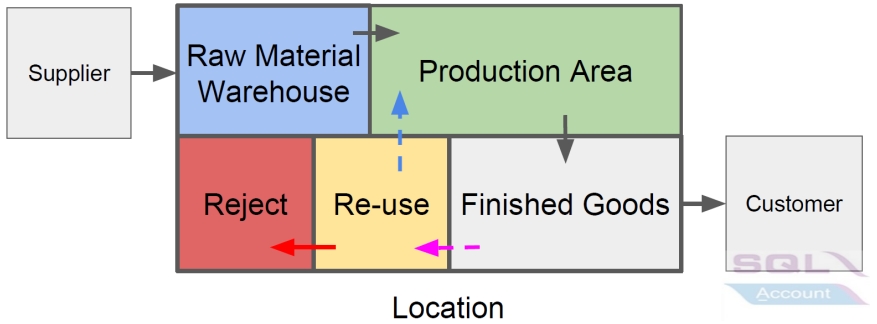
Location (Warehouse)
Stock > Maintain Location:
Define the warehouse code to identify the stock movement between the locations.
-
Receive raw materials from purchase and keep at the Raw Materials Warehouse.
-
Production uses the materials to produce the final products. Raw materials must be deducted from the Raw Materials Warehouse.
-
Final products will be kept at the Finished Goods Warehouse.
-
Work in progress stock kept in WIP Warehouse.
Overview Workflow
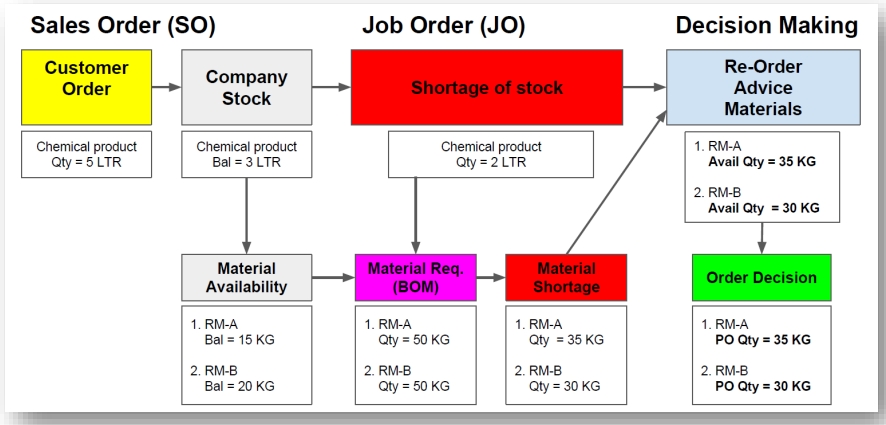
The sales coordinator usually inputs the Sales Order (SO) based on the customer's PO. The stock products will be updated in the system as the ordered quantity. If the stock is purchased from a supplier, then the purchaser needs to transfer from SO to PO.
If the stock is manufactured, then you have to proceed to the Job Order process. How much material/components are required to meet the products ordered by the customer? This question is raised by the Material Planning department. Therefore, the Job Order takes place as an order to be input after the Sales Order. It will plan the materials/components required based on the quantity ordered from the Sales Order.
When products are produced, you have to transfer the Job Order to the Stock Assembly to commit the stock on hand.

Job Order
Sales coordinator usually will input the Sales Order (SO) based on the customer PO received. The stock products will be updated into the system as ordered qty.
How much of the materials/components required to meet the products ordered by the customer? This question was raised by the Material Planning department. Therefore, the Job Order takes place as the order to be input after the Sales Order. It will plan the materials/components required based on the qty ordered from Sales Order. When products are produced out, basically you have to transfer the Job Order to the Stock Assembly to commit the stock on hand.
The SO > PO and Job Order modules are required.
For more information about price, please refer to your sales agent.
Sales Order
-
Create Sales Order (SO)
-
Go to Sales > Sales Order
-
Create and save the customer PO into Sales Order.
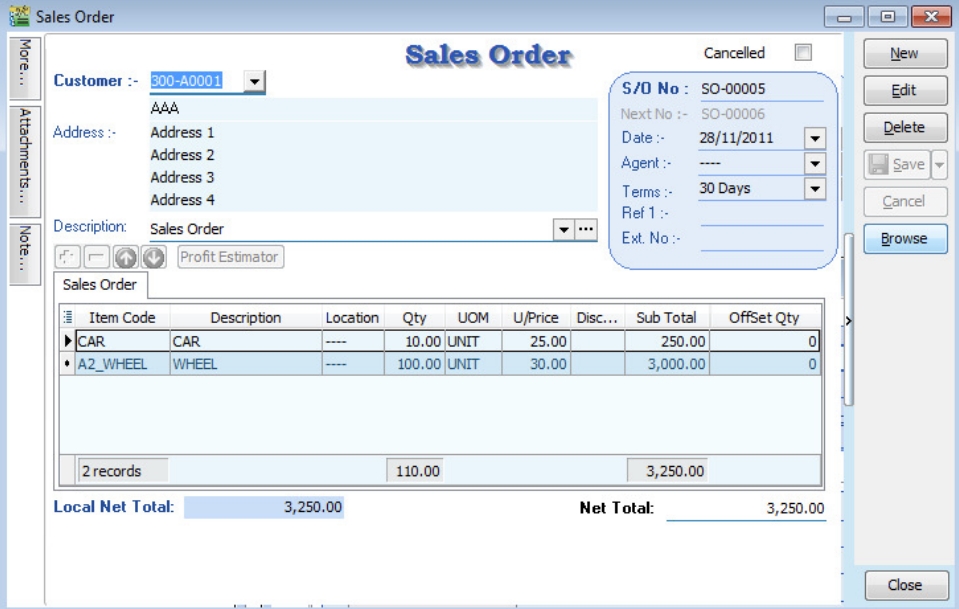
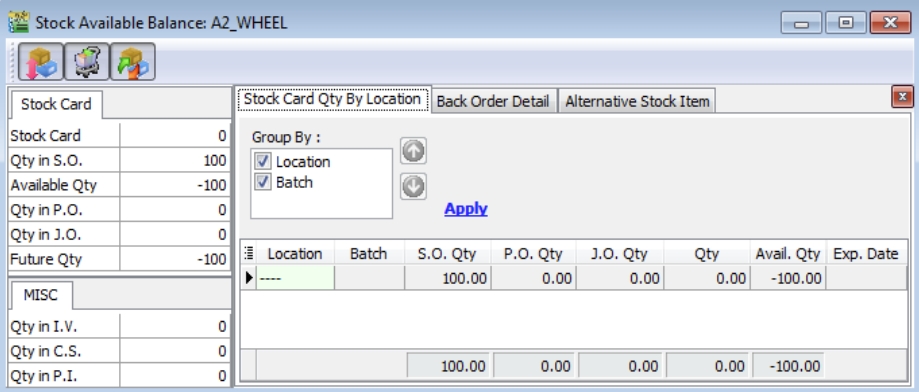
To check the available balance for SO stock:
-
You can press F11 (Available Stock Balance) on the item code highlighted.
-
Below is CAR stock available balance.

-
Below is WHEEL stock available balance.
New Purchase Order
-
Create New Purchase Order (PO)
-
Go to Purchase > Purchase Order
-
Click on the New button to start with a new PO
-
Select the Supplier

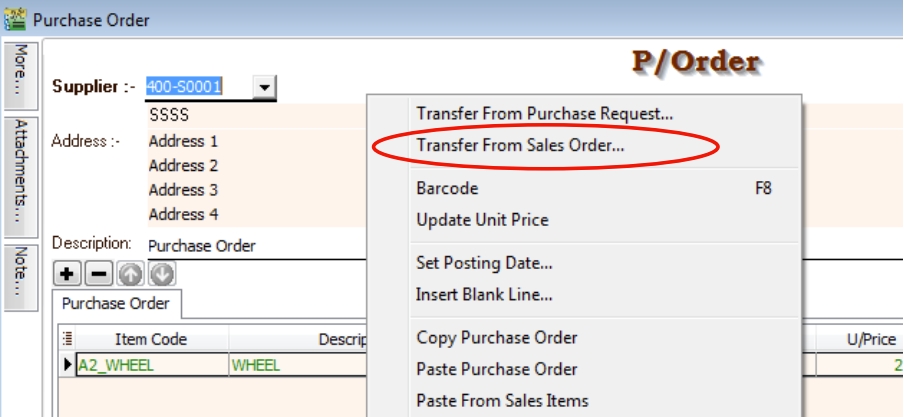
Transfer PO from SO
-
Right-click on P/Order (Title).
-
Click Transfer From Sales Order in the menu.
-
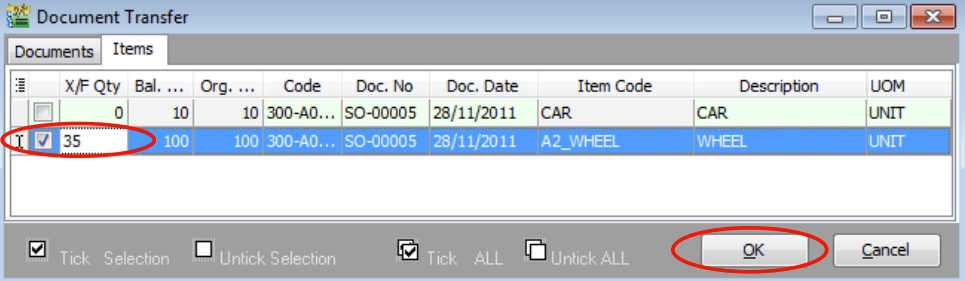
Document Transfer (SO -> PO)
-
Pick the Item from the SO list.
-
Input Transfer Qty to transfer over PO.
-
Click OK to proceed.
-
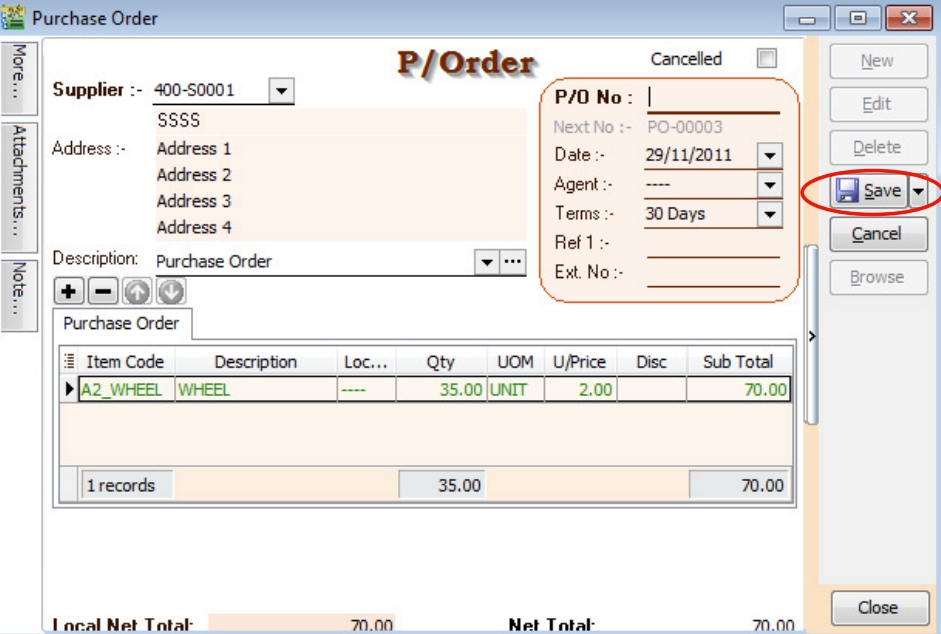
Click the Save button.
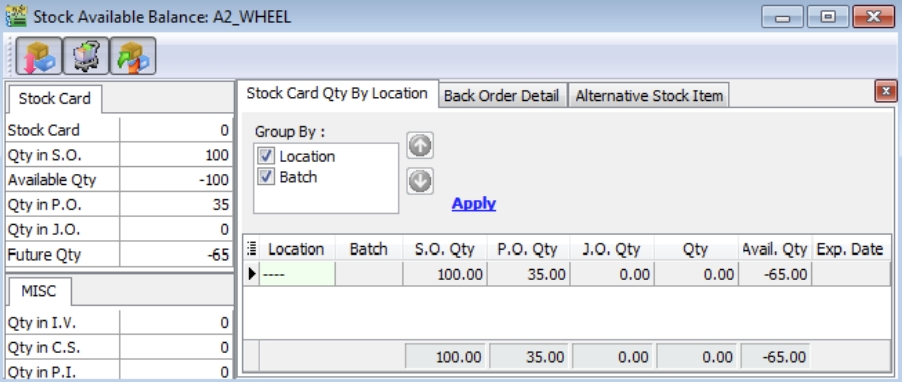
To check the available balance for PO Stock:
-
You can press F11 (Available Stock Balance) on the item code highlighted.
-
Below is WHEEL stock available balance.
New Job Order
-
Click the New button and select the Customer.
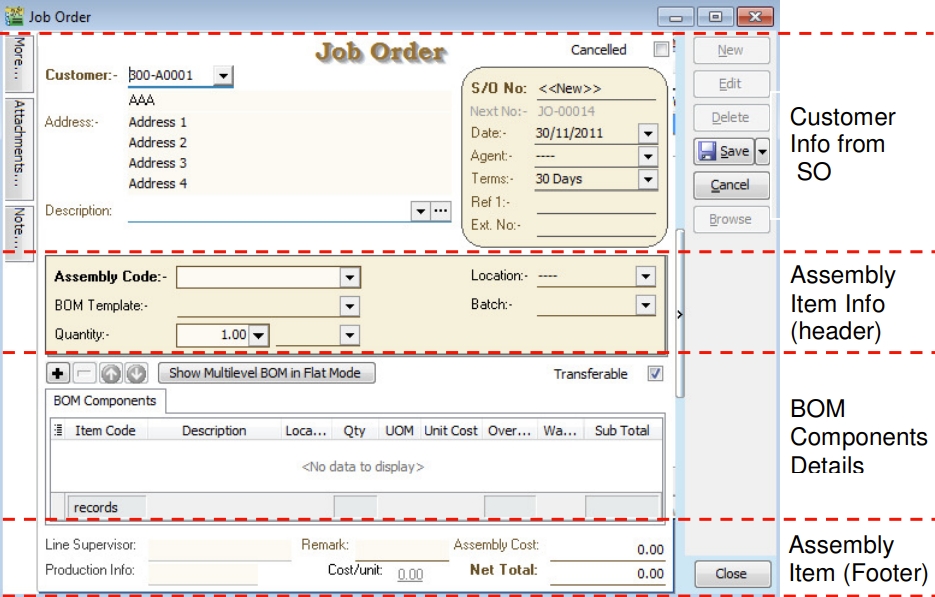
Customer Info from SO
Basically, the customer and other information is copied from the SO.
Assembly Item Info (Header & Footer)
The assembly item is transferred from the SO. It will determine the BOM Components required and the assembly unit cost.
BOM Components Details
Total components quantity requirements to meet the total output.
Document Transfer (SO > JO)
-
Create New Job Order (JO)
Go to Production > Job Order....
-
Click the New button to start with a new JO.
-
Select the Customer.
-
-
JO Transfer From SO
-
Right-click on Job Order (Title).
-
Click Transfer From Sales Order in the menu.
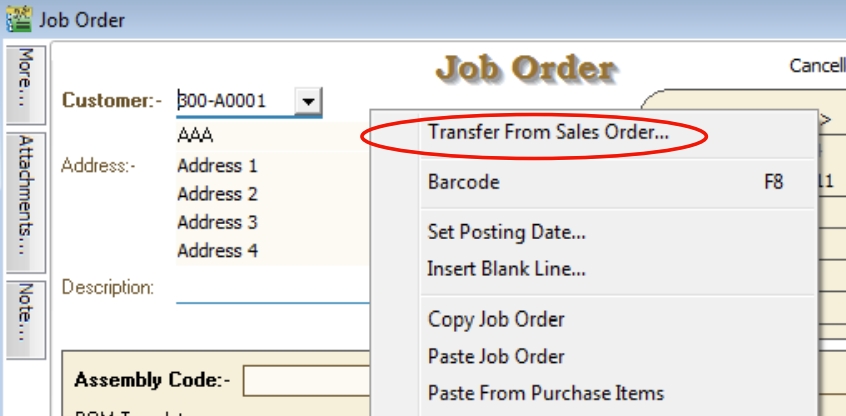
-
-
Document Transfer (SO > JO)
-
Pick the Item from the SO list.
-
Input Transfer Qty to transfer over JO.
-
Click OK to proceed.
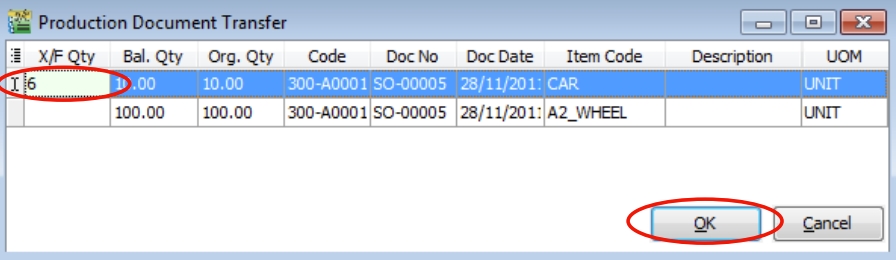
-
-
Show Multilevel BOM in Flat Mode
This function enables users to drill down to the flattened level of the multilevel BOM structure. For example, the CAR multilevel BOM structure.
Level 0 Level 1 Level 2 Level 3 Car Frame Front Frame Orange Car Frame Front Frame Screw Car Frame Back Frame Red Light Car Frame Back Frame Screw Car Wheel Rim Car Wheel Tyres Car Engine Engine Block Filter Car Engine Engine Block Screw Car Engine Piston Tube Car Engine Piston Cover Car Labour Before FLAT MODE, BOM components show at LEVEL 1.
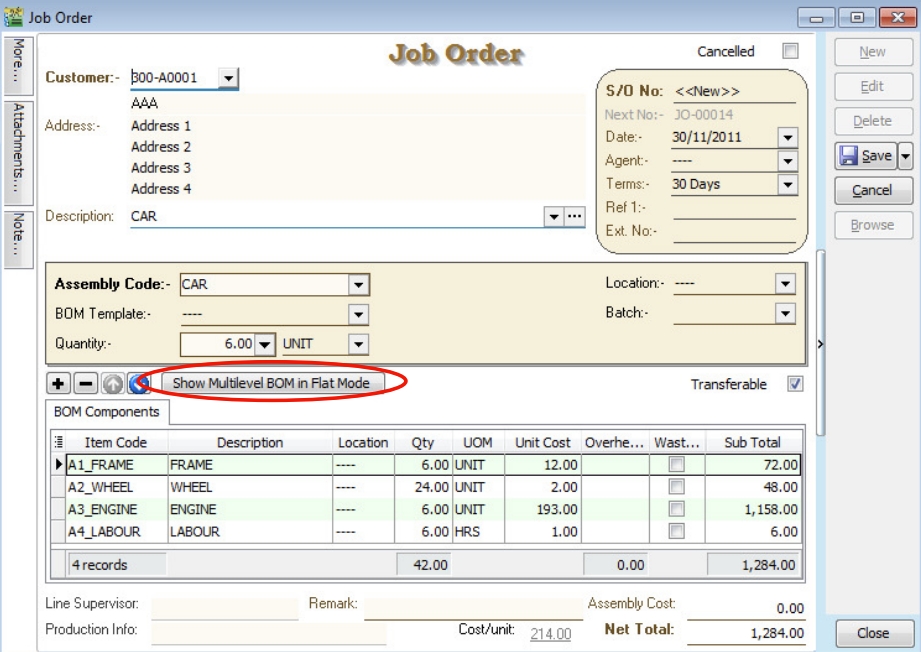
Click the Show Multilevel BOM in Flat Mode button.
The following message will appear.
Press NO to keep the BOM components at LEVEL 1.
Press YES to continue to flatten the multilevel BOM to LEVEL 3.
After FLAT MODE, BOM components show at LEVEL 3.
-
Save the JO Document
Click the Save button.

-
JO Check the Available Stock Balance
You can press F11 (Available Stock Balance) on the item code highlighted.
Below is component “FRAME” stock available balance.
 note
noteResult for component "FRAME" Item:
SO Qty = 0.00
PO Qty = 0.00
JO Qty = -6.00
Qty (On Hand) = 0.00
Available Qty = -6.00
Below is component “WHEEL” stock available balance.
 note
noteResult for component "WHEEL" Item:
SO Qty = -100.00
PO Qty = +35.00
JO Qty = -24.00
Qty (On Hand) = 0.00
Available Qty = -89.00
Below is component "Engine" stock available balance.
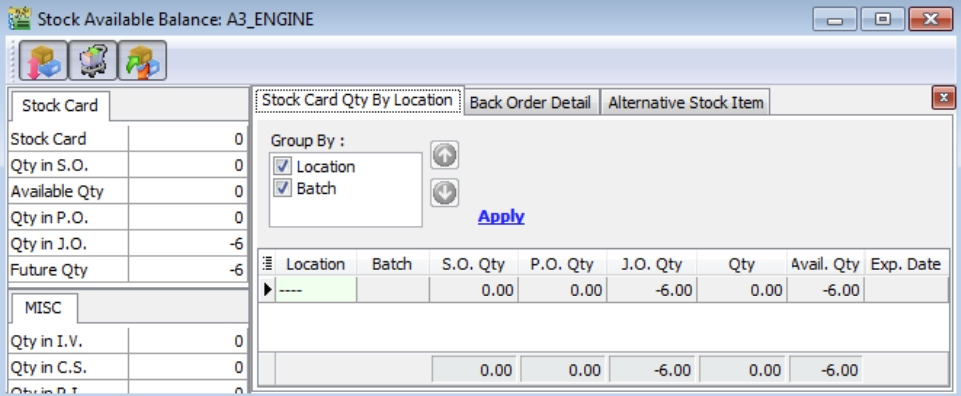 note
noteResult for component "ENGINE" Item:
SO Qty = 0.00
PO Qty = 0.00
JO Qty = -6.00
Qty (On Hand) = 0.00
Available Qty = -6.00
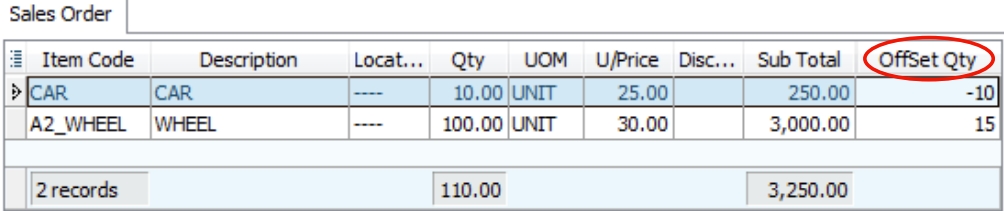
Offset Qty In Sales Order
What is the purpose of the Offset Qty in Sales Order? You will see a new column named “Offset Qty”. It allows you to input a value to increase or reduce the original QTY to be transferred to Purchase Order and Job Order.
-
Positive Offset Qty
REDUCE the Transferable QTY to PO and JO.
For example,
SO Original Qty Offset Qty Transferable to PO/JO 100.00 0.00 (default) 100.00 100.00 +15.00 85.00 -
Negative Offset Qty
INCREASE the Transferable QTY to PO and JO.
For example,
SO Original Qty Offset Qty Transferable to PO/JO 100.00 0.00 (default) 100.00 100.00 -15.00 115.00
Split to X Process
-
Use this field to assign multiple processes/machines in one Job Order/Stock Item Assembly to produce the same End Products using the same range of BOM components.
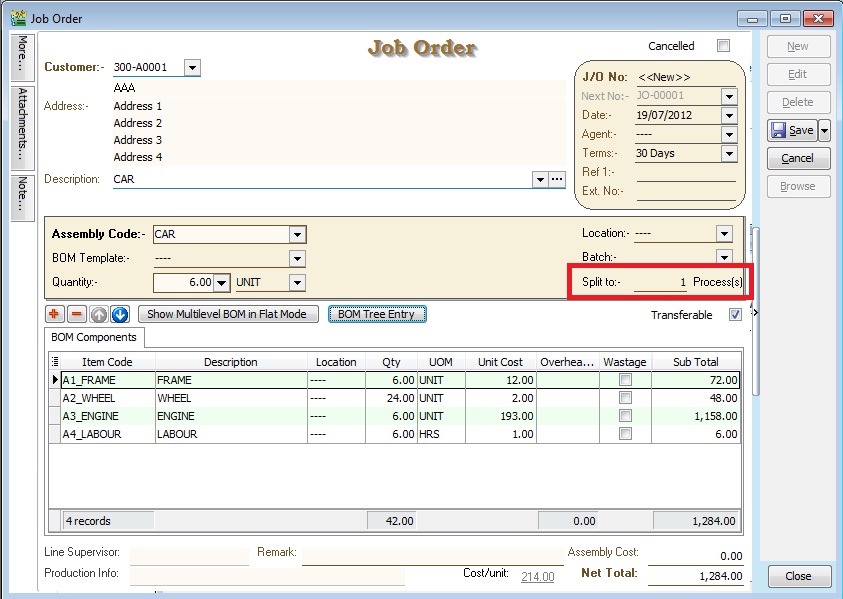
-
For example, To make a cup of MILO KAO KAO, it needs - MILO Powder x 5 spoons - Sugar x 0.5 spoon - Water x 100ml
In order to make 100 cups of milo from one Job Order created, we need 10 persons to make it more efficient. Therefore, we have to input "Split to 10 process(s)", it means 10 persons processing. Job Order will break down the BOM components into 10 processes like below:
No of process(s) 1 2 3 4 5 6 7 8 9 10 TOTAL MILO POWDER 50 50 50 50 50 50 50 50 50 50 500 spoons Sugar 5 5 5 5 5 5 5 5 5 5 50 spoons Water 1000 1000 1000 1000 1000 1000 1000 1000 1000 1000 10000 ml NOTE: Preview and select the standard report name "Job Order 2 with Multiplier - 30 Columns (without cost)".
BOM Tree Entry
-
Some manufacturing companies need to modify and overwrite the standard BOM structure during the entry stage. This button helps to add/remove the components to overwrite the BOM structure.
-
Click the BOM Tree Entry button.
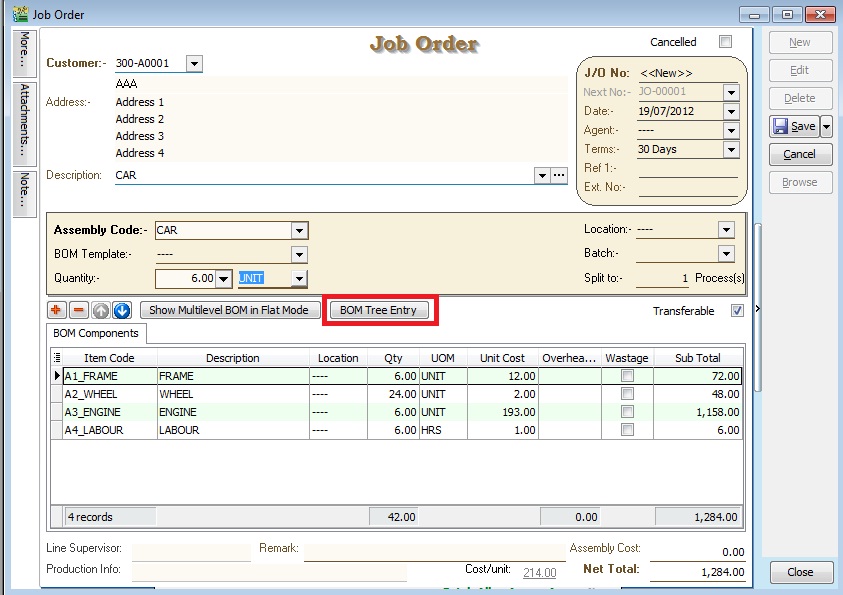
-
You can drill down all the BOM structures.
-
Tick the components in the tree you wish to insert into the Job Order/Stock Assembly/Disassembly.
-
Press OK to confirm.
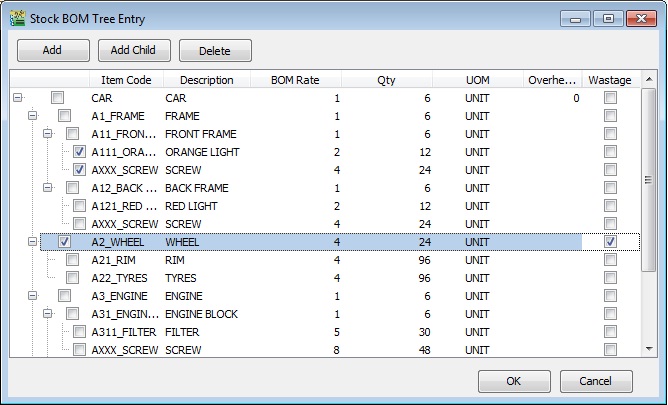
Button Function Add To add new components at LEVEL 1 ONLY Add Child To add new child components start from LEVEL 2 onwards Delete To remove the components at all LEVEL 1, 2, 3, 4, ...
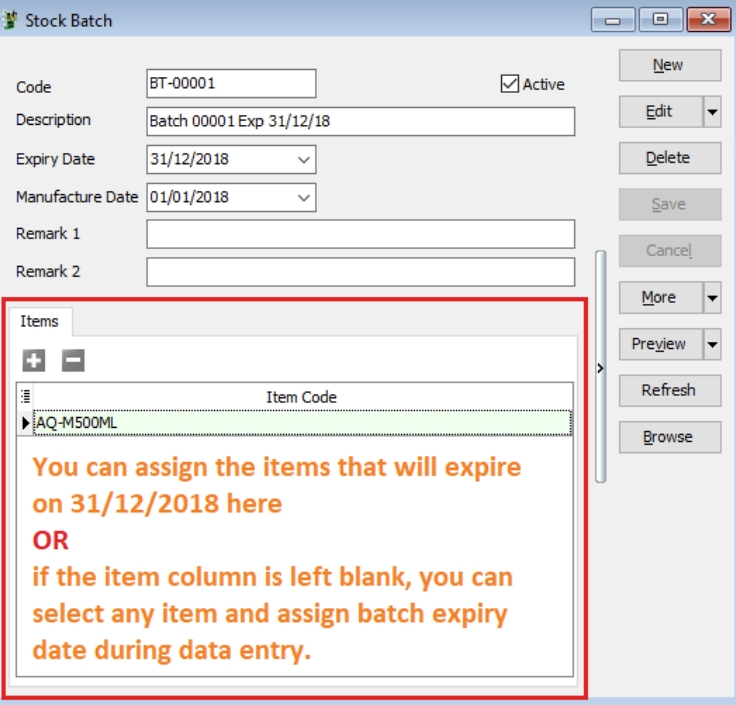
Stock Batch
Watch tutorial video here: Stock Maintain Batch
This module commonly used in food manufacturing, pharmaceutical, cosmetic/skin care product. It helps to trace the expiry date of the products. It can set the manufacturing date for label print purposes and easy to identify the stock expired to write off using stock adjustment.
-
Stock > Maintain Batch > New
Insert the code, description, Expiry date, Manufacturing date & items that will expire on this expiry date.
-
Purchase > Purchase Invoice > New
You can enable Batch column from the hidden bar and assign your stock batch during purchase for every individual item.

-
Sales > Sales Invoice > New
In Sales Invoice, you can select the item issue out from which batch (expiry date), system will also show the expiry day & quantity available.

-
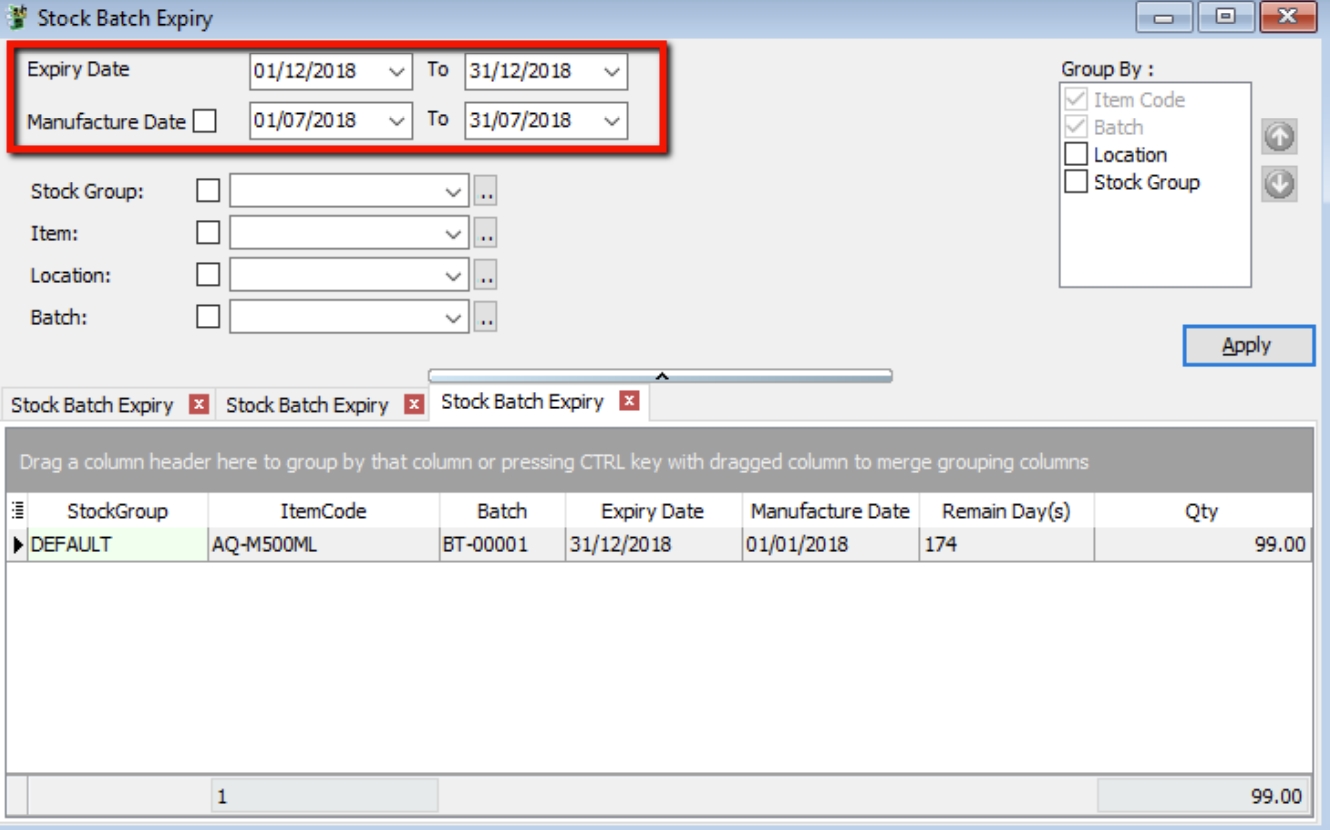
Stock > Print Stock Batch Expiry
You can also check the listing of your product that will be expire soon as well as you can trace the product manufacture date.
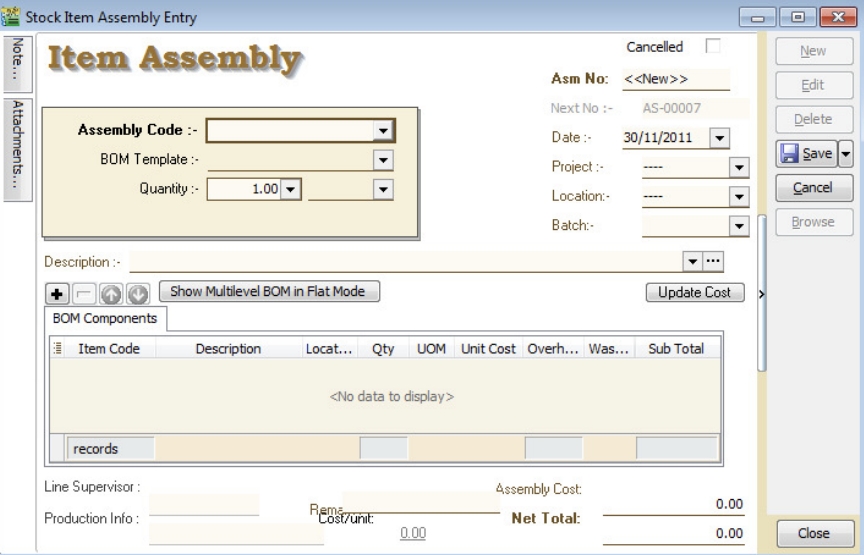
Stock Item Assembly
Stock Item Assembly is an entry form to record the actual components (materials) usage to convert/produce the final product based on the actual output. Unit cost will be used to revalue the stock balance.
Actual components (materials) used will be deducted from the stock balance. However, the final products will replenish the stock balance. You can always check the stock movement from the stock card report.
Stock Item Assembly (Transfer From JO)
-
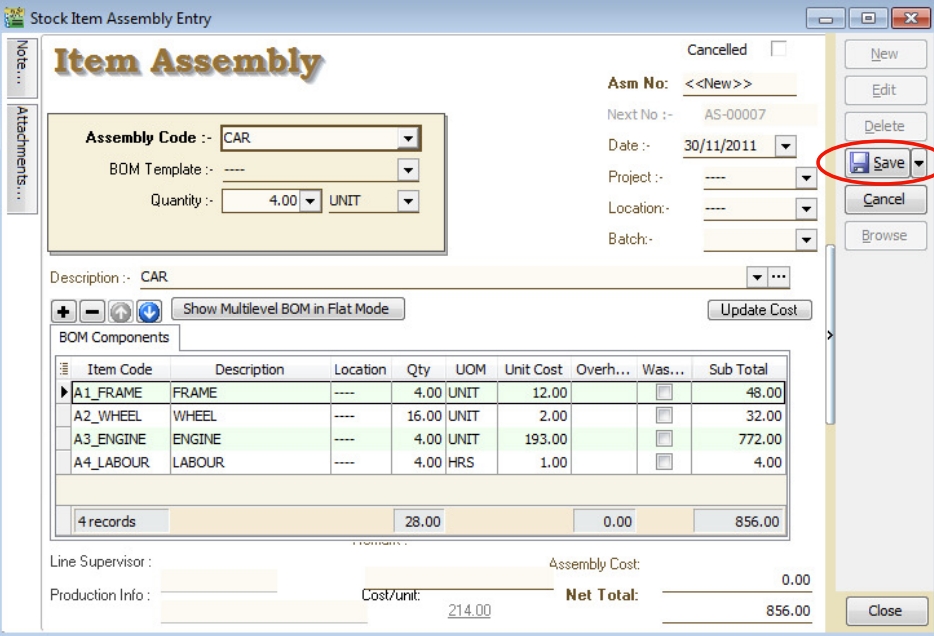
Create New Stock Item Assembly (AS)
Go to Production > Stock Item Assembly….
Click the New button to start with a new AS.
-
AS Transfer From JO
-
Right-click on Item Assembly (Title).
-
Click Transfer From Job Order in the menu.
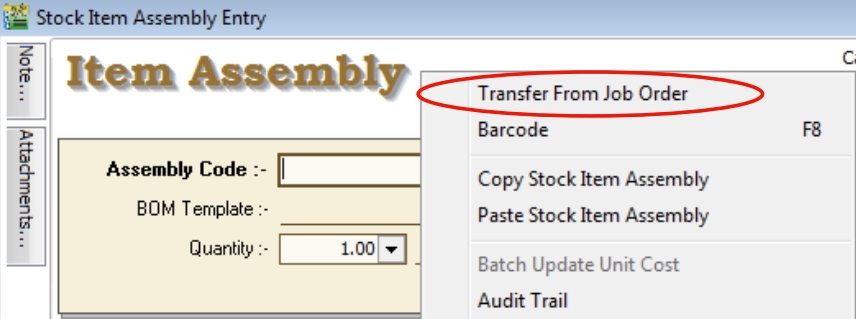
-
-
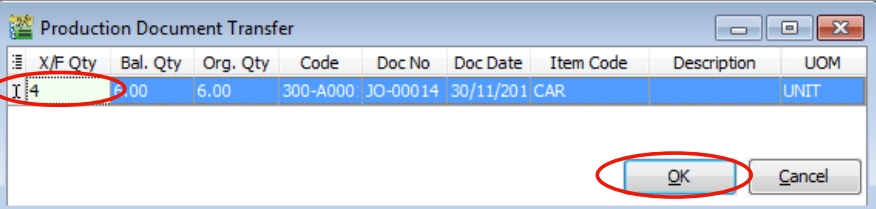
Document Transfer (JO → AS)
-
Pick the Item from the JO list.
-
Input X/F Qty to transfer over AS.
-
Click OK to proceed.
-
-
Save the AS Document
Click the Save button.
-
AS Check the Available Stock Balance
You can press F11 (Available Stock Balance) on the item code highlighted.
Below is component “FRAME” stock available balance.
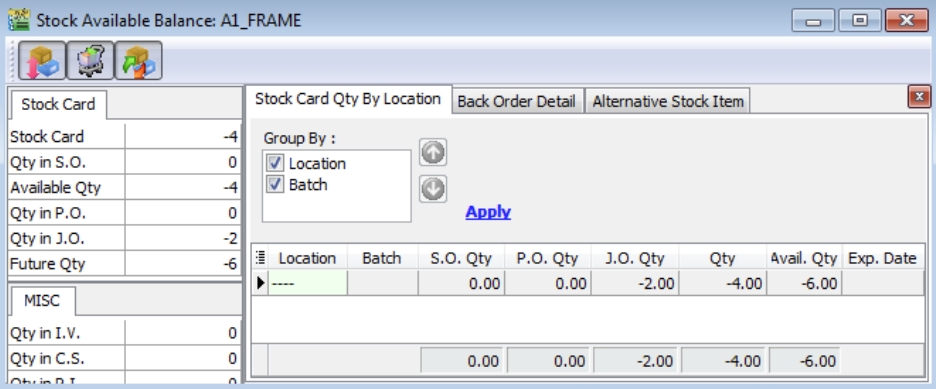 note
noteResult for component "FRAME" item:
SO Qty = 0.00
PO Qty = 0.00
JO Qty = -2.00
Qty (On Hand) = -4.00
Available Qty = -6.00
Below is component “WHEEL” stock available balance.
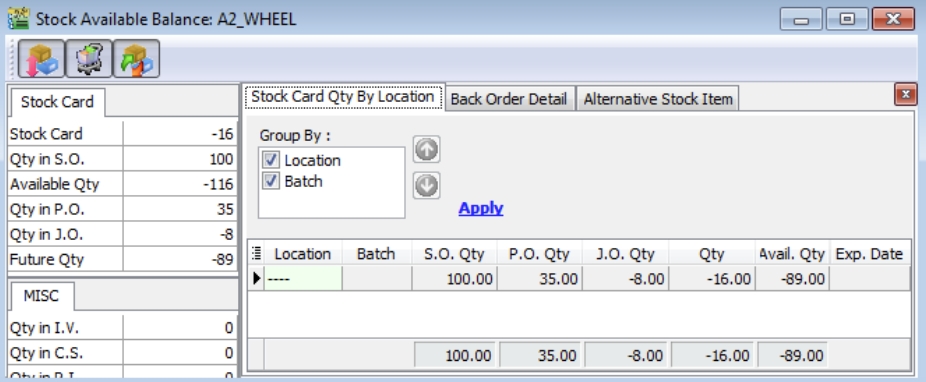 note
noteResult for component "WHEEL" item:
SO Qty = -100.00
PO Qty = +35.00
JO Qty = -8.00
Qty (On Hand) = -16.00
Available Qty = -89.00
Below is component “ENGINE” stock available balance.
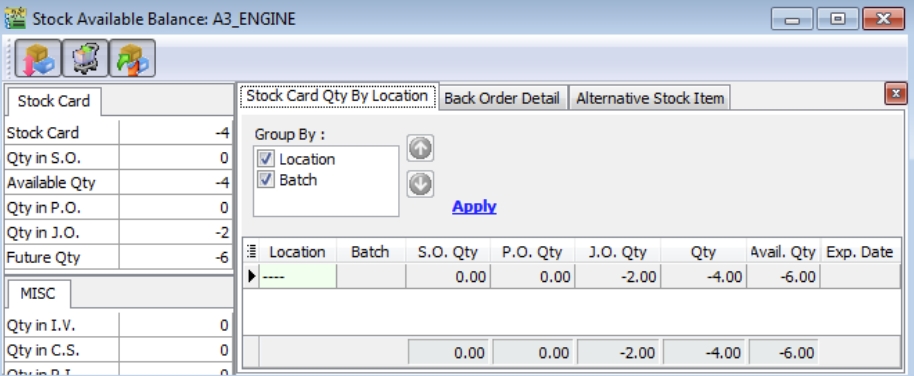 note
noteResult for component "ENGINE" item:
SO Qty = 0.00
PO Qty = 0.00
JO Qty = -2.00
Qty (On Hand) = -4.00
Available Qty = -6.00
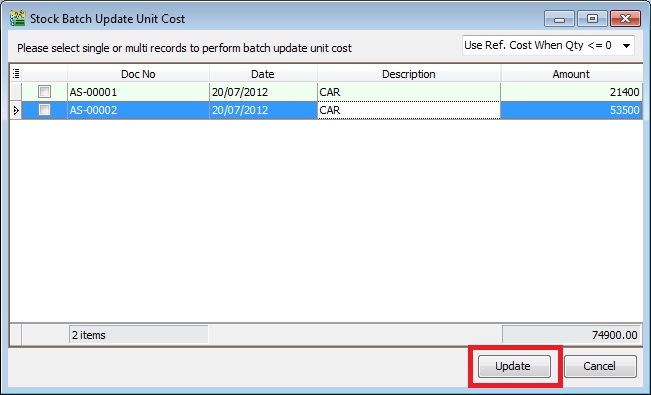
Batch Update Unit Cost
Allows users to run Update Unit Cost for ALL or Stock Item Assembly selected.
-
At Stock Item Assembly browse, Right-click on the area between the detail and close button.
-
You will see the small menu. See screenshot below.
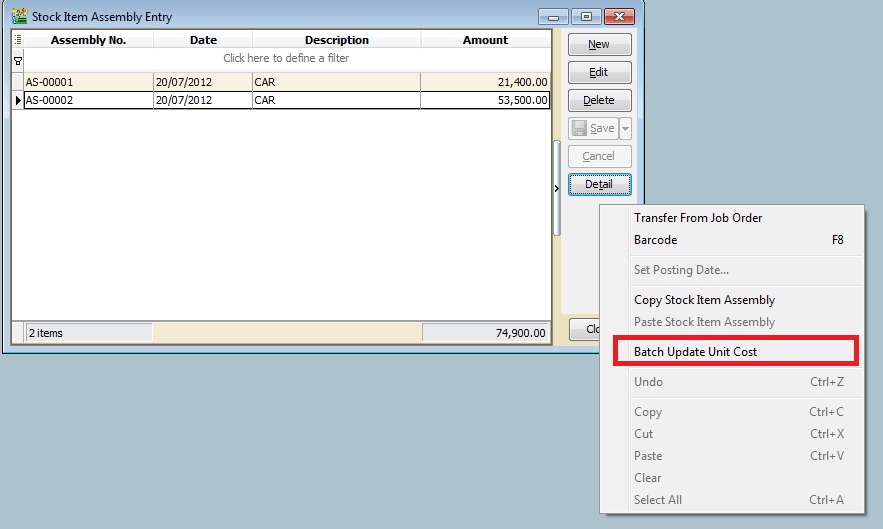
-
Click Batch Update Unit Cost. You will see the screenshot below.
-
You can highlight more than one Stock Assembly document. Right-click and "Tick Selection".
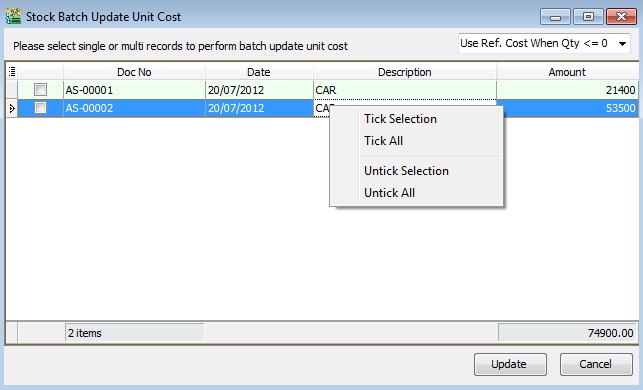
-
After that, press the Update button to start.
-
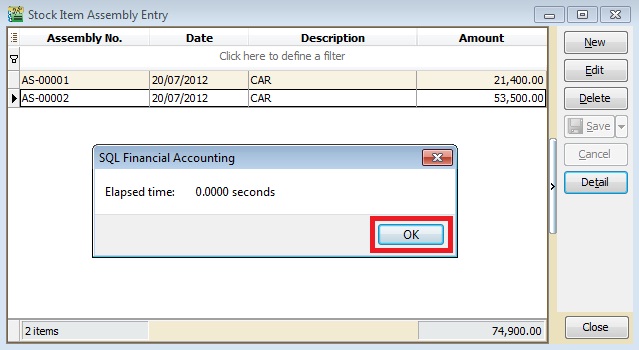
Once completed, the following message will appear. Press OK to exit.
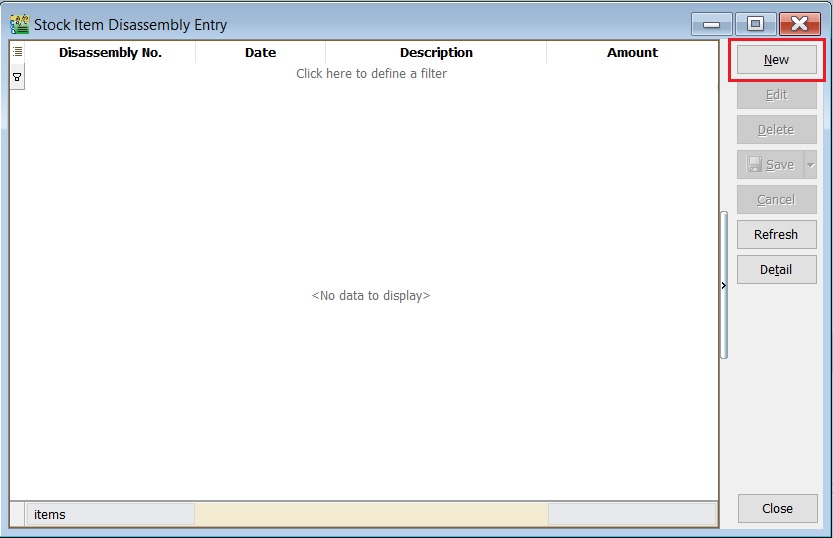
Stock Item Disassembly
Stock Item Disassembly is an entry form to record the actual components (materials) to be received after convert or disassemble from the final product.
Components (materials) will be added into the stock balance. However, the final products will be deducted from the stock balance. You can always check the stock movement from the stock card report.
Stock Item Disassembly (DS) Entry
-
Click the New button.
-
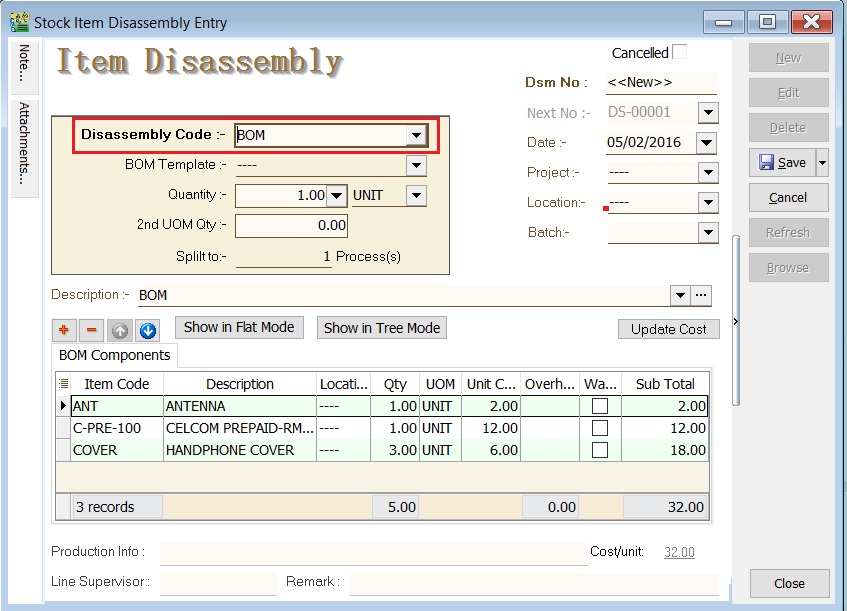
Select the Disassembly Code to disassemble.
-
Enter the quantity. BOM components quantity based on the BOM master in Maintain Stock Item.
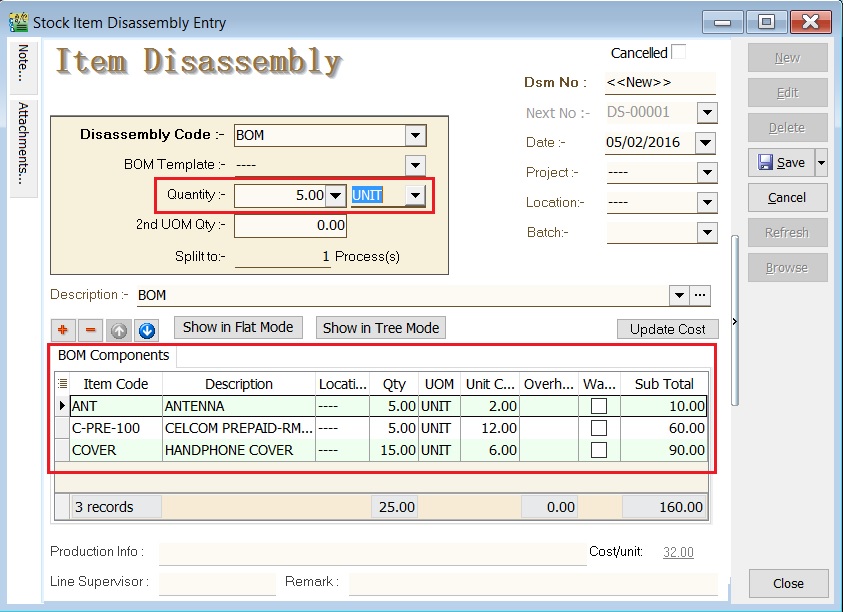
-
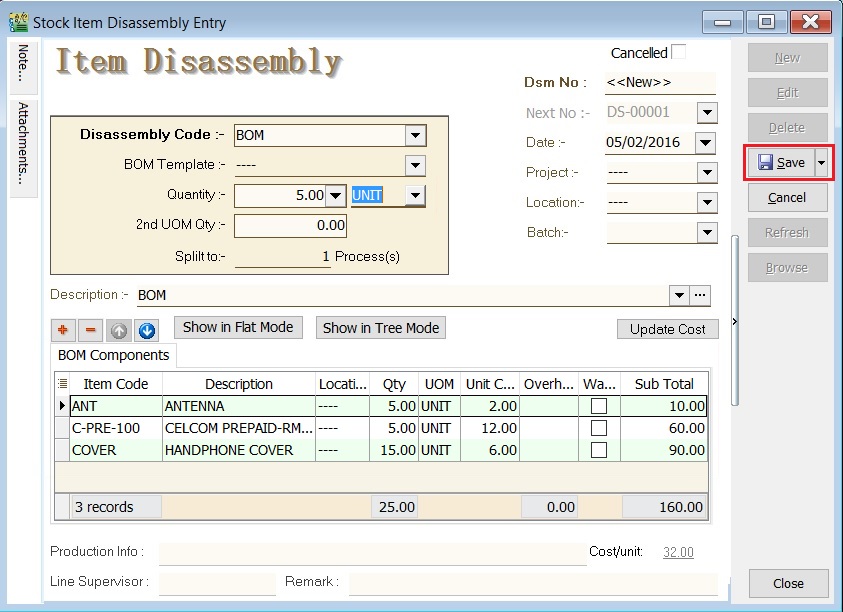
Click the Save button.
Stock Balance Result After Disassembly
Stock balance results:
| Item Code | Qty | DS | After DS Qty | |
|---|---|---|---|---|
| End Products | BOM | 5.00 | -5.00 | 0.00 |
| Component | ANT | 0.00 | +5.00 | 5.00 |
| Component | C-PRE-100 | 0.00 | +5.00 | 5.00 |
| Component | COVER | 0.00 | +15.00 | 15.00 |