Guide
Use this guide to configure POS settings, payment methods, terminals, and masterdata export for X-Pos.
In X-Pos, masterdata is the setup data sent from SQL Account to a POS terminal so it can operate correctly.
It includes items, prices, payment methods, POS settings, customer and stock/location information. Synchronizing masterdata updates the terminal with the latest configuration; downloading masterdata creates a ZIP file for manual transfer.
Maintain POS Settings
Use Maintain POS Settings to create and manage POS configuration profiles. Each profile controls posting, payment, POS screen, customer display, receipt printer, and counter-closing behaviour.
Access Maintain POS Settings
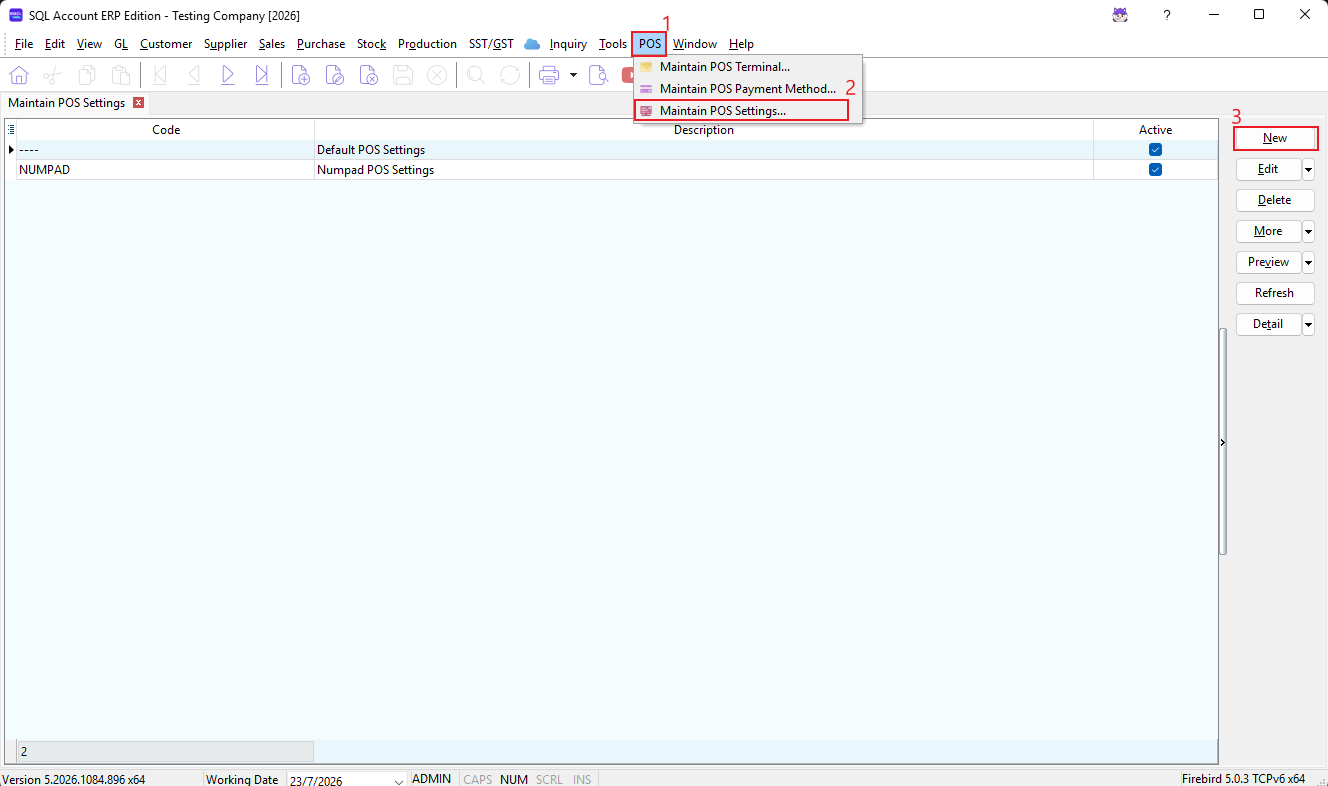
- From the main menu, go to POS.
- Click Maintain POS Settings....
- Open an existing profile to edit it, or click New to create a profile.
The browse screen displays the profile code, description, and active status. The default profile uses code ----, which cannot be changed.
Create or Edit a Profile
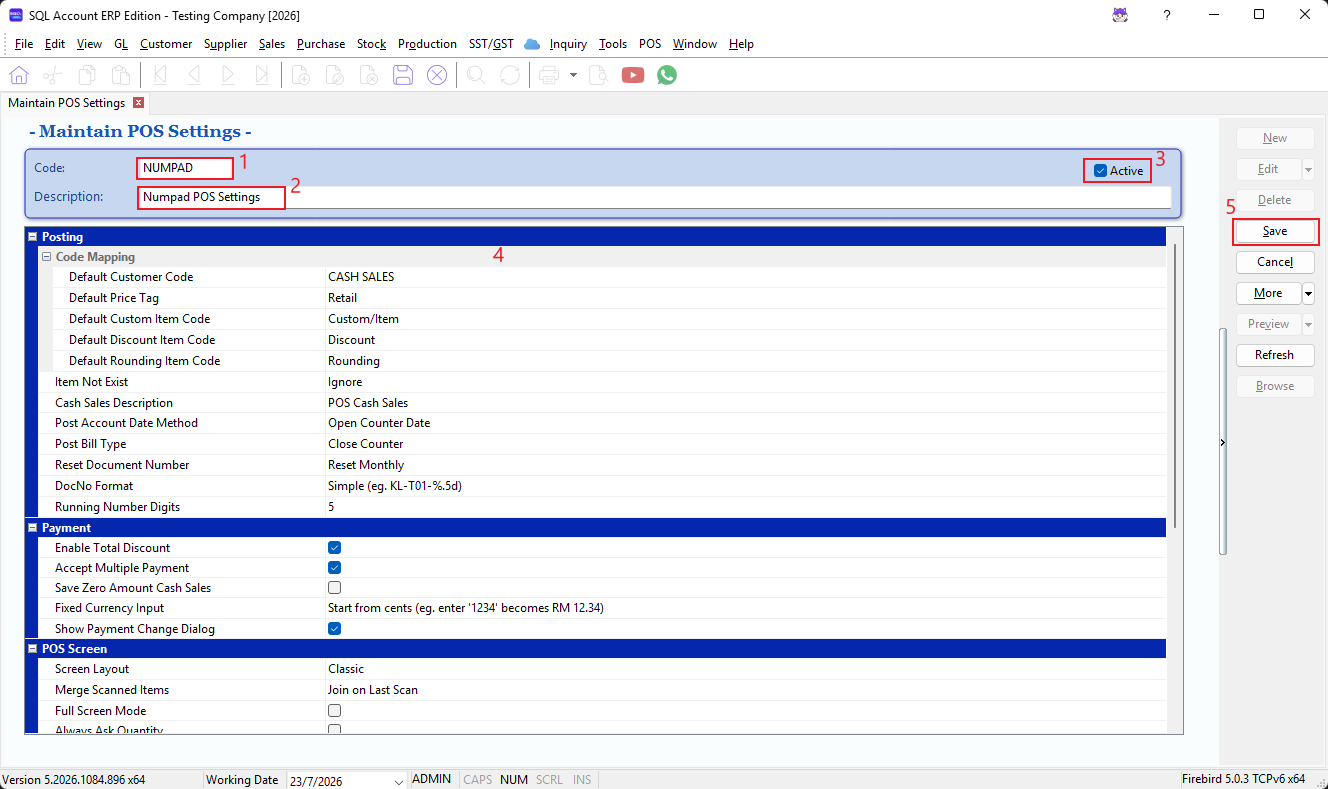
- Enter a short Code for a new profile, such as
NUMPADorRETAIL. - Enter a meaningful Description.
- Select Active when the profile is ready for use.
- Configure the options in the settings grid.
- Click Save to save the profile and its settings.
Posting
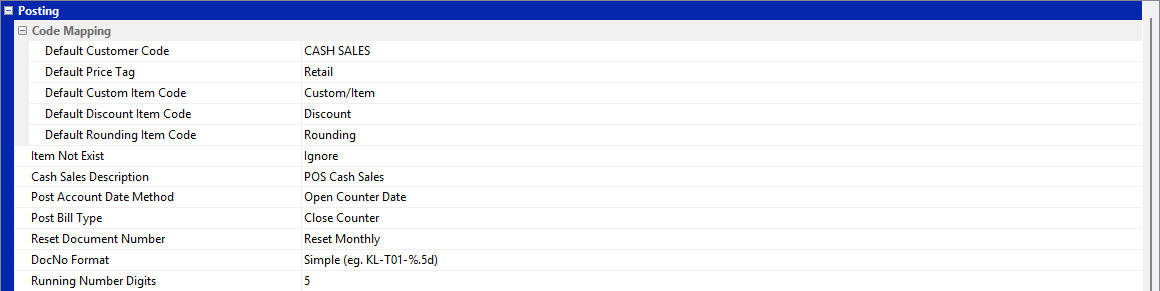
Code Mapping
| Setting | Description |
|---|---|
| Default Customer Code | Customer code used for POS cash sales when no customer is selected. |
| Default Price Tag | Price tag used as the default selling price source. |
| Default Custom Item Code | Item code used when a cashier enters a custom or non-catalogue item. |
| Default Discount Item Code | Item code used to post POS discounts. |
| Default Rounding Item Code | Item code used to post rounding differences. |
Posting Behaviour
| Setting | Description |
|---|---|
| Item Not Exist | Choose whether an unknown scanned item is ignored or posted using the default custom item code. |
| Cash Sales Description | Description used for POS cash-sales documents. |
| Post Account Date Method | Select whether transactions are posted using the counter opening date or counter closing date. |
| Post Bill Type | Controls when bills are posted. The available method now is only Close Counter. |
| Reset Document Number | Select whether document numbers are 1. Never reset 2. Reset monthly 3. Reset yearly |
| DocNo Format | Select a document-number format. 1. Simple 2. Daily 3. Monthly 4. Yearly 5. Full date-and-time |
| Running Number Digits | Enter the number of digits for the running number. The default is 5. |
Payment
| Setting | Description |
|---|---|
| Enable Total Discount | Allows a discount to be applied to the total bill. |
| Accept Multiple Payment | Allows a sale to be settled using more than one payment method. |
| Save Zero Amount Cash Sales | Saves cash-sales documents with a zero amount. |
| Fixed Currency Input | Sets currency input to two implied decimal places or zero implied decimal places. |
| Show Payment Change Dialog | Displays the change-due dialog after payment. |

POS Screen
| Setting | Description |
|---|---|
| Screen Layout | Select 1. Classic 2. Numpad 3. Catalogue 4. Simple Touch 5. Touch |
| Merge Scanned Items | Select whether repeated scans 1. Join the last line 2. Always join an existing line 3. Never join lines |
| Full Screen Mode | Opens POS in full-screen mode. |
| Always Ask Quantity | Prompts the cashier to enter a quantity during item entry. |
| Always Ask Price on Zero Price Item | Prompts for a price when a scanned item has a zero price. |
| Always Ask Batch Selection | Prompts the cashier to select a batch. |
| After Quantity Change Always Reset Price | Restores the item price after the quantity is changed. |
| After Quantity Change Always Reset Discount | Restores the item discount after the quantity is changed. |

Customer Display
Set the customer-facing display Title, Background Color, Font Color, and Font Size to match the outlet's display device and branding.

Receipt Printer
| Setting | Description |
|---|---|
| Auto Print Receipt | Prints the receipt automatically after a sale. |
| Cut Receipt Paper | Sends the cut-paper instruction to a compatible receipt printer. |

Other
| Setting | Description |
|---|---|
| Close Counter with Password | Requires a password when closing a counter. |
| Undo Counter Close Timeout (mins) | Sets the period, from 1 to 60 minutes, during which a closed counter can be undone. |

- Complete the customer, item, discount, and rounding code mappings before processing sales.
- Choose a document-number reset rule and format that meet the outlet's audit and reporting requirements before the first live sale.
- Test the receipt printer before enabling Cut Receipt Paper, as this command depends on printer support.
- Restrict counter-close access and set a suitable undo timeout for the outlet's cash-control process.
Maintain POS Payment Method
Use Maintain POS Payment Method to configure the payment buttons available at the POS counter and map each payment type to the relevant SQL Account payment method.
Access Maintain POS Payment Method
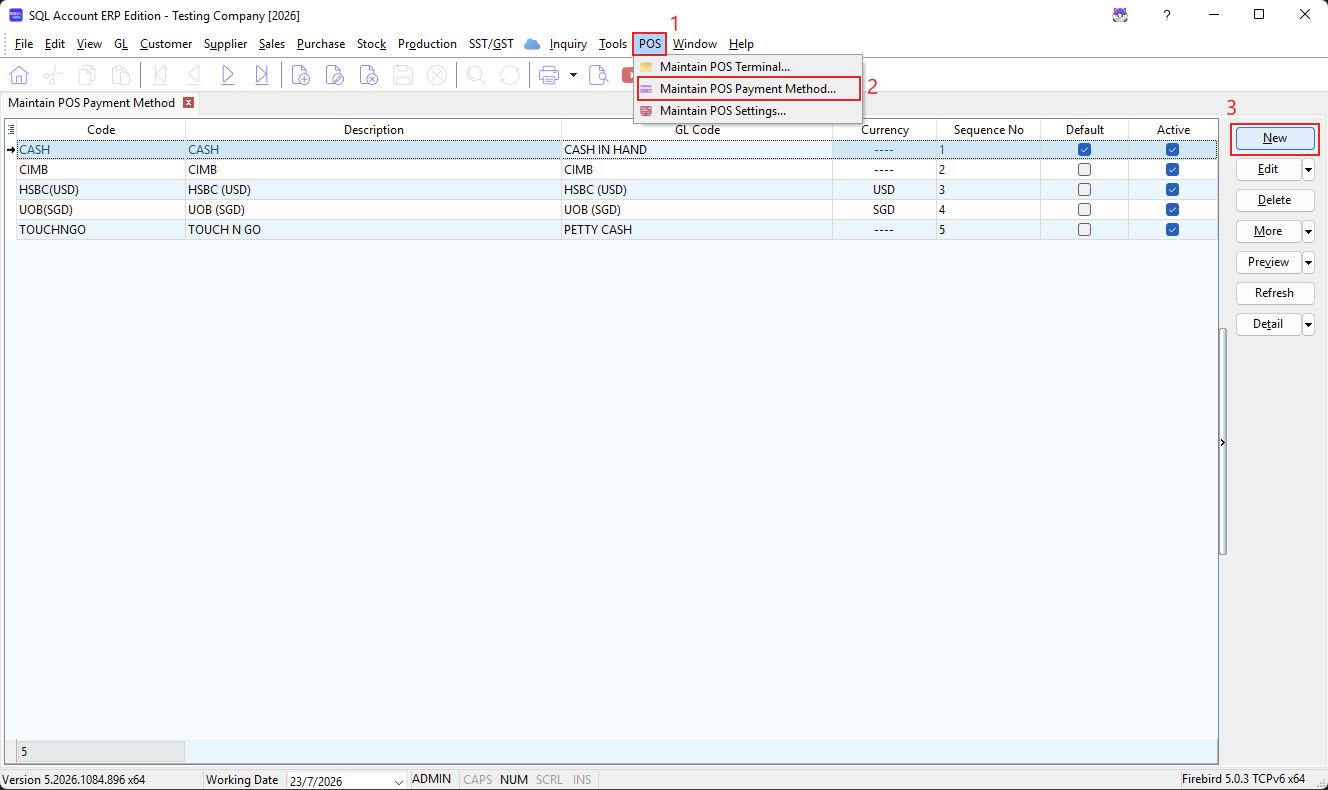
- From the main menu, go to POS.
- Click Maintain POS Payment Method....
- Click New to add a payment method, or open an existing record to edit it.
Create a Payment Method
| Field | Description |
|---|---|
| Code | Enter a short, unique payment code, such as CASH, VISA, or EWALLET. |
| Description | Enter the payment method name to display to users, such as Cash or Touch 'n Go. |
| GL Code | Select the related SQL Account payment method or GL account. POS transactions made with this method are posted to the selected account. |
| Default | Select this option to make the payment method the default at checkout. Only one payment method should normally be used as the default. |
| Active | Select this option to make the payment method available at the POS counter. Clear it to keep the setup but prevent it from being used for new sales. |
POS Payment Options
| Field | Description |
|---|---|
| Type | Select the payment category: 1. Cash 2. Bank 3. Card 4. E-Wallet |
| Currency | Select the payment currency. For foreign-currency payments, select the applicable currency; the displayed rate uses the current selling rate. |
| Sequence No | Controls the payment method display order. Use consecutive numbers, such as 1, 2, and 3. |
| Rounding | Select No rounding or 5 cents rounding. Use 5-cent rounding only when required for cash payments. |
| Print Receipt (pcs) | Enter the number of receipt copies to print. A maximum of three copies is allowed. |
| Must Fill Ref. No | Requires the cashier to enter a reference number before completing payment. This is useful for card, bank transfer, and e-wallet payments. |
| Kick Drawer | Opens the cash drawer when this payment method is used. This option should normally be enabled only for cash payments. |
| Picture | Optionally add an image or logo for the payment method. |
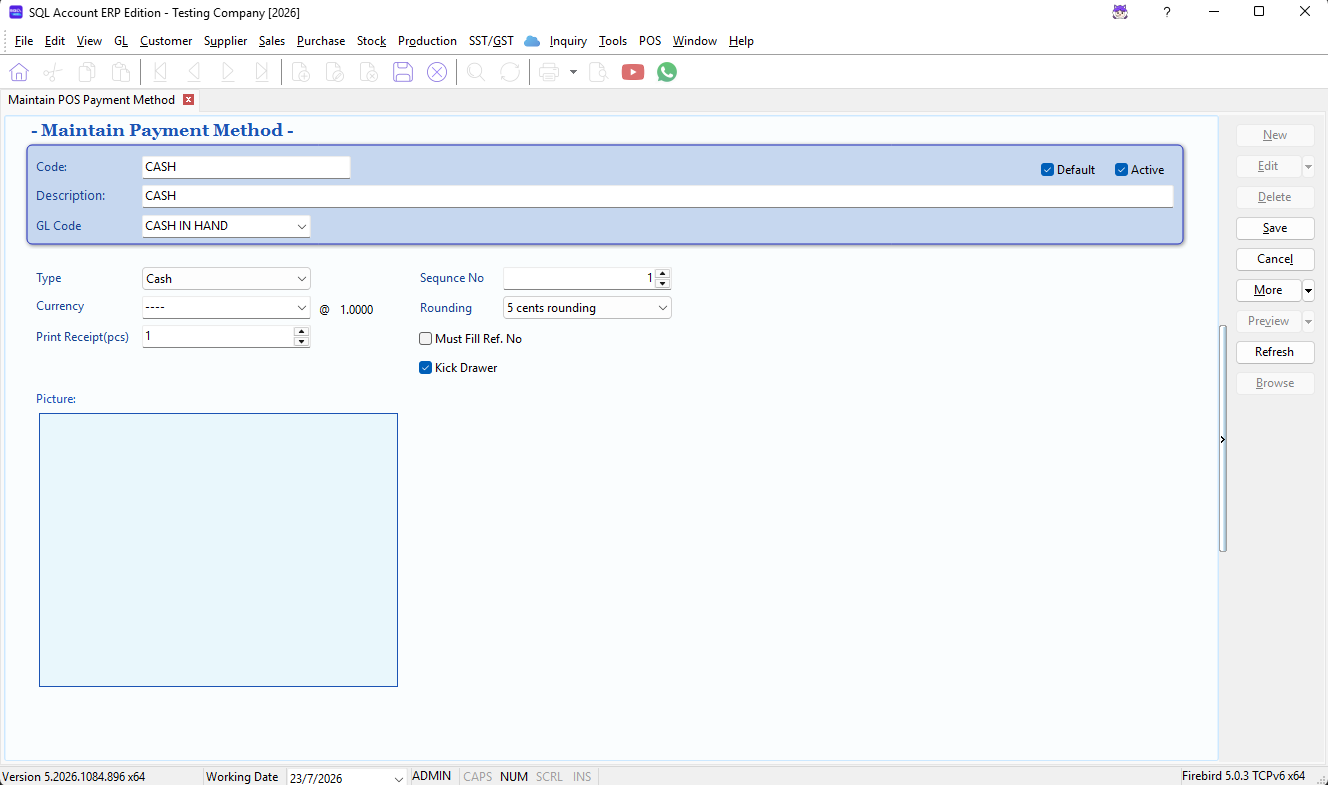
Click Save to save the payment method.
Example Setup
| Payment Method | Type | GL Code | Suggested Setup |
|---|---|---|---|
| Cash | Cash | Cash-on-hand payment method | Set as active and default, assign sequence number 1, and enable Kick Drawer. Enable 5-cent rounding only if applicable. |
| Card terminal | Card | Card or bank clearing payment method | Set as active, require a reference number, assign sequence number 2, and leave Kick Drawer cleared. |
| E-wallet | E-Wallet | E-wallet clearing payment method | Set as active and assign sequence number 3. Require a reference number when it is needed for reconciliation. |
- Ensure every POS payment method is mapped to the correct GL Code before processing live sales.
- Keep only payment methods intended for cashier use marked as Active.
- Use Sequence No to place frequently used payment methods first.
- Test each payment method with a small transaction to verify the posting account, reference-number requirement, receipt copies, and cash-drawer behaviour.
Maintain POS Terminal
Use Maintain POS Terminal to register each POS device, assign its outlet location and POS settings profile, bind its API user, and synchronize its masterdata.
Access Maintain POS Terminal
- From the main menu, go to POS.
- Click Maintain POS Terminal....
- Click New to create a terminal, or open an existing terminal to edit it.
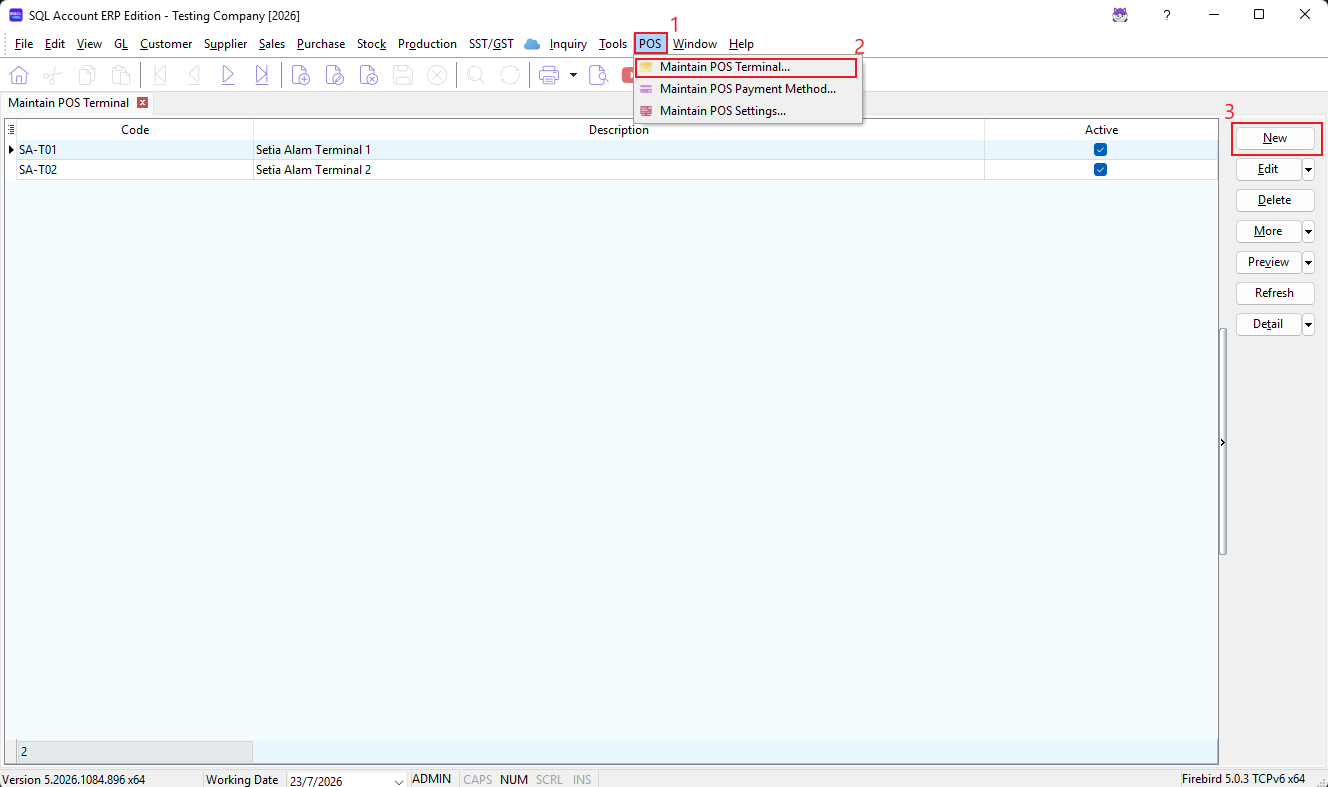
Create a Terminal
| Field | Description |
|---|---|
| Code | Enter a unique terminal identifier, such as COUNTER01. Keep the code short and unchanged because it is used for terminal binding and masterdata export. |
| Description | Enter a clear device or counter name, such as Main Counter. |
| Location | Select the stock or outlet location served by this POS terminal. |
| Settings | Select the POS settings profile to apply to this terminal. Create the profile first in the Maintain POS Settings section. |
| Bind API User | Displays the user account associated with the terminal for API use and masterdata synchronization. |
| Active | Makes the terminal available for operation and online masterdata synchronization. |
| Last Sync | Displays the date and time of the latest masterdata synchronization. |
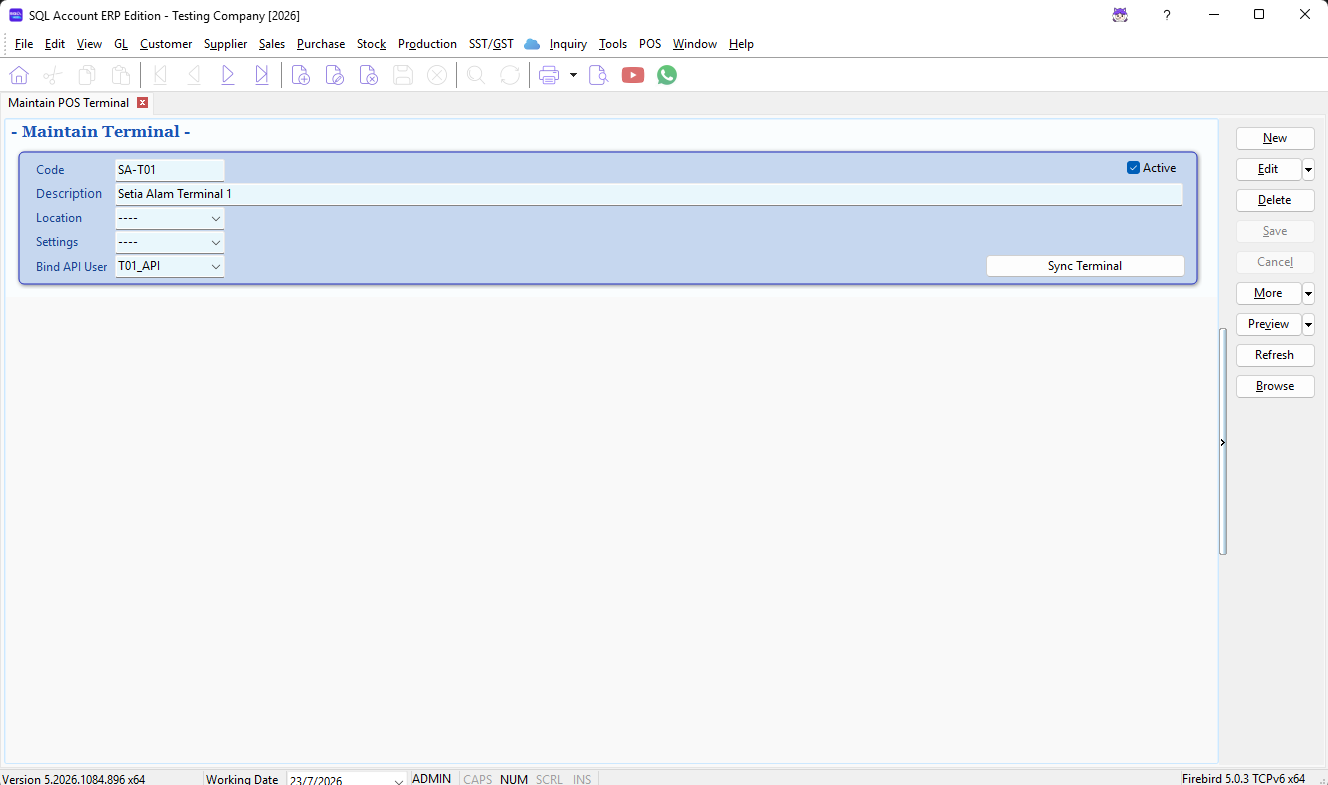
Recommended Setup Order
- Create the required POS payment methods.
- Create and test the POS settings profile.
- Create the terminal and assign its Location and Settings profile.
- Select Active and save the terminal.
- Bind an API user.
- Synchronize masterdata before using the terminal.
Bind an API User
With the saved terminal open, use Bind API User when no user is currently bound. The system creates or reuses a dedicated API user based on the terminal code and binds it to the terminal:
<TERMINAL_CODE>_API
For example, terminal COUNTER01 is bound to COUNTER01_API. The binding action also creates an API secret key if the user does not already have one.
Do not use the system ADMIN account as the terminal API user.
If the API user cannot be created, confirm that the application API host is configured and that your user has permission to maintain system users.
Sync Terminal
Click Sync Terminal on a saved terminal to access the following actions.
| Action | Description |
|---|---|
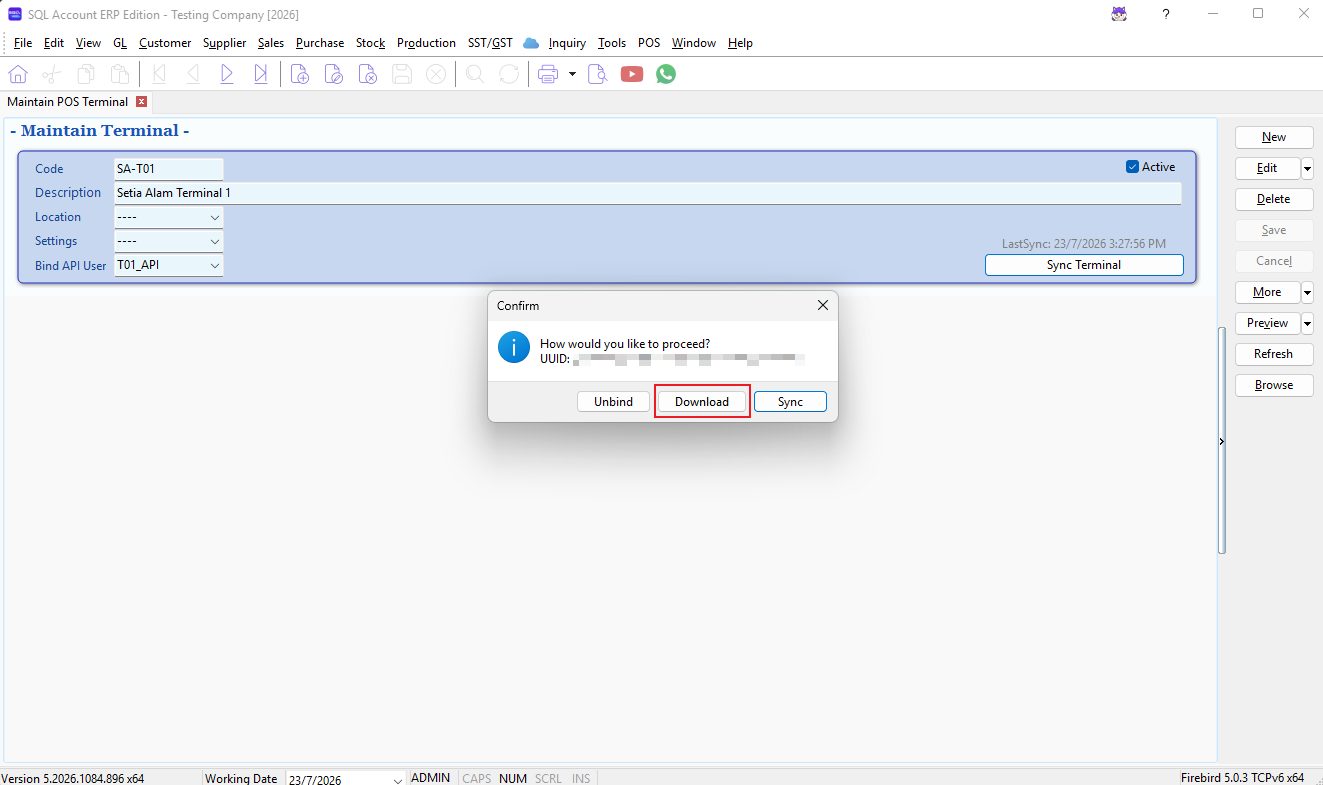
| Sync | Creates the masterdata package and uploads it to the POS masterdata service. A terminal UUID is created if one does not already exist. |
| Download | Creates the masterdata package locally and lets you choose a folder in which to save the ZIP file. Use this option for manual transfer or troubleshooting. |
| Unbind | Removes the terminal UUID binding. Use this only when the terminal must be connected as a new device. |
The terminal must be Active before online synchronization is available. Save or cancel any changes before starting a sync.
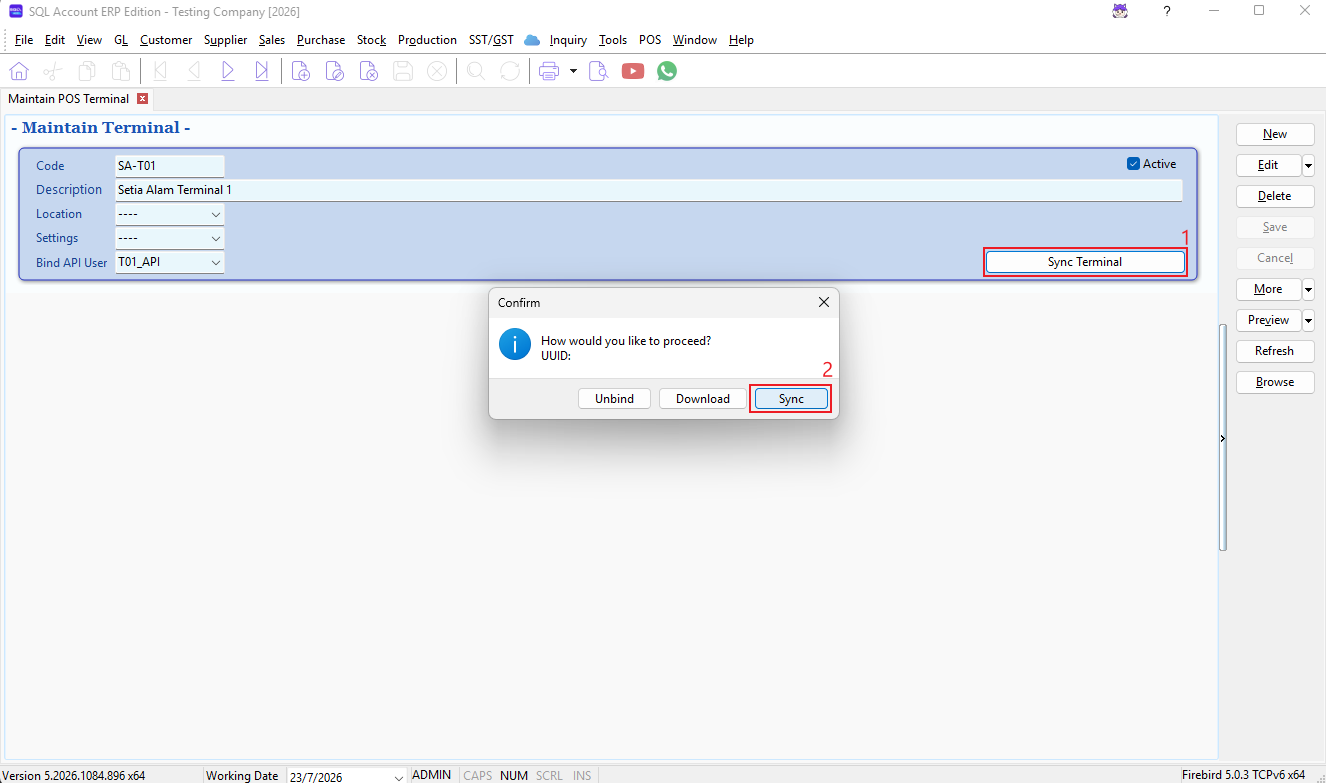
Before Deploying the Device
- Confirm that the terminal has the correct Location and Settings profile.
- Confirm that the selected profile includes the required customer, item, discount, and rounding mappings.
- Bind a dedicated API user. Do not share a terminal identity between devices.
- Run a masterdata sync and record the generated PIN if the sync displays one.
- Complete a test sale on the POS device and verify its payment and accounting behaviour.
Export POS masterdata
Export POS masterdata to prepare an X-Pos terminal with the required master data and configuration. You can upload the masterdata directly to the POS masterdata service or download it as a ZIP file for manual transfer.
Before You Begin
- Create the terminal in the Maintain POS Terminal section.
- Assign its Location and Settings profile.
- Select Active and save the terminal.
- Ensure that the required POS settings, payment methods, items, customers, and stock or location information have been maintained.
- Skip Step 1 below if Bind API User in Maintain POS Terminal setup correctly.
Step 1: Create and Bind the API User
- Go to POS > Maintain POS Terminal....
- Open the required terminal.
- Run Bind API User while the Bind API User field is empty.
- Save the terminal if prompted.
The system creates or reuses a dedicated API user in the following format:
<TERMINAL_CODE>_API
For example, terminal COUNTER01 uses COUNTER01_API. The system binds the user to the terminal and generates an API secret key when one does not already exist.
Do not bind the ADMIN user. If the system reports that the API application is not configured, configure the application API host before trying again.
Step 2: Sync masterdata for One Terminal
- Open the terminal record.
- Ensure that the terminal is saved, active, and not in edit mode.
- Click Sync Terminal.
- Click Sync.
- Wait for the upload confirmation.
During the first successful export, the system assigns a UUID to the terminal. Later exports will update the Last Sync time.
If the service returns a PIN, record it immediately. The application displays the PIN and copies it to the clipboard for use when pairing or setting up the terminal.
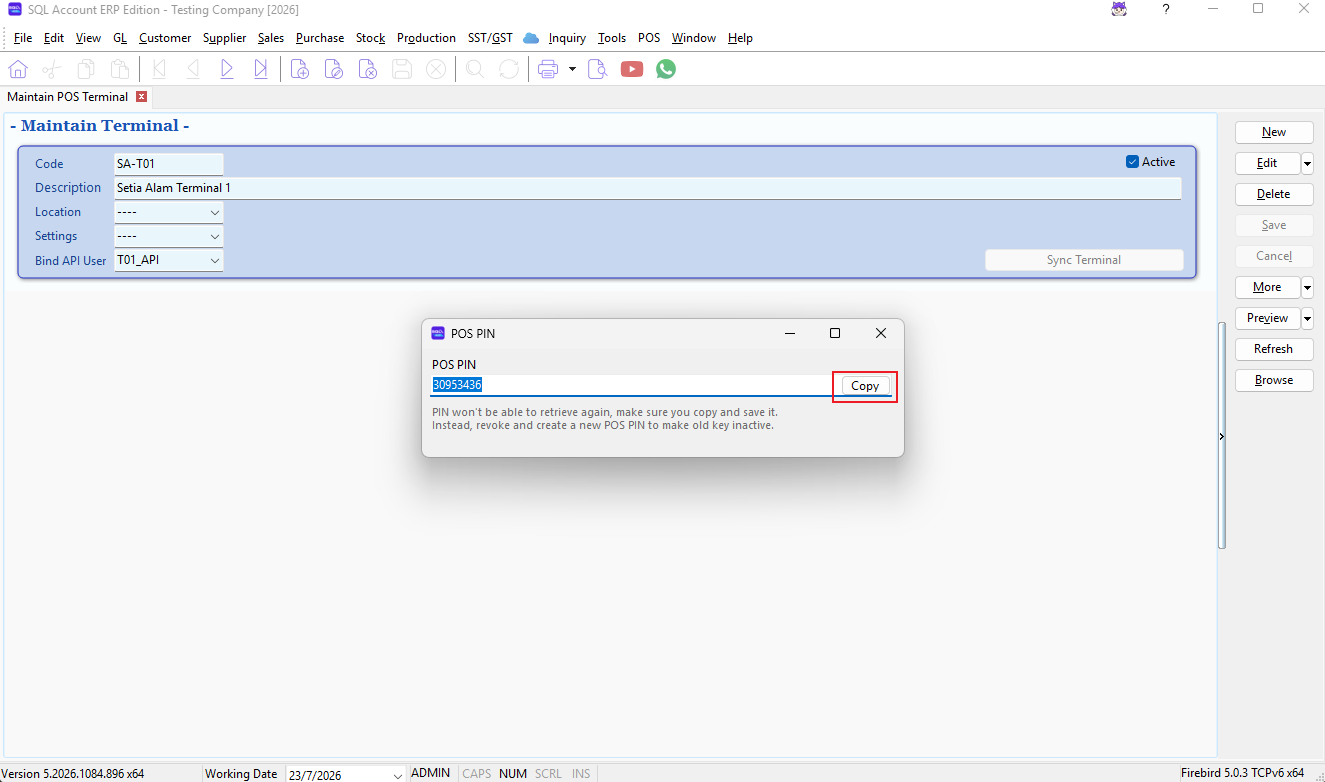
The PIN cannot be retrieved again. If it is lost, revoke the current terminal binding and synchronize again to create a new PIN.
Step 3: Download masterdata for Manual Transfer
Use this option when the masterdata needs to be transferred manually instead of uploaded online.
- Open the terminal record.
- Click Sync Terminal.
- Click Download.
- Choose a destination folder.
- Keep the generated ZIP file intact and transfer it using your approved deployment method.
The download process also creates a UUID when needed and updates the terminal's Last Sync time after the file is saved.
Export masterdata for Multiple Terminals
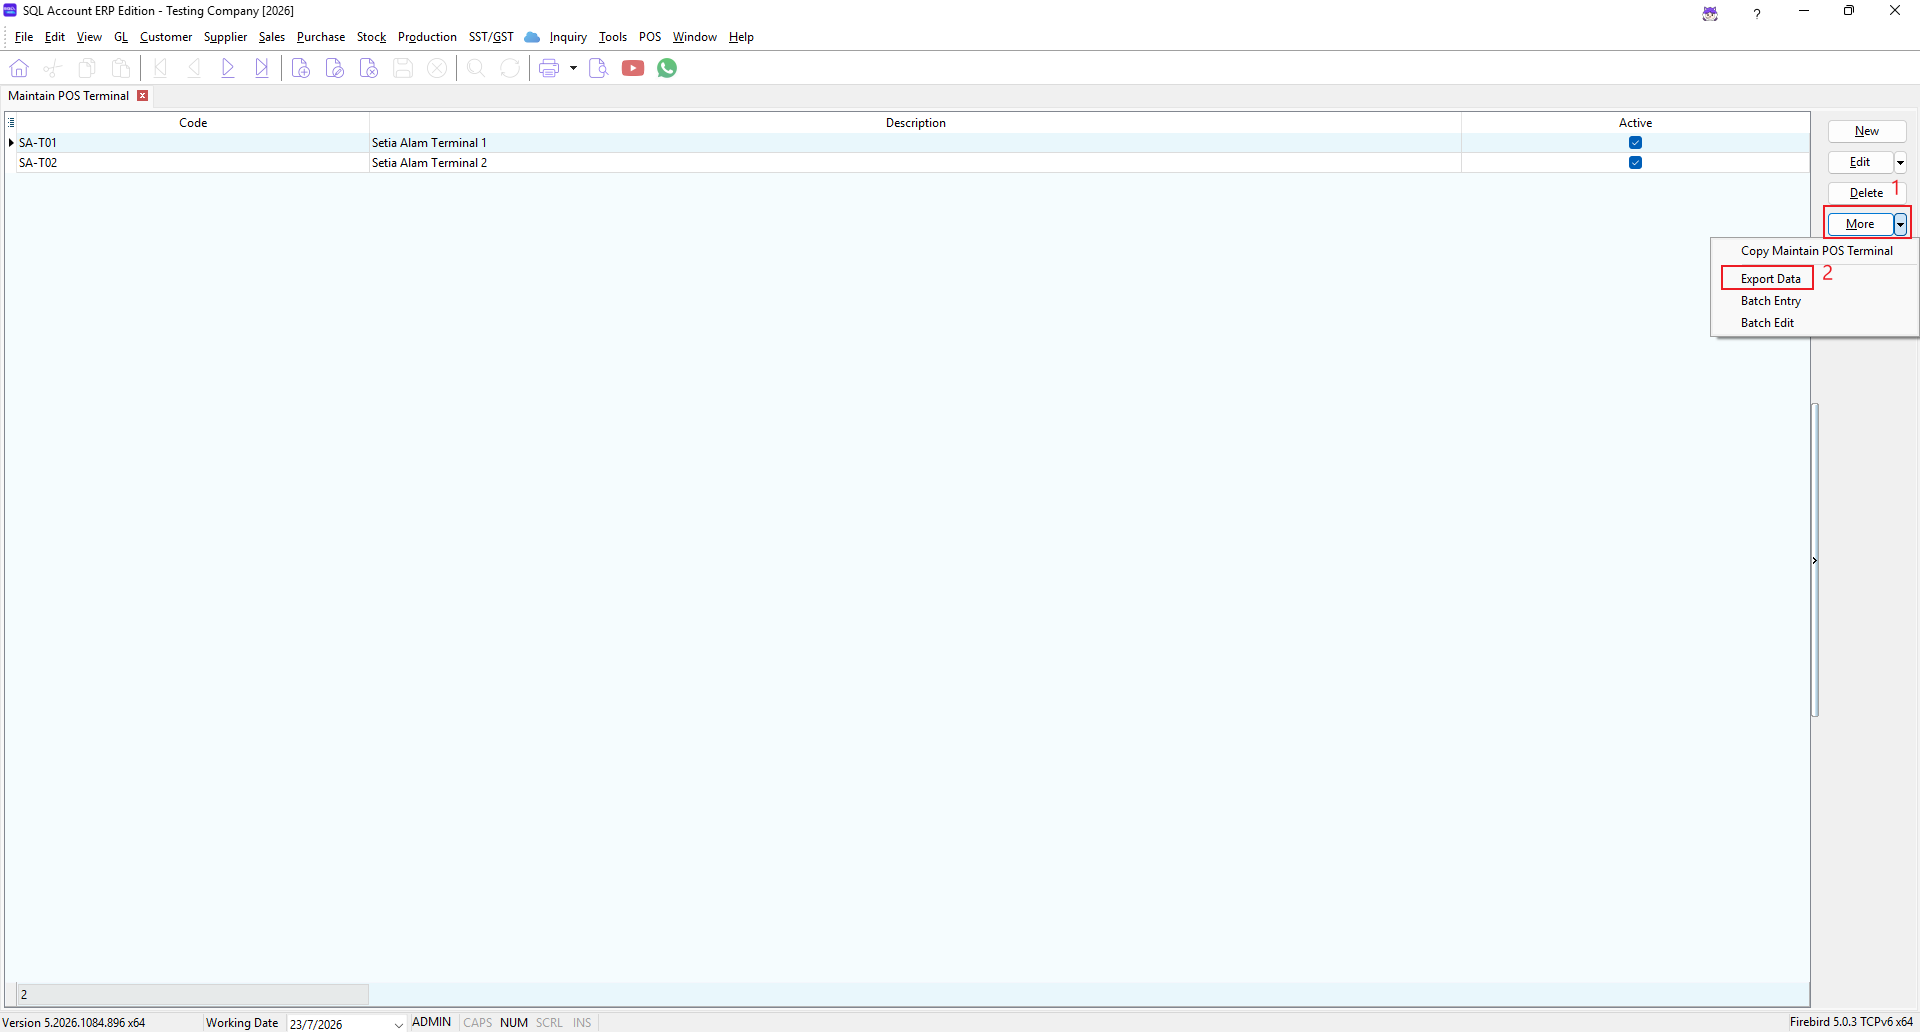
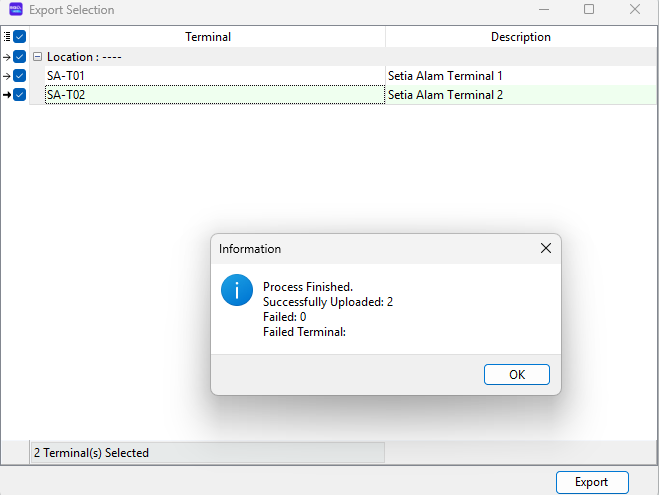
From the terminal browse screen, click More > Export Data.
- Select one or more terminals in the export list.
- Click Export.
- Review the completion message for the number of successful uploads and any failed terminal codes.
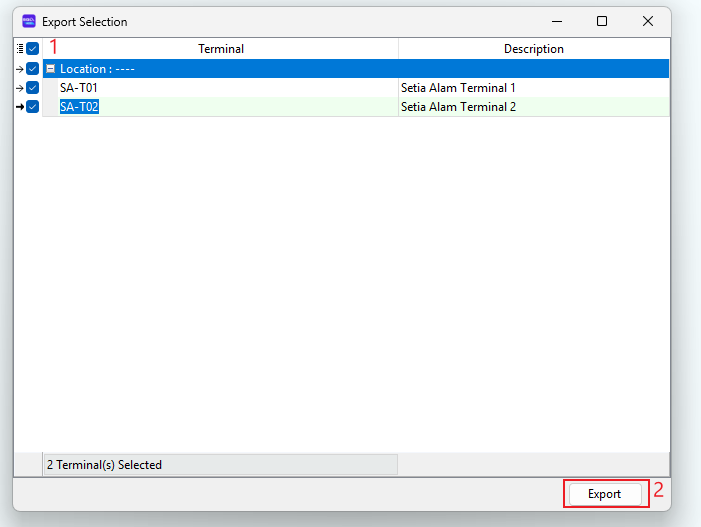
Only terminals that already have a UUID binding are shown in the multi-terminal export list.
Reset a Terminal Binding
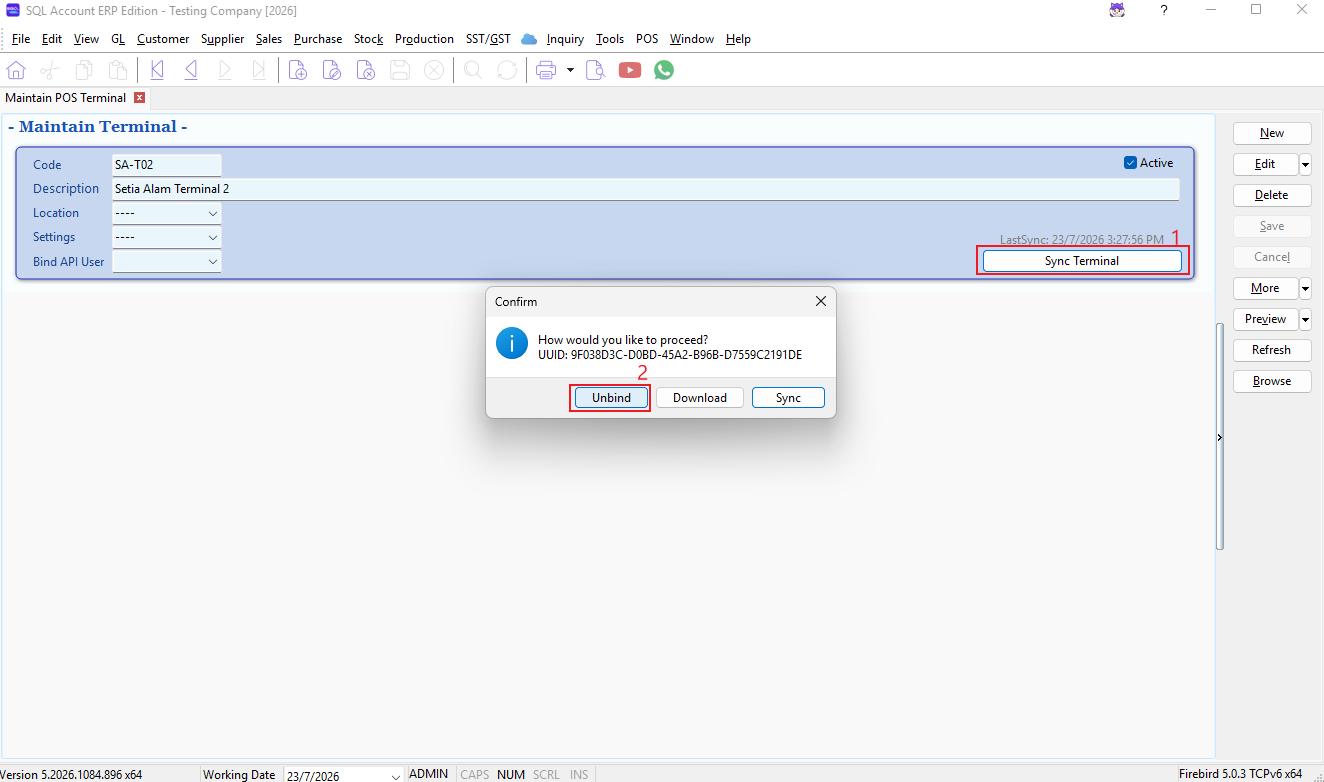
Use this procedure only when the terminal must be connected as a new device.
- Open the terminal record.
- Click Sync Terminal.
- Click Unbind and confirm the prompt.
- Click Sync again to establish a new binding.
Unbinding clears the terminal UUID. It is not required for a normal masterdata refresh.
Troubleshooting
| Issue | Action |
|---|---|
| Export cannot start | Save or cancel changes first. Export is unavailable while the terminal is in edit or insert mode. |
| Sync is disabled | Confirm that the terminal exists, is saved, and is Active. |
| Token or upload error | Check the API and service configuration, confirm internet connectivity, then try again. |
| Time lookup error | Check DNS and network connectivity, then try again when a trusted current time can be obtained. |
| Terminal masterdata is out of date | Verify the terminal location and settings assignment, save changes, then run Sync again. |
| A terminal is missing from batch export | Synchronize the terminal once individually to create its UUID binding, then reopen the batch export list. |